
Making a Serverless eBook Stamping & Delivery Service
Hi everyone! 👋 I recently launched the release candidate of my Practical Python Projects book. There were a couple of unique issues I was facing and I decided to write about them and share how I got around most of them. This is not an end-to-end service implementation tutorial but rather a quick walk-through. I will show you most of the important bits and pieces of code for this service. If you are pressed for time, you can go to whatever section sounds interesting and start reading from there.
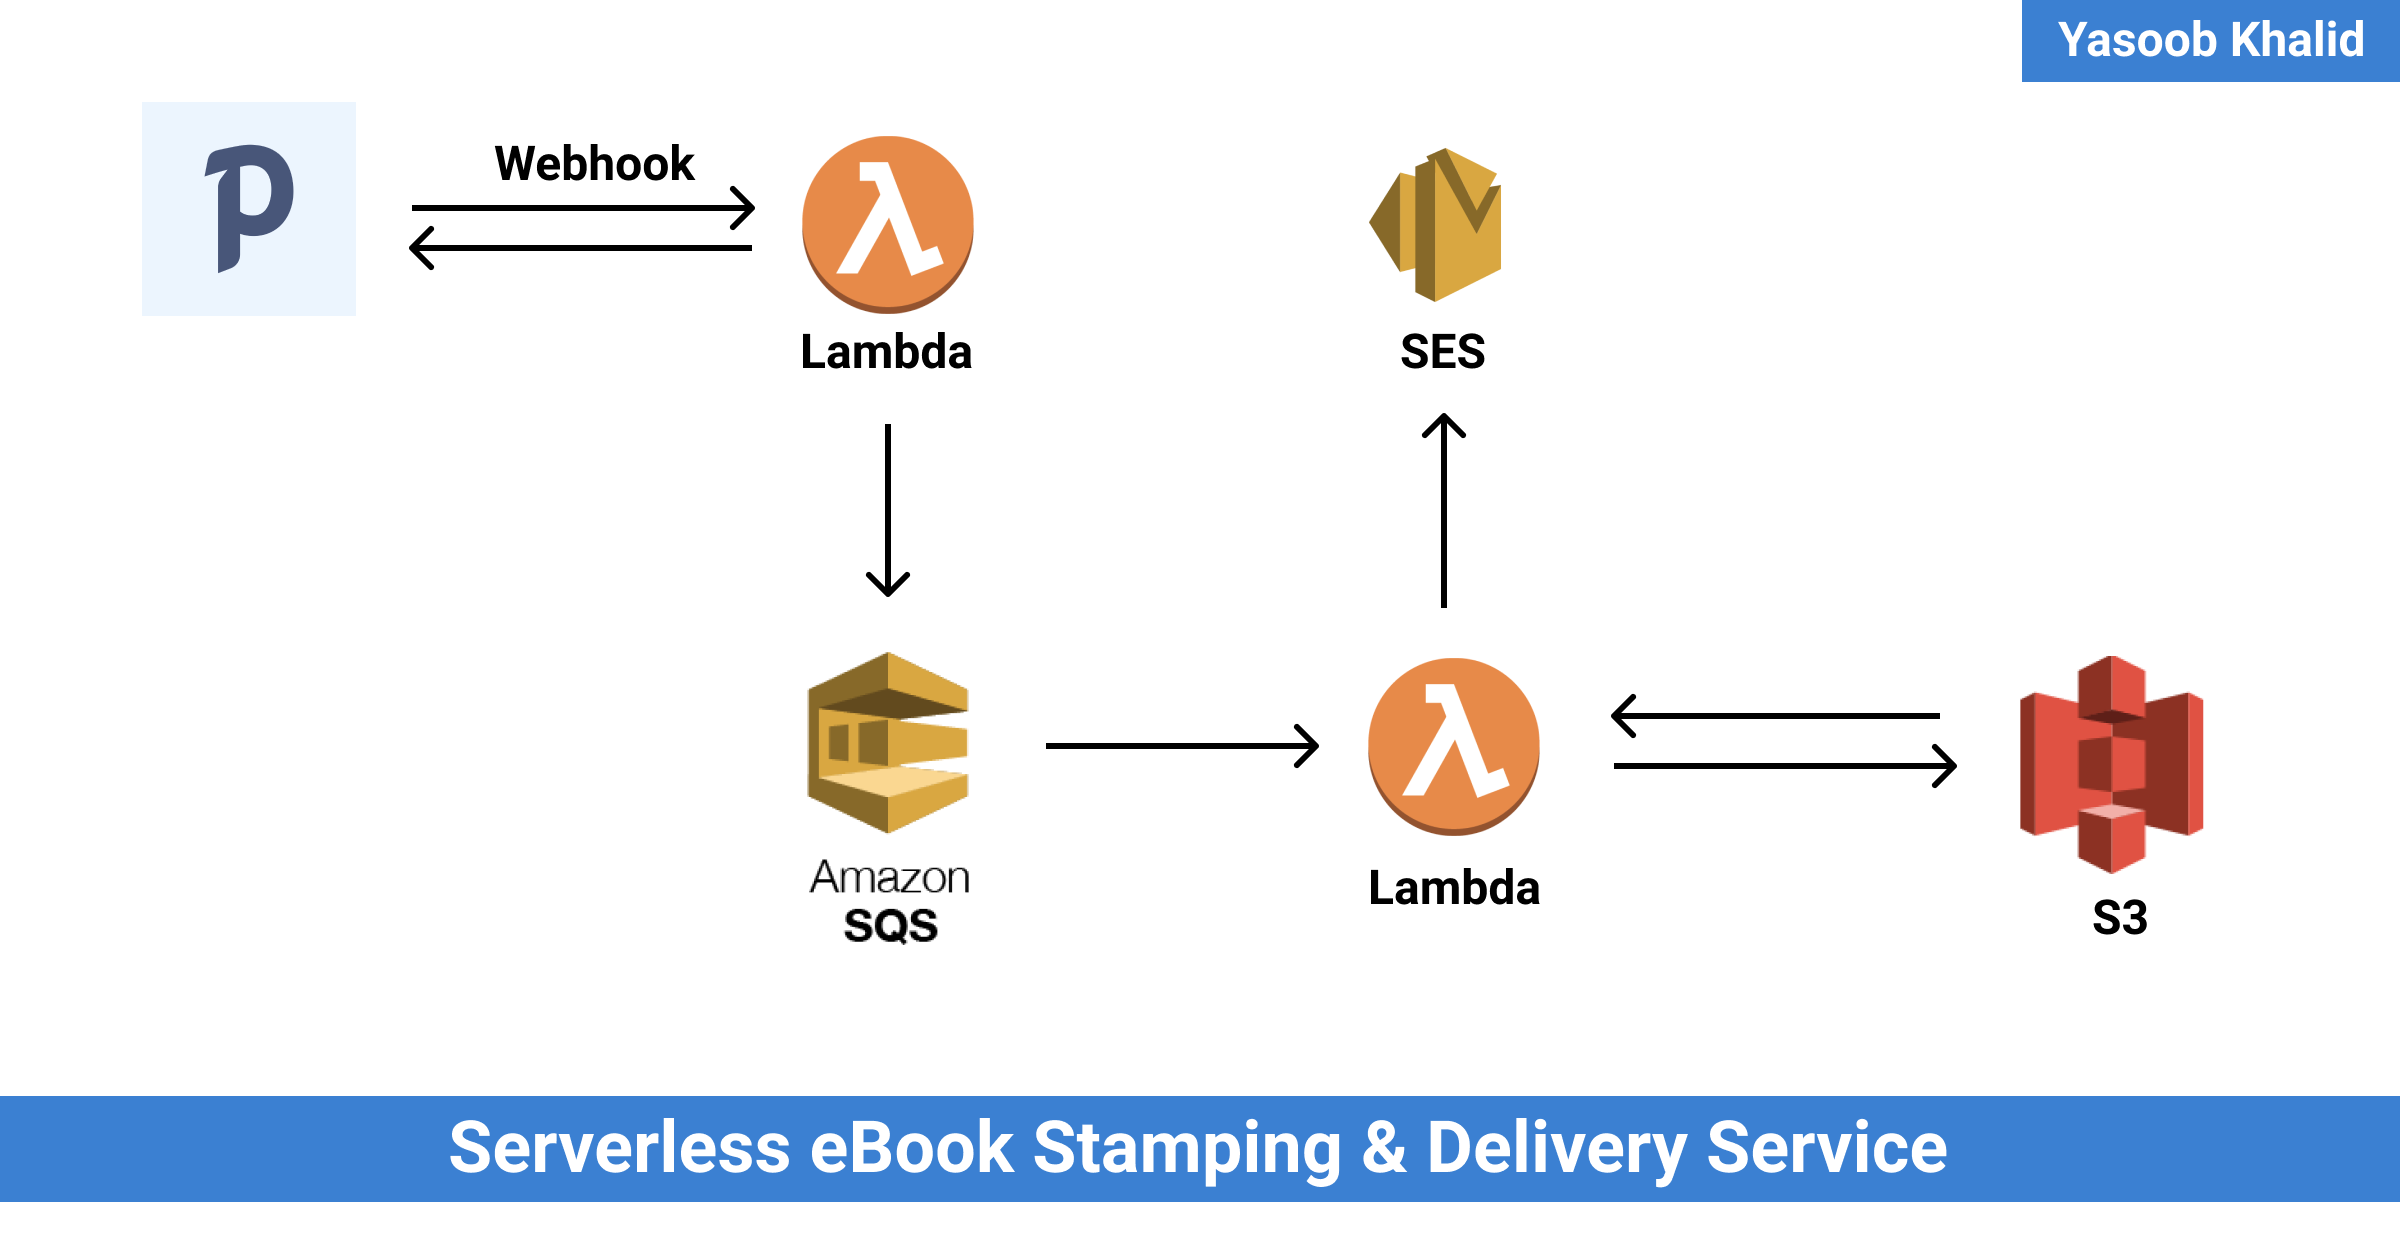
TLDR: I am using Paddle as my merchant. Paddle sends webhook requests to a service that is hosted on AWS Lambda. This service stamps PDFs, saves them on S3 (Simple Storage Service), and emails a pre-signed URL to customers using Amazon SES (Simple Email Service).
Introduction
Practical Python Projects isn’t my first book but it is the first one that I wanted to sell. There are a couple of good options for indie authors: Gumroad, SendOwl, etc. However, most of these services aren’t a viable option for people in a few major countries (including Pakistan) as PayPal and Stripe are the only supported payout methods and they aren’t available throughout the world. As I couldn’t use any of these services, I decided to look around. I expanded the scope of my search by looking for payment processors as well and not simply eBook selling options.
After a while, I came across Paddle. It supported direct bank deposits and Payoneer as payout options. This meant that it could be used in most countries (including Pakistan). However, Paddle also had a problem which I found out only after creating a product listing on the platform. Its eBook publishing features and mailing list management features were severely limited but considering that this was the only viable payment gateway, I still decided to move forward with it.
Issues
Let’s talk about the drawbacks of using Paddle for selling eBooks online. Paddle allows you to upload a product as a digital download on the platform but the link to the product is not scoped to a customer. It is accessible to whoever gets their hands on the link. This would have been fine if there were two other features available:
- PDF stamping with customer name
- Time based or number of accesses based link expiry
However, Paddle didn’t have any of these. The links were non-expiring and there was no PDF stamping. If you are an indie author, chances are, you might already know why these features are important. These features help curb piracy. If the links are expiring, a person can’t just post them to an online forum and have them stay available for eternity. And if a PDF is stamped with a customer’s name, the expectation and hope are that they would not want to put the book online with their name in-tact.
Thankfully, Paddle supports webhooks. Being a programmer, there was a possibility for me to hack something together that generated stamped PDFs and emailed them to customers using Paddle’s webhooks support. It sounded like a fun side-project.
Have you ever spent so much time doing meta hacking and micro-optimizations that you forget the bigger picture? I have been down that rabbit hole before and wanted to stay away from it this time. I promised myself that I would do the least amount of work required to get a service up and running and start selling the book in a week max.
If I was to finish this project within a week, I had to figure out the minimum requirements for this service before diving into the code and this also meant I didn’t fall into this over-planning trap:

Requirements
These were the requirements I managed to come up with:
- File hosting: A cheap and convenient file hosting service with an easy API and support for expiring links.
- Email delivery: A cheap transactional email service that doesn’t break the bank and has good and fast deliverability.
- Webhook service: A cheap managed server that doesn’t require constant upkeep and should be a set & forget type scenario.
- Cheap: No hard limit on how much I can spend but the whole solution should ideally be free or as least expensive as possible
- Learning: Bonus points if I can learn something new in the process
Solution
There were quite a few options that fit the bill and it took me a while to make the final decision.
Every major cloud provider has a file hosting service and there are quite a few transactional email delivery services. For file hosting, I ended up going with Amazon S3 (Simple Storage Service) as it had a generous free tier and was fairly cheap even beyond the free quota. As for email delivery, I decided to go with Amazon SES (Simple Email Service) for roughly the same reasons: cheap + generous free quota.
For the webhook service, I thought about going the typical route of setting up an API using Flask or a similar Python framework and host it on Digital Ocean. However, there were a couple of issues with this. This wasn’t the cheapest option and my attention was being attracted by “serverless” offerings. By this point, I had been hearing about serverless computing so much that it was kind of hard to ignore. It sounded like a good fit for my situation too. I would not have to worry about updating the infrastructure on which the serverless function would be running and I would not be charged if there were no book sales happening. A win-win situation. I decided to give in to the serverless fad and go with AWS lambda. This was a good decision because it meant I would be learning something new as well. I had used lambda before but that was around 2-3 years ago at a hackathon. It was high time to give it a second look.
The PDF stamping turned out to be harder than I thought and led me to a couple of unexpected edge cases. I looked around for a Python library because I wanted to keep all of my code in Python. I came across PyPDF2 and reportlab. I made the initial version of the stamping program using PyPDF2 but later replaced it with pdfrw. I will share the reasons later.
Solution in a bit detail
Instead of working with each service separately, I decided to use serverless. It allows you to launch serverless deployments super quickly and also helps make them reproducible. You only need a serverless.yml file that defines all the services you want to provision and some other code you might want to run on the server. If you are planning on running some Python code on AWS Lambda then this would mean having at least these three files:
serverless.yml: Declare the services you needhandler.py: Write the handler code for a Lambda functionrequirements.txt: Declare all the dependencies your Python code relies on
Getting started with serverless
Serverless has decent documentation. It is really easy to get started and the CLI tool sets up the directory structure for you.
You can install serverless using NPM by typing npm install -g serverless and then set it up by running the serverless command in the terminal. Choose the appropriate options and you will have it set it up for working with AWS in no time.
Note: You aren’t required to use AWS, serverless supports most other major cloud providers as well
Let’s start a new serverless project by typing this in the terminal:
$ serverless create \
  --template aws-python3 \
  --name automated-book-delivery \
  --path automated-book-delivery
This is going to create a serverless project inside the automated-book-delivery path and name it automated-book-delivery. Now we can cd into the folder and set up a virtual environment to do local development.
$ cd automated-book-delivery
$ python -m venv vevn
$ source venv/bin/activate
The directory structure should look like this:
.
├── handler.py
├── serverless.yml
└── venv
    ├...
After stripping the comments, the serverless.yml file should resemble this:
service: automated-book-delivery
frameworkVersion: '2'

provider:
  name: aws
  runtime: python3.8
  lambdaHashingVersion: 20201221

functions:
  hello:
    handler: handler.hello
And the handler.py file should look like this:
import json


def hello(event, context):
    body = {
        "message": "Go Serverless v1.0! Your function executed successfully!",
        "input": event
    }

    response = {
        "statusCode": 200,
        "body": json.dumps(body)
    }

    return response

    # Use this code if you don't use the http event with the LAMBDA-PROXY
    # integration
    """
    return {
        "message": "Go Serverless v1.0! Your function executed successfully!",
        "event": event
    }
    """
Depending on how barebones your serverless infra is going to be, you might have to worry about only these two files. You can deploy the service by using this command:
$ sls deploy
Note: sls is just an alias for serverless
Exploring webhook data structure
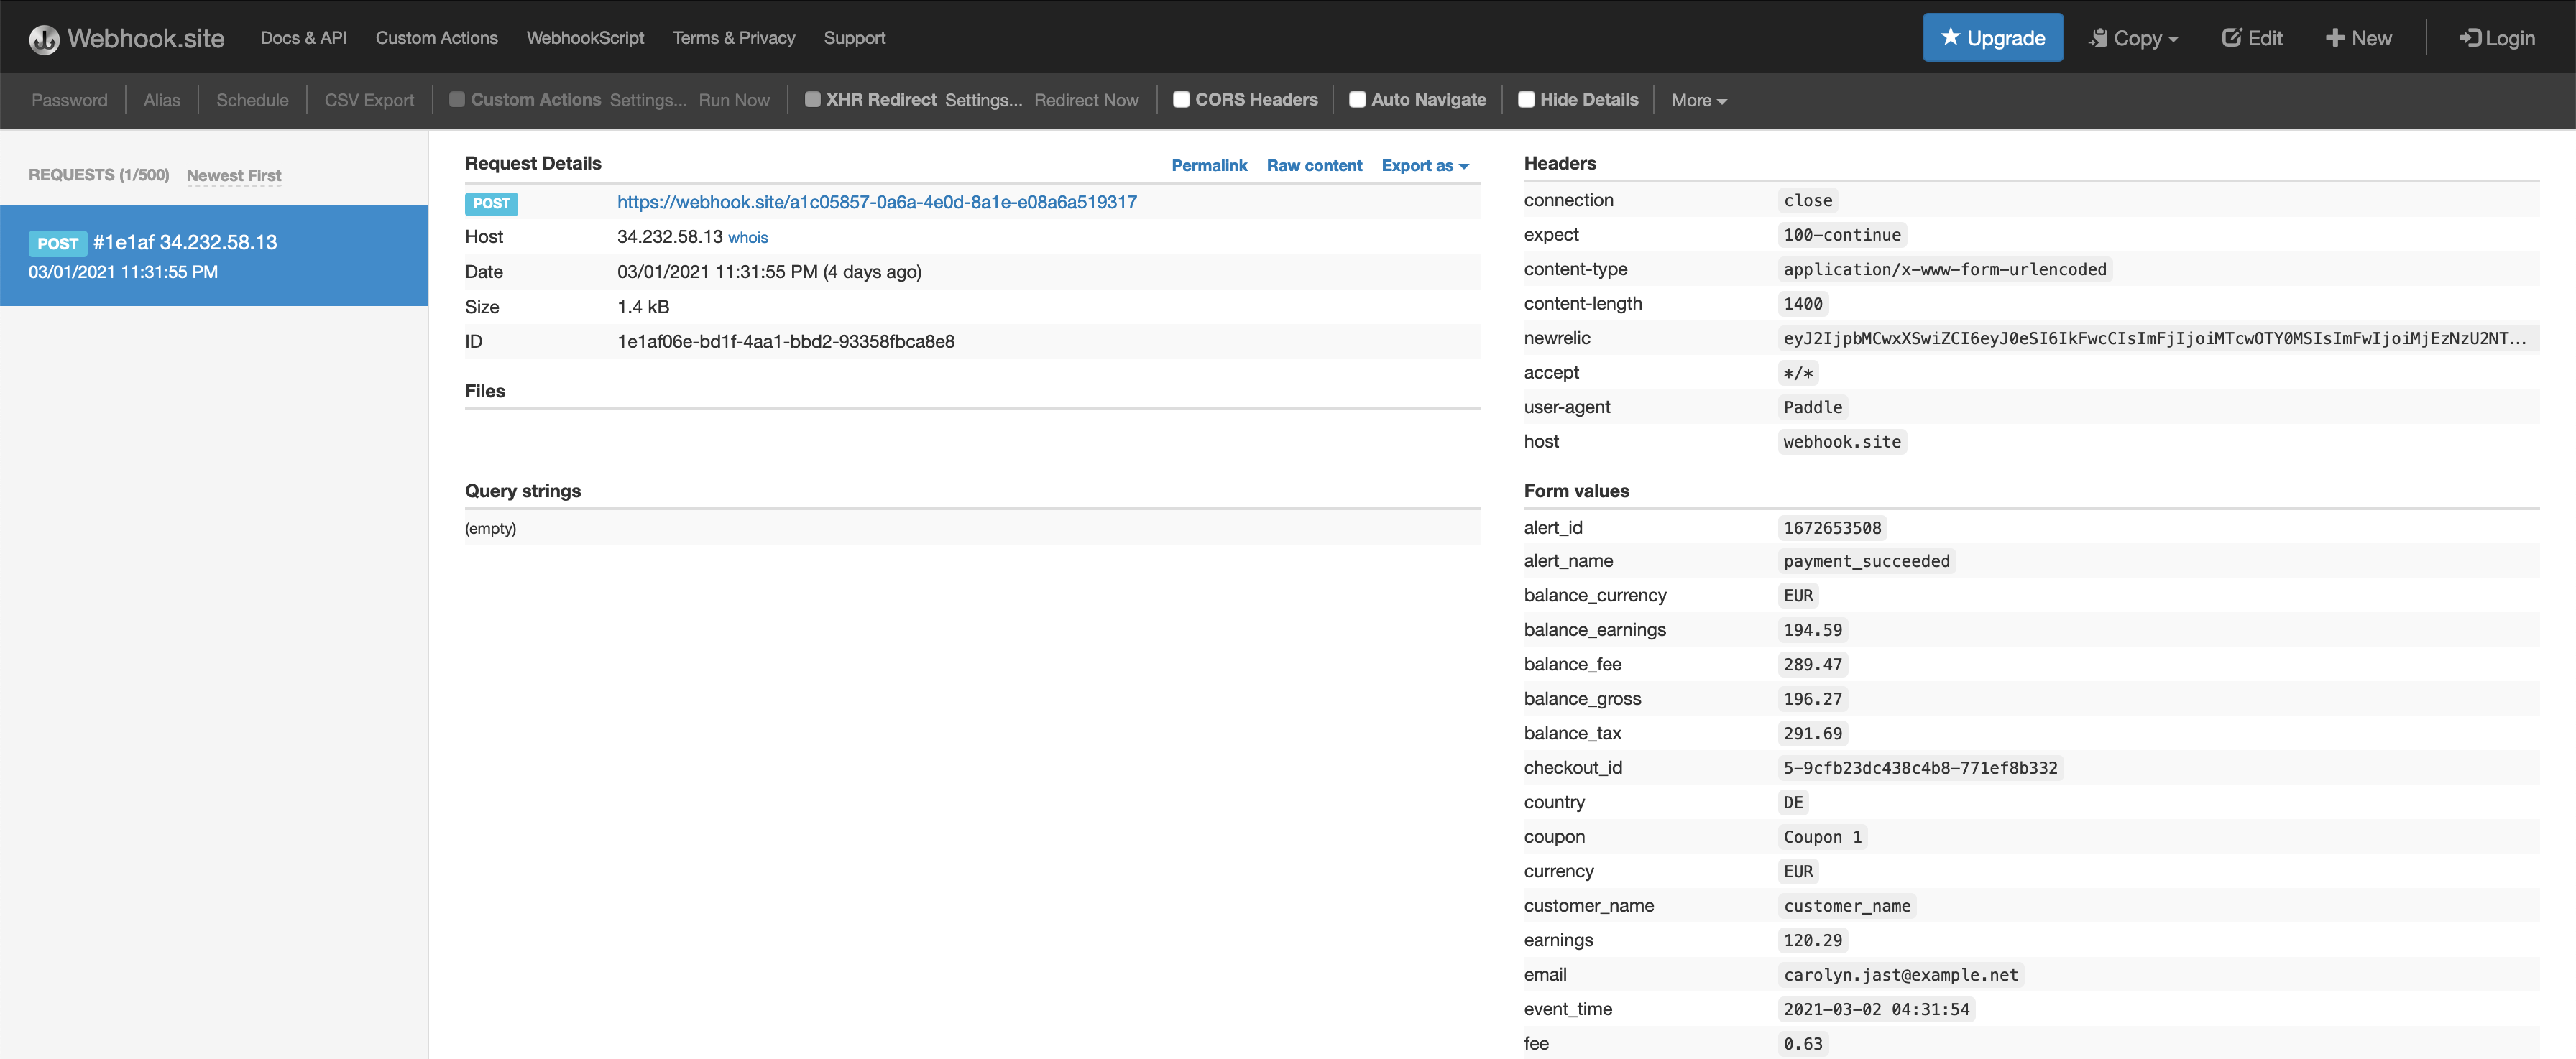
While exploring the response of the Paddle webhook, I made extensive use of online request bin websites. These websites provide you with a public URL where you can send a webhook request and afterwards they allow you to inspect what the request looked like and what data it contained. The one I used was webhook.site. It made it easy to visualize what kind of data Paddle was going to send.
Paddle docs do a good job of explaining it but I don’t think there is any substitute for live data. It just gives everything a whole lot more context and makes it holistic. This is what the webhook request looked like on webhook.site when I sent a test request using Paddle:
I took the raw data from the webhook.site and tried parsing it using Python in the interpreter. I love using the interpreter for these tasks as it makes the feedback loop super quick and I can iterate without losing a lot of precious time.
External API endpoint
This is the endpoint that receives the webhook request from Paddle. My external API endpoint handling code looks like this:
def hello(event, context):
    paddle_data = dict(parse_qsl(event['body'], keep_blank_values=True))

    signature = paddle_data.get("p_signature")

    valid, data = verify_signature(paddle_data)

    if not valid:
        print("Signature verification failed")
        return

    name = data['customer_name']
    email = data['email']
    order_no = data['p_order_id']

    sqs = boto3.resource('sqs', region_name="us-west-1")

    queue = sqs.get_queue_by_name(QueueName=os.environ["QUEUE_NAME"])
    response = queue.send_message(MessageBody=f'{name}::{email}::{order_no}')
    return {
        "statusCode": 200,
        "body": json.dumps({"Sent Message":response})
    }
The event parameter contains the request that lambda received. event is a dictionary and the body key contains the POST data that was sent with the request. I take the body and parse it using parse_qsl from the urllib.parse package (this is all Python 3). parse_qsl turns the data into a list of key, value pairs which I later turn into a dictionary.
Someone with a keen eye might be wondering why I have keep_blank_values=True as part of the parse_qsl function call. This is important because Paddle might send some empty values and the default behavior of parse_qsl is to just omit them from the returned list. However, I needed to retain those if I wanted to accurately recalculate the signature of the whole payload.
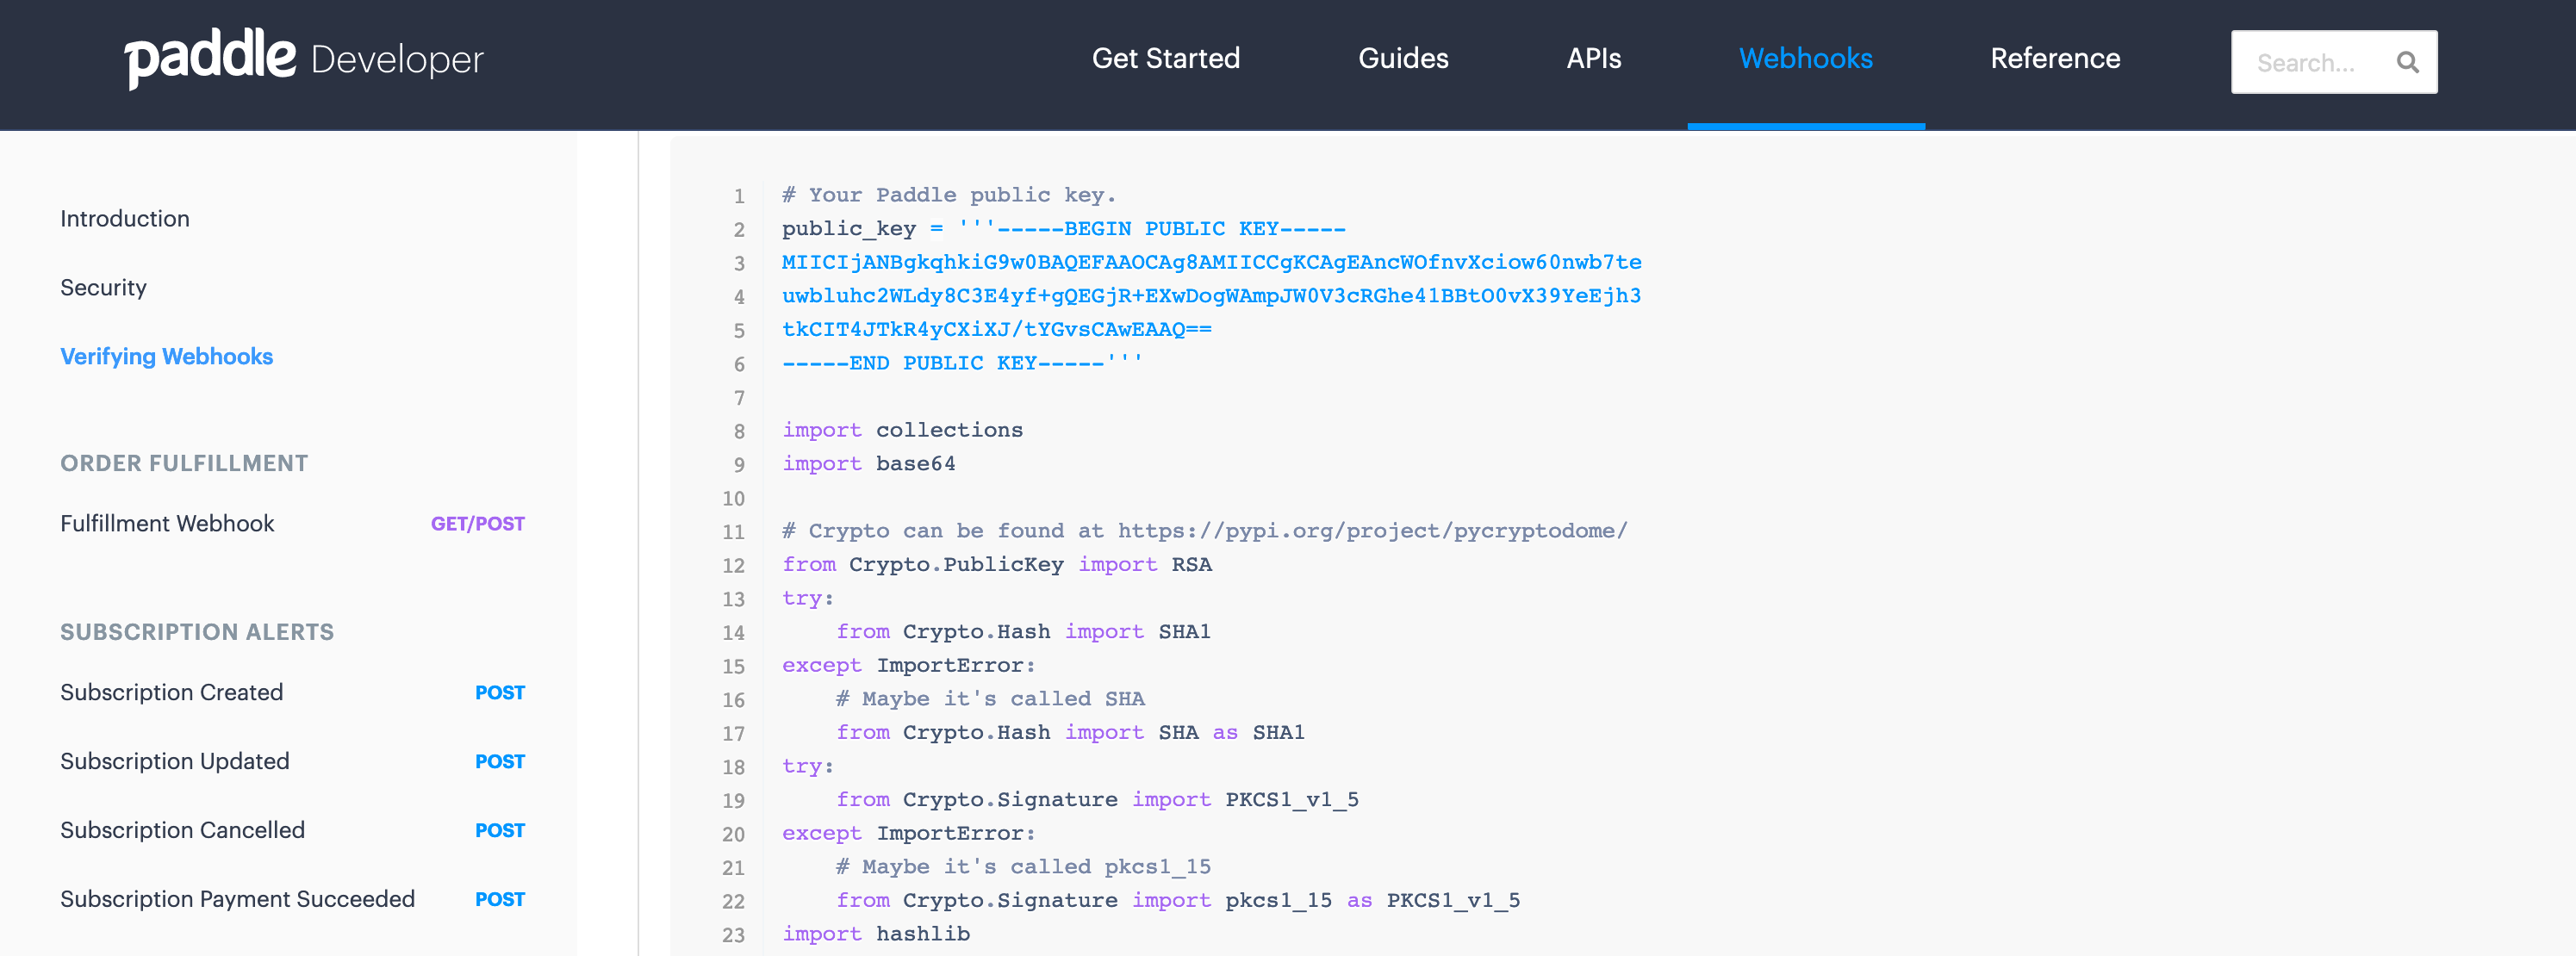
When Paddle sends webhook requests, it includes a p_signature field which is an encrypted signature of all the values in the payload. It is encrypted using public-key crypto and Paddle provides vendors with a public key they can use to encrypt a recalculated signature, match it with the encrypted signature paddle sent, and make sure the request was actually generated by Paddle. This is very useful as it helps make sure we only respond to the webhooks that are actually generated by Paddle and not an impersonator. Most (if not all) webhook services contain a relatively similar feature for verifying the authenticity of webhook calls.
After parsing the payload data using parse_qsl, I verify the signature by making a call to the verify_signature function. This is a custom function based on the description provided over at Paddle docs.
Afterwards, I extract the name, email, and order no from the payload, merge them into a single string by using :: as the separator and push it to an SQS (Simple Queue Service) queue. I could have just set these three (name, email, order no) values as MessageAttributes but I liked merging them together and keep the message size and processing code shorter.
Lastly, I return a 200 status code as expected by Paddle. I have simplified this code a little bit by getting rid of error checking for brevity.
You might be wondering why I am pushing a message to the SQS queue and not processing the PDF in the same request. Well, the initial PDF stamping code that I had written was taking closer to 29s to run on lambda and the public API endpoints have a maximum timeout of 30s. This was causing a couple of requests to time out so I had to figure out how to decouple the external API from the actual PDF processing.
One solution to this problem was to use SQS. The idea is that you send a message to this queue and as soon as the queue receives a new message, it triggers another lambda function. This second lambda function is not an external API endpoint and so it can have a max timeout of 15 minutes. That was more than enough for my case.
Getting SQS up and running
SQS was a bit tricky to get up and running. I was getting a ton of errors that I have now forgotten. I first declared it as a resource in my serverless.yml file:
resources:
  Resources:
    # ...
    BookDelivery:
      Type: "AWS::SQS::Queue"
      Properties:
        QueueName: automated-book-delivery
        VisibilityTimeout: 1800
Then I requested the following permissions for the IAM role:
- Effect: "Allow"
  Action:
    - "sqs:ListQueues"
    - "sqs:GetQueueUrl"
    - "sqs:DeleteMessage"
    - "sqs:ReceiveMessage"
    - "sqs:SendMessage"
    - "sqs:SetQueueAttributes"
    - "sqs:GetQueueAttributes"
  Resource: "*"
I tried making the Resource value more granular and target only the queue I made for this service but it was failing. I was getting a ton of access denied errors:
ClientError An error occurred (AccessDenied) when calling the ListQueues operation: Access to the resource https://us-west-1.queue.amazonaws.com/ is denied
I had given the IAM role, the ListQueues permission but the Resource scope was too narrow. I was running out of time so I decided to use this bandaid solution and move on. The queue was successfully sending and receiving messages at this point and that is all that I needed.
Lastly, I added this queue as a trigger for a lambda function:
functions:
    # --snip--
    process:
        handler: handler.process_book
        environment:
            REGION: us-west-1
            QUEUE_NAME: automated-book-delivery
        events:
            - sqs:
                batchSize: 1
                arn:
                    Fn::GetAtt:
                    - BookDelivery
                    - Arn
The batchSize: 1 option makes sure that our function is called with only one queue message. This was useful because if a lambda function is called with 10 messages (as a list of messages) and the function fails while processing the 9th message, all messages are re-enqueued. We can either add proper error processing or just use a batchSize of 1. There are actual cost tradeoffs happening but my service wasn’t going to be used by a ton of people so I wasn’t too concerned about the tradeoffs. Remember, I was aiming to launch this as quickly as possible.
The API for sending messages to the queue is fairly simple (boto3 SQS docs):
# Sending message
sqs = boto3.resource('sqs', region_name="us-west-1")
queue = sqs.get_queue_by_name(QueueName="queue-name")
response = queue.send_message(MessageBody=f'test message')
We don’t need to worry about receiving messages from the Queue as lambda will call our handler with the queue message as an argument if we set a queue as a trigger for a lambda function.
PDF processing
This is the function that is triggered by the queue message. It expects a couple of environment variables:
- BUCKET: name for destination S3 bucket
- REGION: The region this service is running in
- SOURCE_BUCKET: S3 bucket that contains source PDF and other source files (EPUB etc)
These variables are set in the serverless.yml file as shown in the previous section. Only one S3 bucket is created as a resource with this service. The second S3 bucket is where I will upload the source files and it will just keep the original unstamped files.
But before we get into the actual function code, let’s take a look at the PDF stamping.
PDF Stamping
In the solution section I mentioned that I started with PyPDF2. This is the kind of PDF stamping I was aiming for:

There are two steps involved in making this:
- Create the watermark
- Merge the watermark with source PDF
I ended up using this code for doing the stamping:
from PyPDF2 import PdfFileWriter, PdfFileReader
import io
from reportlab.pdfgen import canvas
from reportlab.platypus import SimpleDocTemplate
from reportlab.lib.pagesizes import letter

packet = io.BytesIO()

PAGE_WIDTH  = letter[0]

# Create a PDF using Reportlab
caption = ("Prepared exclusively for YASOOB KHALID "
                    "(hi@yasoob.me)  Transaction: 0068830245")
can = canvas.Canvas(packet, pagesize=letter)
can.setFont("Helvetica", 10)
can.setFillColorRGB(0.703125,0.703125,0.703125)
can.drawCentredString(PAGE_WIDTH/2, 20, caption)
can.save()

packet.seek(0)

with open("book.pdf", "rb") as input_file:
    input_pdf = PdfFileReader(input_file)
    watermark_pdf = PdfFileReader(packet)

    watermark_page = watermark_pdf.getPage(0)
    output = PdfFileWriter()

    # Don't stamp the cover page
    pdf_page = input_pdf.getPage(0)
    output.addPage(pdf_page)

    for i in range(1, input_pdf.getNumPages()):
        pdf_page = input_pdf.getPage(i)
        pdf_page.mergePage(watermark_page)
        output.addPage(pdf_page)

    with open("output.pdf", "wb") as merged_file:
        output.write(merged_file)
We first create a canvas object and then write “Prepared exclusively for YASOOB KHALID (hi@yasoob.me) Transaction: 0068830245” as a centered string that is 20 units from the bottom. We then open the source pdf (book.pdf) and the generated watermark PDF using the PdfFileReader class of PyPDF2 and merge the watermark with the source.
While doing this, we skip over the first page (page no 0) so that the cover of the book isn’t watermarked and process the rest of the pages normally by merging them with the watermark.
Finally, we save the merged PDF as output.pdf.
This worked. A typical run of the 329 page PDF took around 25-30 seconds. But there was a big issue. After sending out this merged version of the PDF to customers, one person reached out to me and told me about the TOC links not working. I was a bit confused as the original PDF had working links in the TOC.
The left image is from the original PDF and the right image is from the stamped PDF. Look at the bookmark list on the left PDF and how it is missing from the right PDF.

It was only after this issue that I started to look for other options. I spent a long time trying to figure out if PyPDF2 would help me retain the bookmarks but I wasn’t able to figure out a solution. Moreover, I had found out about this issue while the book was already selling so I had to figure out a solution quickly.
I did some research and came across a pure Python PDF manipulation library pdfrw. Turns out, it was super easy to do the PDF stamping using pdfrw and the library also retained the bookmarks without any special commands. Additionally, the stamping code was quicker and shorter than before. The resulting script looked like this:
from pdfrw import PdfReader, PdfWriter, PageMerge
import io
from reportlab.pdfgen import canvas
from reportlab.platypus import SimpleDocTemplate
from reportlab.lib.pagesizes import letter

packet = io.BytesIO()

PAGE_WIDTH  = letter[0]
PAGE_HEIGHT = letter[1]

# create a new PDF with Reportlab
caption = ("Prepared exclusively for YASOOB KHALID "
                    "(hi@yasoob.me)  Transaction: 0068830245")
can = canvas.Canvas(packet, pagesize=letter)
can.setFont("Helvetica", 10)
can.setFillColorRGB(0.703125,0.703125,0.703125)
can.drawCentredString(PAGE_WIDTH/2, 20, caption)
can.save()

packet.seek(0)

with open("book-bak.pdf", "rb") as input_file:
    input_pdf = PdfReader(input_file)
    watermark_pdf = PageMerge().add(PdfReader(packet).pages[0])[0]

    for page in input_pdf.pages[6:]:
        PageMerge(page).add(watermark_pdf).render()

    final_pdf = io.BytesIO()
    PdfWriter(final_pdf, trailer=input_pdf).write()
    final_pdf.seek(0)
    with open("output.pdf", "wb") as merged_file:
        merged_file.write(final_pdf.read())
The code was also surprisingly quick. I had never done any automated PDF manipulation before so I had no idea what kind of runtimes I should expect. But pdfrw code ended up taking only 2-3 seconds to do the stamping as compared to 30 seconds taken by PyPDF2.
Turning PDF stamping into a lambda function
Lambda only has access to a /tmp directory and I was really trying not to use it if at all possible. This meant that I had to download the source PDF from S3 to memory and put the rendered PDF in memory before uploading it to S3 . This was fairly straightforward as I had done similar stuff before where I used the io.BytesIO() object as a file. I am only going to show you the stripped down function code that uses pdfrw:
def process_book(event, context):
    for record in event['Records']:
       payload=record["body"]

    message = event['Records'][0]['body']
    name, email, order_no = message.split('::')
    client_ref=f"{name}_{email}_{order_no}"

    packet = io.BytesIO()
    final_pdf = io.BytesIO()

    PAGE_WIDTH  = letter[0]

    # create a new PDF with Reportlab
    caption = (f"Prepared exclusively for {name} ({email}) "
                "Transaction: {order_no}")
    can = canvas.Canvas(packet, pagesize=letter)
    can.setFont("Helvetica", 10)
    can.setFillColorRGB(0.703125,0.703125,0.703125)
    can.drawCentredString(PAGE_WIDTH/2, 20, caption)
    can.save()

    packet.seek(0)

    original_pdf = io.BytesIO()
    s3.download_fileobj(os.environ['SOURCE_BUCKET'],
        'PracticalPythonProjects.pdf', original_pdf)
    original_pdf.seek(0)

    input_pdf = PdfReader(original_pdf)
    watermark_pdf = PageMerge().add(PdfReader(packet).pages[0])[0]

    for page in input_pdf.pages[6:]:
        PageMerge(page).add(watermark_pdf).render()

    PdfWriter(final_pdf, trailer=input_pdf).write()
    final_pdf.seek(0)

    s3_resource = boto3.resource("s3")
    obj = s3_resource.Object(
        bucket_name=os.environ["BUCKET"],
        key=client_ref,
    )
    obj.put(Body=final_pdf, ContentType='application/pdf')

    pdf_link, epub_link, mobi_link, kpf_link = generate_links(client_ref, s3_client=s3)

    email_info = {
        "name": name,
        "email": email,
        "order_no": order_no,
        "pdf_link": pdf_link,
        "epub_link": epub_link,
        "mobi_link": mobi_link,
        "kpf_link": kpf_link,
    }

    # Send email
    ses_client = boto3.client('ses', region_name=region)
    response = send_email(**email_info, ses_client=ses_client)
    print(f"SES response: {response}")
    return
I create a stamped PDF and upload it to S3 with the name stored in client_ref variable. I call a generate_links function that uses the client_ref and an s3 client to generate PDF, EPUB, MOBI, and KPF links. And finally, I send an email using a send_mail function. The current handler code generates client_ref slightly differently. I talk about it in the Renaming S3 bucket data section.
Generating S3 links
The generate_links function looks like this:
def generate_links(client_ref, s3_client):
    expiration_time = 604800
    pdf_link = s3_client.generate_presigned_url('get_object',
        Params={'Bucket': os.environ["BUCKET"],
                'Key': client_ref},
        ExpiresIn=expiration_time)

    epub_link = s3_client.generate_presigned_url('get_object',
        Params={'Bucket': os.environ["SOURCE_BUCKET"],
                'Key': "PracticalPythonProjects.epub"},
        ExpiresIn=expiration_time)

    mobi_link = s3_client.generate_presigned_url('get_object',
        Params={'Bucket': os.environ["SOURCE_BUCKET"],
                'Key': "PracticalPythonProjects.mobi"},
        ExpiresIn=expiration_time)

    kpf_link = s3_client.generate_presigned_url('get_object',
        Params={'Bucket': os.environ["SOURCE_BUCKET"],
                'Key': "PracticalPythonProjects.kpf"},
        ExpiresIn=expiration_time)

    return pdf_link, epub_link, mobi_link, kpf_link
This function creates 4 links. The PDF link is generated from the file that was just recently stamped and uploaded to S3 and the other links are generated from the source files bucket. The latter isn’t stamped so we can simply make use of the files from the source bucket rather than regenerating them for each customer.
I am setting the expiration date for these pre-signed URLs to the maximum value allowed by S3 which is 604800s. These equal 7 days or a week. (the resulting links were still expiring in a couple of hours. I discuss this in the Expiring links section)
I also had to make sure that the S3 client object was created with these parameters:
from botocore.client import Config
import boto3

# ...

region = "us-west-1"
s3 = boto3.client('s3',
    region_name=region,
    endpoint_url=f'https://s3.{region}.amazonaws.com',
    config=Config(signature_version='s3v4', s3={'addressing_style': 'virtual'})
)
This was necessary for me to make my pre-signed URLs work. I also had to move my bucket from us-east-2 to us-west-1 as the former region was causing some weird errors while accessing the pre-signed URLs.
I will cover the send_email function in the next section.
Getting SES up and running
SES is fairly straightforward. You go to AWS SES console (assuming you already have an AWS account) and verify a new Domain. This is required to send emails via SES. You enter the domain information and SES generates some TXT and CNAME records for you. You go and put them on your website via the DNS management interface of whichever host you are using.
This is what the SES console looks like when you have a verified domain.
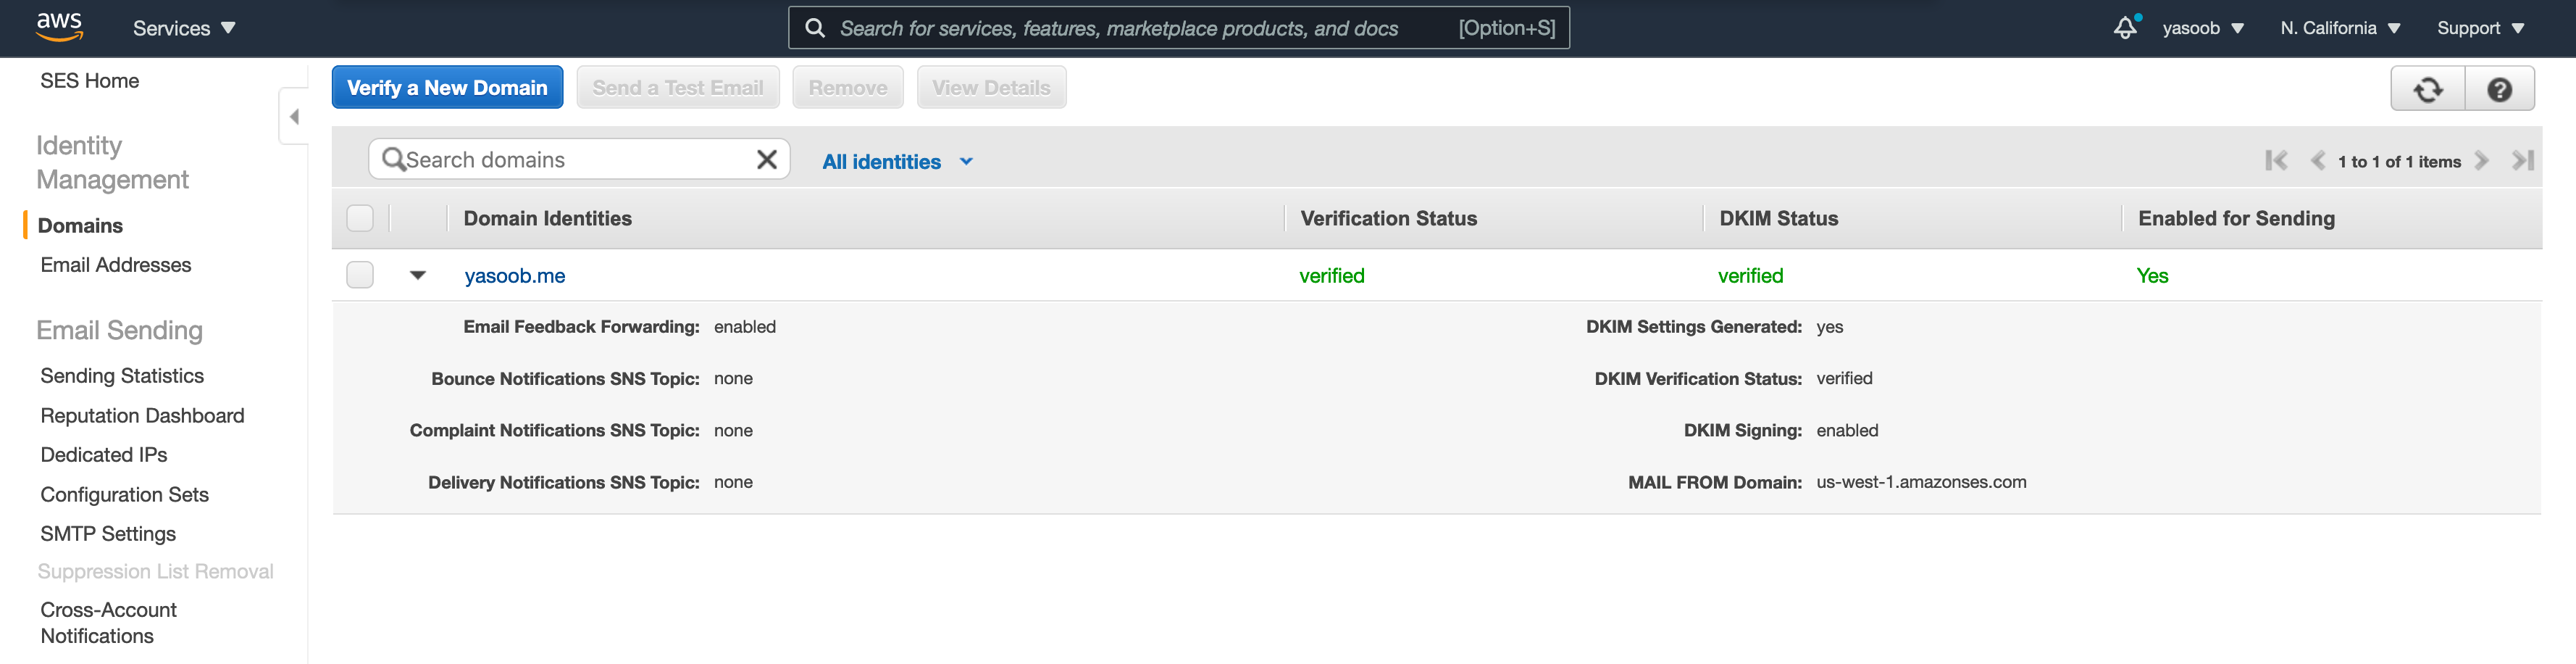
After you get a domain verified, the initial SES sending quota is fairly limited and your application is still in sandbox. This means that you can only send emails to people on the same domain as the one you verified or the people whose email had been verified via the “Email Addresses tab” under “Identity Management”. In order to increase your sending quota and permission to send to people outside of verified domains, you need to submit a request.
You need to go to the “Sending Statistics” tab, click on “Edit your account details” and enter information regarding how you will be using SES in production. AWS people will review your application and approve your request within a day and increase the number of emails you can send within a second and within a day.
The domain verification takes anywhere from a couple of mins to a few hours and the DKIM status change usually takes longer than the normal verification. In my case, both were done within a few hours. As for the production request application, mine got approved in around a day.
Once I had SES all set up, I could get the boto3 library and play with it. The code I use for sending an email looks like this:
def send_email(name, email, pdf_link, epub_link,
            mobi_link, kpf_link, order_no, ses_client):
    final_body = (f"Hi {name}!"
                    "Thank you so much for ordering my book. I am really excited "
                    # ...
                    f"- PDF: {pdf_link}\r\n"
                    f"- EPUB: {epub_link}\r\n"
                    f"- MOBI: {mobi_link}\r\n"
                    f"- KPF: {kpf_link}\r\n\n"
                    # ...
                    "Take care,\r\n"
                    "Yasoob")
    SENDER = "Yasoob Khalid <hi@yasoob.me>"
    CHARSET = "UTF-8"
    SUBJECT = f"Your copy of Practical Python Projects 🚀 | Order {order_no}"
    email_info = {
        "name": name,
        "email": email,
        "order_no": order_no,
        "pdf_link": pdf_link,
        "epub_link": epub_link,
        "mobi_link": mobi_link,
        "kpf_link": kpf_link,
    }
    response = ses_client.send_email(
        Destination={
            'ToAddresses': [
                email,
            ],
        },
        Message={
            'Body': {
                'Html': {
                    'Charset': CHARSET,
                    'Data': email_head + email_body.format(**email_info),
                },
                'Text': {
                    'Charset': CHARSET,
                    'Data': final_body,
                },
            },
            'Subject': {
                'Charset': CHARSET,
                'Data': SUBJECT,
            },
        },
        Source=SENDER,
        ReplyToAddresses=[
            'hi@yasoob.me',
        ],
    )
    return response
The email_head and email_body are just two multiline strings containing the HTML email. The email_body contains a couple of placeholders that I fill in using the email_info dict.
I call this function like this:
import boto3

email_info = {
  "name": name,
  "email": email,
  "order_no": order_no,
  "pdf_link": pdf_link,
  "epub_link": epub_link,
  "mobi_link": mobi_link,
  "kpf_link": kpf_link,
}

ses_client = boto3.client('ses', region_name='us-west-1')
response = send_email(**email_info, ses_client=ses_client)
print(f"SES response: {response}")
The resulting email looks like this:
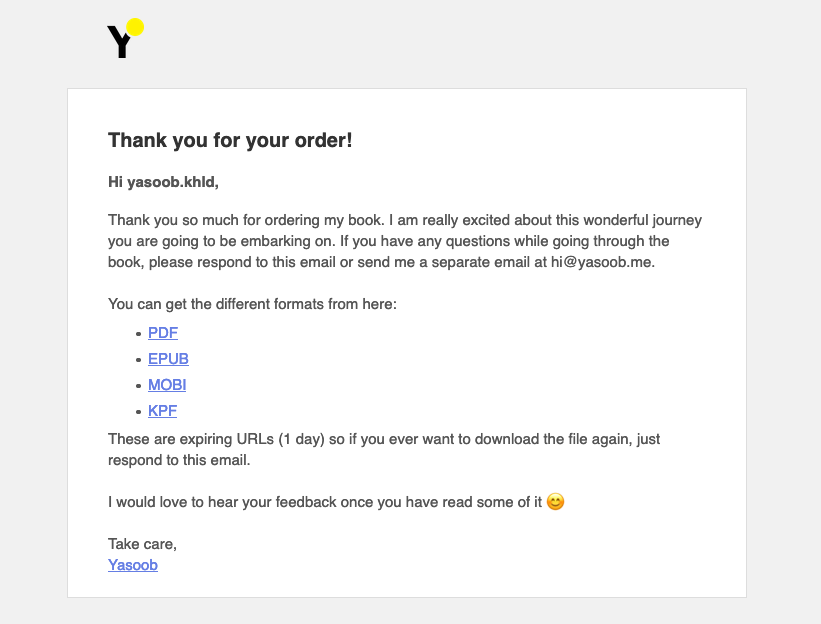
This is all that you need to send a custom email using SES and this is how I integrated SES with the process function.
Custom domain
Now that I had all the parts up and running, I had to figure out how to deploy the service on a custom domain. All the original serverless documentation pointed to either registering a new domain with AWS Route 53 or transfer the DNS of an existing domain to Route 53. I didn’t want to do either as Route 53 is expensive for a new domain (+ I already owned 1 that I wanted to use) and I had already custom-configured a ton of CNAME and TXT records for my old domain with my other domain registrar (Namecheap) that I was in no mood to copy over.
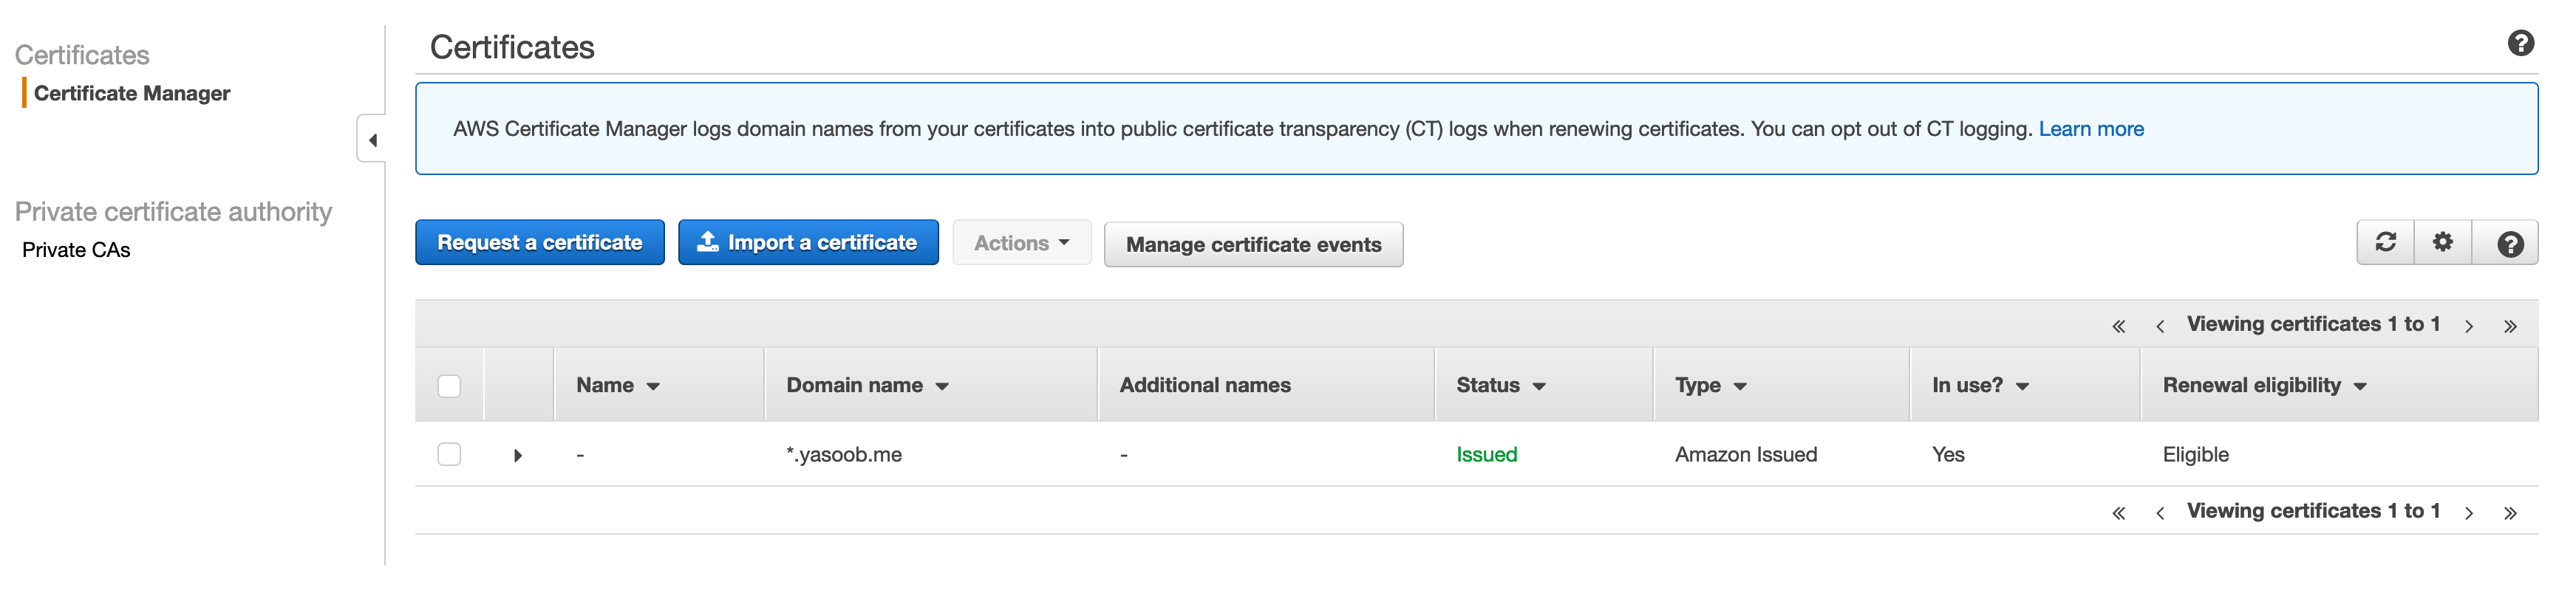
The solution was simpler than I thought. I followed the main serverless tutorial with a few changes. Here are the steps I followed:
- Go to the AWS Certificate Manager and request a certificate for a pre-existing domain
- Install the serverless domain manager using NPM
$ npm install serverless-domain-manager --save-dev - Edit the
serverless.ymlfile to add the domain manager plugin and define my domain
plugins:
  - serverless-python-requirements
  - serverless-domain-manager

custom:
    # ...
  customDomain:
    domainName: ____.yasoob.me
    certificateName: "*.yasoob.me"
    basePath: ''
    stage: ${self:provider.stage}
    endpointType: 'regional'
    createRoute53Record: false
(Replace the _____ with the actual subdomain that will be pointing to this service)
- Run the domain manager plugin
sls create_domain - Deploy
sls deploy
The deployment will show output similar to this:
Serverless Domain Manager Summary
Domain Name
  api.example.com
Distribution Domain Name
  a19cneopjuq1t1.cloudfront.net
- Set up a CNAME record in the DNS from the custom subdomain to the CloudFront URL the deploy command outputted.
This blog by Stephen Owens was super helpful.
Fun post-launch issues
I have already shared quite a few issues in this article but let me describe a couple more.
Expiring links
After releasing the book, I got an email from a customer that the links I emailed them were already expired after a day as compared to a week (this is what I had told them). Turns out they were right. The pre-signed URL did contain the X-Amz-Expires=604800 parameter but for some reason, Amazon was not respecting it. 604800 is in seconds and that equals a week. It took some searching around to find out that the AWS role that was generating these pre-signed URLs was tied to the Lambda function identity. It is impossible to generate pre-signed URLs that take more than a couple of hours to expire by using this identity.
If you are a long-time AWS/Lambda user, you might have already known this but I am a new user and this “feature” isn’t well documented anywhere. I had to come up with a solution to this problem. I couldn’t just manually generate the URLs each time a customer wants to download their copy. Either the URLs shouldn’t expire or there should be a self-service system where the customers can generate the URLs on demand. I decided to go with the latter solution.
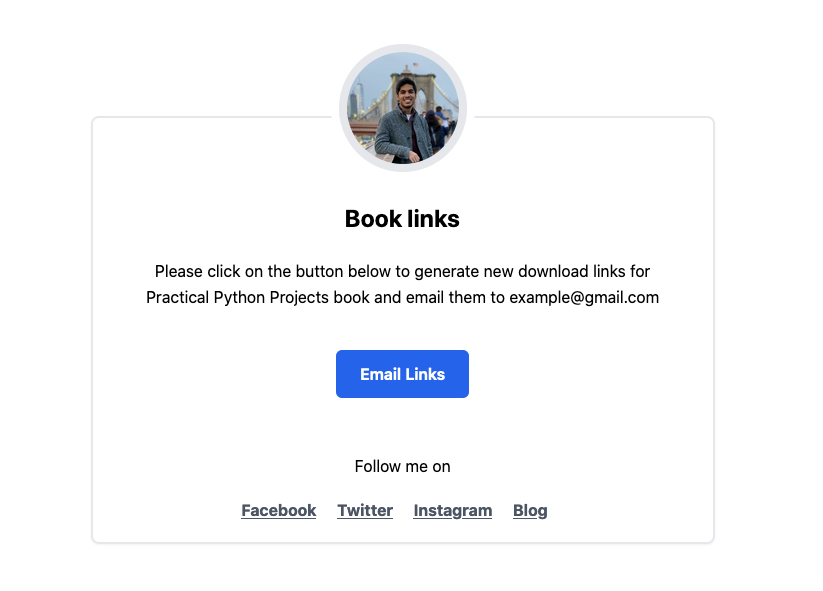
I set up a new Lambda function whose job was to only generate pre-signed URLs for pre-existing resources and send an email to the customer. The code is fairly similar to the handler code I showed in one of the previous sections.
This is what the public page for this looks like:
CORS issue
Access to XMLHttpRequest at '<Lambda Endpoint>' from origin 'https://practicalpython.yasoob.me' has been blocked by CROS policy: No 'Access-Control-Allow-Origin' header is present on the requested resource.
If you are seeing this error for the first time, it is tough to wrap your head around the root cause. Mozilla does a good job at explaining it. For the new API endpoint for generating pre-signed URLs on demand, I had a similar issue and had to set up CORS.
This is required if you are serving your API from a different domain and your front-end is at a different domain. It is easy to fix this issue. I had to modify my serverless.yml file like this:
events:
    - http:
        path: /
        method: post
        cors: true
Notice the cors: true statement in the event trigger definition. I also had to make sure that when I was returning the response from my handler, I added the appropriate headers as well:
return {
            "statusCode": 200,
            'headers': {
                'Content-Type': 'application/json',
                'Access-Control-Allow-Origin': '*',
                'Access-Control-Allow-Credentials': True
            },
            "body": json.dumps(message)
        }
It is also important to note that if your handler function’s return value doesn’t include statusCode, you will see weird return responses that are hard to debug. I am an avid Flask user so I was simply returning from the function like this:
return message, 200
It took me a while to realize that lambda doesn’t work the same way as Flask. The API gateway was unable to understand my response and so instead of returning a 200 status, it was returning some 5xx error. I wasn’t able to track this error using CloudWatch either. Thankfully that is all in the past now.
Rename S3 bucket data
During the initial launch, I was saving the generated PDF files in S3 with the following naming convention:
Name_Email_OrderNo
This worked out well initially but later on, I found that the report that Paddle generates doesn’t include the user’s name. I wanted a naming convention where I can easily cross-reference a file against the Paddle report. The main reason for using this naming convention was to make sure that files were unique. I realized that even if I drop the name, the files would still be unique. I modified my new pre-signed URL generation endpoint in such a way that if a file with the key Email_OrderNo didn’t exist, it would copy the Name_Email_OrderNo to Email_OrderNo, delete the old file, and generate pre-signed URLs for this new file (Email_OrderNo). The reason for doing a copy instead of a rename is that S3 doesn’t support renaming so you have to create a copy with a new name and then delete the old file.
It seemed pretty straightforward. The boto3 method calls for copying and deleting the file roughly look like this:
old_client_ref = "Name_Email_OrderNo"
client_ref = "Email_OrderNo"
BUCKET = "customer-files"
s3_resource.Object(BUCKET, client_ref).copy_from(
    CopySource="/".join([BUCKET, old_client_ref])
)
s3_resource.Object(BUCKET,old_client_ref).delete()
The IAM role policy in serverless.yml looked like this:
- Effect: "Allow"
    Action:
    - "s3:PutObject"
    - "s3:ListBucket"
    - "s3:GetObject"
    - "s3:GetObjectAcl"
    - "s3:DeleteObject"
    Resource: "arn:aws:s3:::customer-files/*"
I tested the boto3 code locally and deployed the code. To my surprise, the code failed in production. The logs showed this error:
botocore.exceptions.ClientError: An error occurred (AccessDenied) when calling the CopyObject operation: Access Denied
I was a bit confused. The S3 policy code looked perfectly fine. I turned to Google and even Google wasn’t able to help me. Turns out, I had to add the following permissions to the IAM role as well:
- Effect: "Allow"
    Action:
    - "s3:ListBucket"
    - "s3:GetObject"
    - "s3:GetObjectAcl"
    Resource: "arn:aws:s3:::*/*"
I am not sure why S3 requires these extra permissions for copying files as the boto3 code shouldn’t be interfacing with any other S3 bucket. I will write a separate post on how I debugged this policy issue as it took me quite a while.
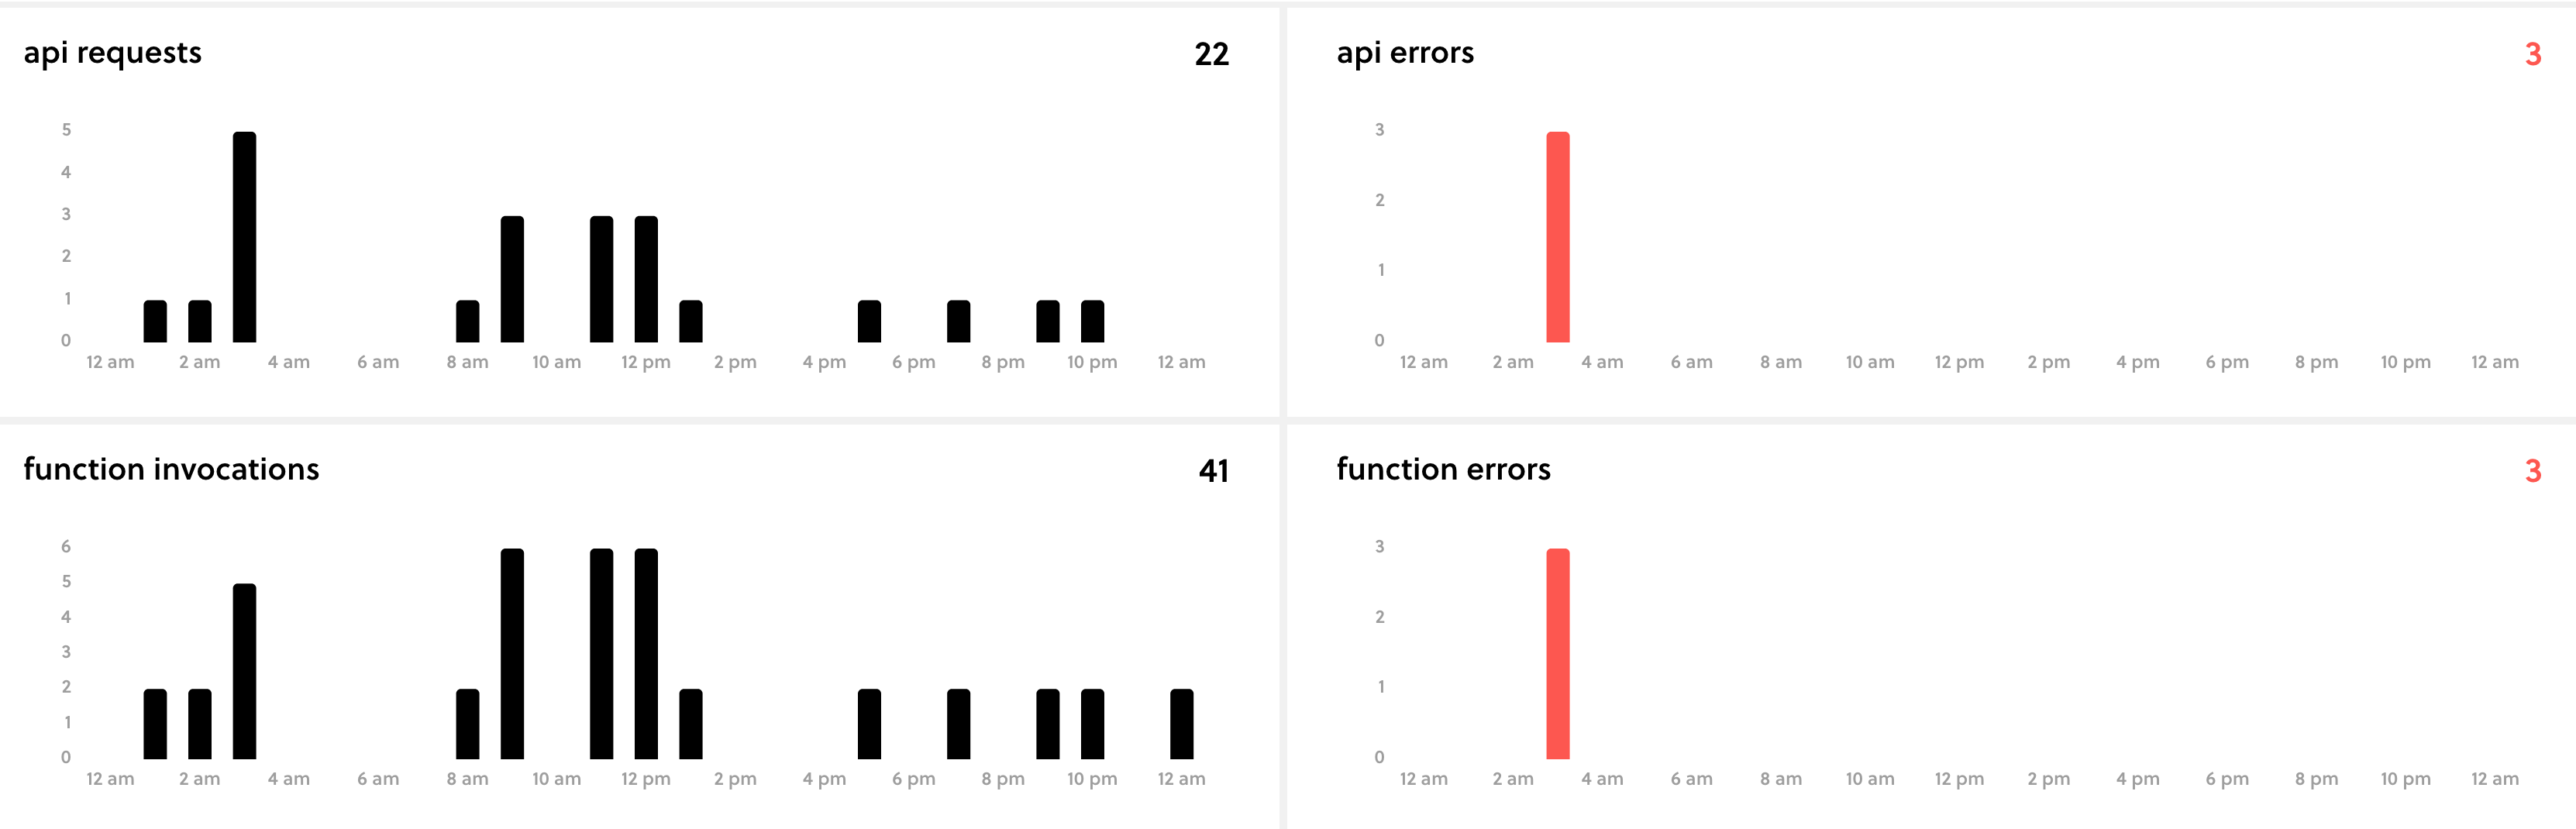
Serverless monitoring
The best part about using serverless is that you can sign up for a free serverless.com account. The serverless command will prompt you to sign up when you initially start a brand new serverless project. This dashboard allows you to monitor your serverless functions easily and for free. This has been really helpful during my initial and ongoing deployments. This is the main dashboard that I keep an eye on to make sure my functions aren’t failing for any reason.
Things to watch out for
Here are a couple of things that might be good to keep in mind:
- Lambda:
- Time limit for public API endpoints is 30s
- Does a cold start if a function is rarely used but not really an issue as the cold start is super quick
- Might get expensive if service is used super frequently
- S3
- pre-signed URLs have a max expiry of 1 week
- You can enable file retention config to delete files after 30 days to prevent extra cost
- SES
- You need to verify the domain in each zone you want to send email from e.g
us-west-1vsus-east-2
- You need to verify the domain in each zone you want to send email from e.g
- PDF processing
- PyPDF2 is slow and not maintained anymore
pdfrwis pure Python but not as full-featured- PDF spec doesn’t change frequently so libraries don’t need to be updated super often
- Test different PDF processing libraries and use whichever one suits your use case as there is no one size fits all
- Paddle
- Takes a big chunk from the sale but there aren’t too many viable options for a major group of people
Next Steps
I plan on fleshing out this service to add a couple more features. Maybe turn it into a full-fledged service like SendOwl.
I was always skeptical of self-hosted email newsletter services like Sendy as I had heard too many horror stories around deliverability issues but this experience and another tangential experience with SES has made me more confident that Sendy is the way to go. I am currently using Mailchimp and that costs me $78 for the base package for 5000+ subscribers. Sendy can bring that down to around $0-5 after initial payment for the software. I also don’t send enough emails to justify the $78 price tag.
Conclusion
I was able to test and launch this service within 3 days. I started developing it on Monday and it was in production on Thursday. I did this all without any prior experience with serverless.com or PDF stamping. Focus played a huge role in this and forcing myself to keep my eye on the target at all times helped me do this. Were there a couple of issues post-launch? Sure. Were they big enough to prevent the launch? Heck no.

So what was the most tiring+critical bug? The time when a customer reached out and informed me about the bookmarks not working. That was a completely unforeseen issue and the more I searched for how to fix the problem using PyPDF2, the more frustrated I became. Finding a super quick solution using pdfrw is a reminder that sometimes the library you are using might not be the best for the job and it is always okay to look around a little bit.
Another important learning from this exercise is that customers are sympathetic if you keep them updated about an issue. I sent an email to all the customers after the link expiry and the PDF stamping issue and got a few encouraging responses. There is a reason people say: “just ship it!”. You can always fix the lingering bugs with time if they aren’t too serious 🤞
I hope you learned something new from this article. If you have any questions, comments, or concerns, please write a comment below or send me an email. I love hearing from you all! ❤️
✍️ Comments
Thank you!
Your comment has been submitted and will be published once it has been approved. 😊
OK