

Setting up listmonk, an open-source newsletter & mailing list manager
Hi everyone! 👋
I have been using Mailchimp for my mailing list for a while and even though it is great, it is super expensive. I have 5000+ people in my list and that puts me in their $78 plan. I send the newsletter very rarely and don’t really earn anything from the mailing list so it was really hard for me to justify the $78. I had recently integrated Amazon SES with a project and found out that SES gives you a free 50,000 email sending quota per month. That sounded more than enough for my purposes and I thought that surely someone must have made an open-source mailing list management system on top of SES. To my surprise, there weren’t a ton of options out there.
During my search, I came across Sendy and listmonk. Sendy is mature but closed source and paid. On the other hand, listmonk is opensource but is slightly rough around the edges and lacks certain important features like email bounce tracking. It was tough to decide between these two but I eventually figured I should give listmonk a try before investing in Sendy.
Note: There is also Mailtrain out there but I didn’t go ahead with it because the recommended requirements for the v2 are higher than the free ec2 instance Amazon offers and I wanted to keep everything free if possible
I only wanted basic features in a mailing list package:
- Email open rate
- Link click-through rate
- Mailing list/Subscribers management
- Subscribe/Unsubscribe form
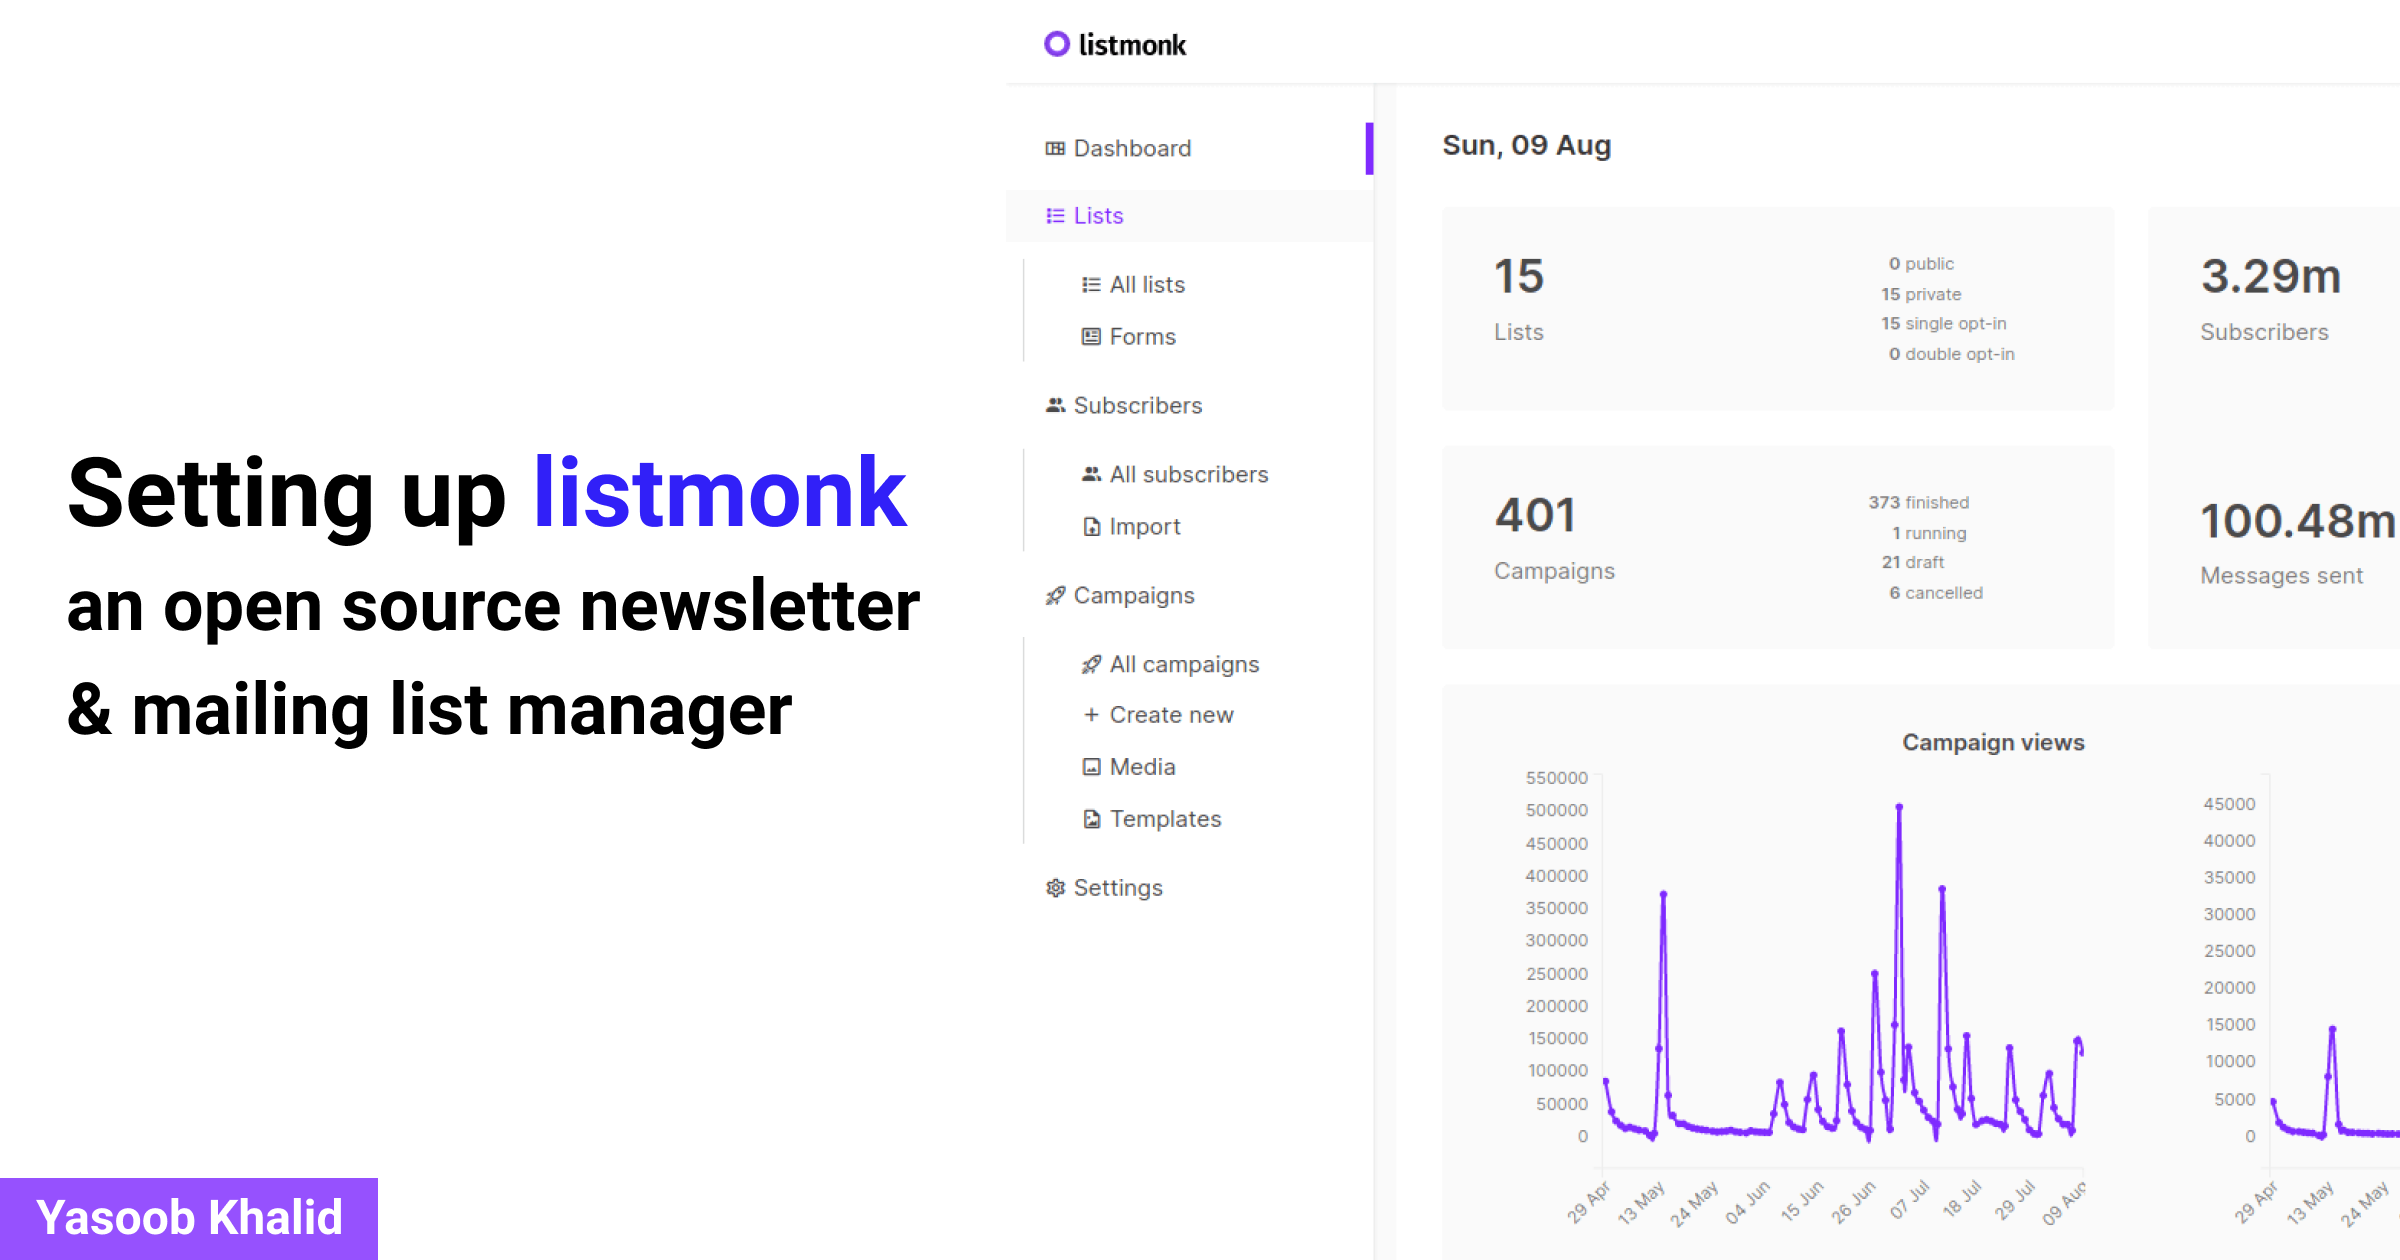
Listmonk checked all of these boxes. There were a couple of rough edges but it mostly fits the bill. I was not too confident with my choice listmonk but then again listmonk is being used in production by the fine folks at Zerodha to send millions of emails each month. A major drawback for listmonk is that there aren’t detailed instructions about production setup. Considering that it is open-source software, I decided to document my journey and show you how I set it up.
For this tutorial, I am assuming that you are running an ubuntu machine and already have it up and going. And I am also assuming that you have docker installed.
TLDR: You can get the final setup code from this repository
Setting up docker-compose
Listmonk helpfully has an image up on Dockerhub that we can use. The GitHub repository contains a sample docker-compose.yml file for us:
# NOTE: This docker-compose.yml is meant to be just an example guideline
# on how you can achieve the same. It is not intended to run out of the box
# and you must edit the below configurations to suit your needs.

version: "3.7"

x-app-defaults: &app-defaults
  restart: unless-stopped
  image: listmonk/listmonk:latest
  ports:
    - "9000:9000"
  networks:
    - listmonk

x-db-defaults: &db-defaults
    image: postgres:11
    ports:
      - "9432:5432"
    networks:
      - listmonk
    environment:
      - POSTGRES_PASSWORD=listmonk
      - POSTGRES_USER=listmonk
      - POSTGRES_DB=listmonk
    restart: unless-stopped

services:
  db:
    <<: *db-defaults
    volumes:
      - type: volume
        source: listmonk-data
        target: /var/lib/postgresql/data

  app:
    <<: *app-defaults
    depends_on:
      - db

  demo-db:
    <<: *db-defaults

  demo-app:
    <<: *app-defaults
    command: [sh, -c, "yes | ./listmonk --install --config config-demo.toml && ./listmonk --config config-demo.toml"]
    depends_on:
      - demo-db

networks:
  listmonk:

volumes:
  listmonk-data:
If we simply save this file and run docker-compose up -d demo-app, we can access the demo-app at localhost:9000. However, we don’t want the demo-app. We want to supply our custom config file. We can do that by modifying the docker-compose.yml file like this:
  app:
    <<: *app-defaults
    depends_on:
      - db
    volumes:
      - ./config.toml/:/listmonk/config.toml
Afterward, we need to create a config.toml file and save it in the same directory as the docker-compose.yml file. A sample config.toml file looks like this:
[app]
    # Interface and port where the app will run its webserver.
    address = "0.0.0.0:9000"

    # BasicAuth authentication for the admin dashboard. This will eventually
    # be replaced with a better multi-user, role-based authentication system.
    # IMPORTANT: Leave both values empty to disable authentication on admin
    # only where an external authentication is already setup.
    admin_username = "listmonk"
    admin_password = "listmonk"

# Database.
[db]
    host = "db"
    port = 5432
    user = "listmonk"
    password = "listmonk"
    database = "listmonk"
    ssl_mode = "disable"
    max_open = 25
    max_idle = 25
    max_lifetime = "300s"
Make sure you replace the admin user/pass in the config file and use something unique. Now we can run docker-compose up -d app and have listmonk up and running on port 9000 with our custom config.
Custom static files
By default listmonk sends out this email when someone tries signing up to a newsletter/mailing list:
- Without the logo
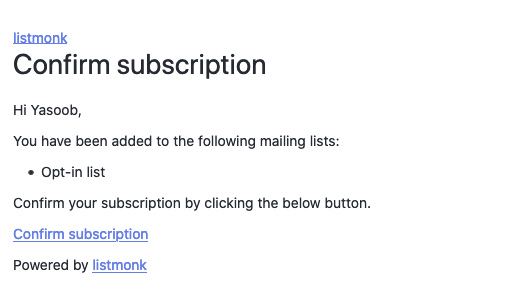
- With the logo
![]()
I did not like this opt-in email. I wanted to give it more character and freshen it up a little bit. The solution is pretty simple. The listmonk GitHub repo contains a static directory with these templates. Download the static directory and place it right next to the docker-compose.yml file. Now go ahead and make whatever changes you want to the templates.
I updated the subscriber-optin.html file and the result was this:
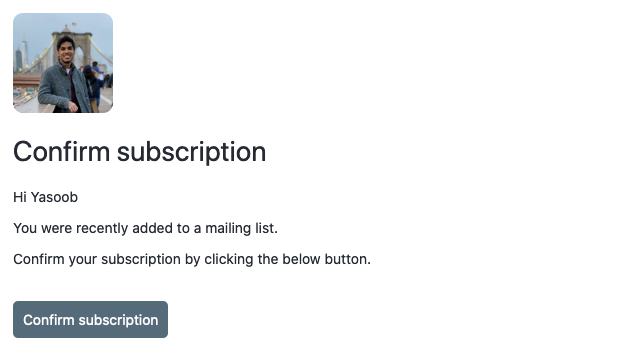
That looks much nicer than the original optin email. But how do we tell listmonk to use these custom templates? Listmonk can take a --static-dir argument that specifies a custom static files directory. We can modify the docker-compose.yml file and update the app service definition like this:
  app:
    <<: *app-defaults
    depends_on:
      - db
    command: "./listmonk --static-dir=/listmonk/static"
    volumes:
      - ./config.toml/:/listmonk/config.toml
      - ./static:/listmonk/static
And now we can ask docker to restart app service. This will make sure that listmonk picks up our custom templates:
docker-compose up --force-recreate -d app
The current directory structure would look something like this:
.
├── config.toml
├── docker-compose.yml
└── static
    ├── email-templates
    │   ├── base.html
    │   ├── campaign-status.html
    │   ├── default.tpl
    │   ├── import-status.html
    │   ├── subscriber-data.html
    │   ├── subscriber-optin-campaign.html
    │   └── subscriber-optin.html
    └── public
        ├── static
        │   ├── favicon.png
        │   ├── logo.png
        │   ├── logo.svg
        │   ├── script.js
        │   └── style.css
        └── templates
            ├── index.html
            ├── message.html
            ├── optin.html
            ├── subscription-form.html
            └── subscription.html
Importing old subscribers
If you are migrating from another mailing list solution like Mailchimp or Substack, you might already have a ton of subscribers. It is painful to think that you will have to gather all of those subscribers again or ask them for consent. They have already given you their consent to email them and you want to change your mailing list provider without any effect on your old subscribers.
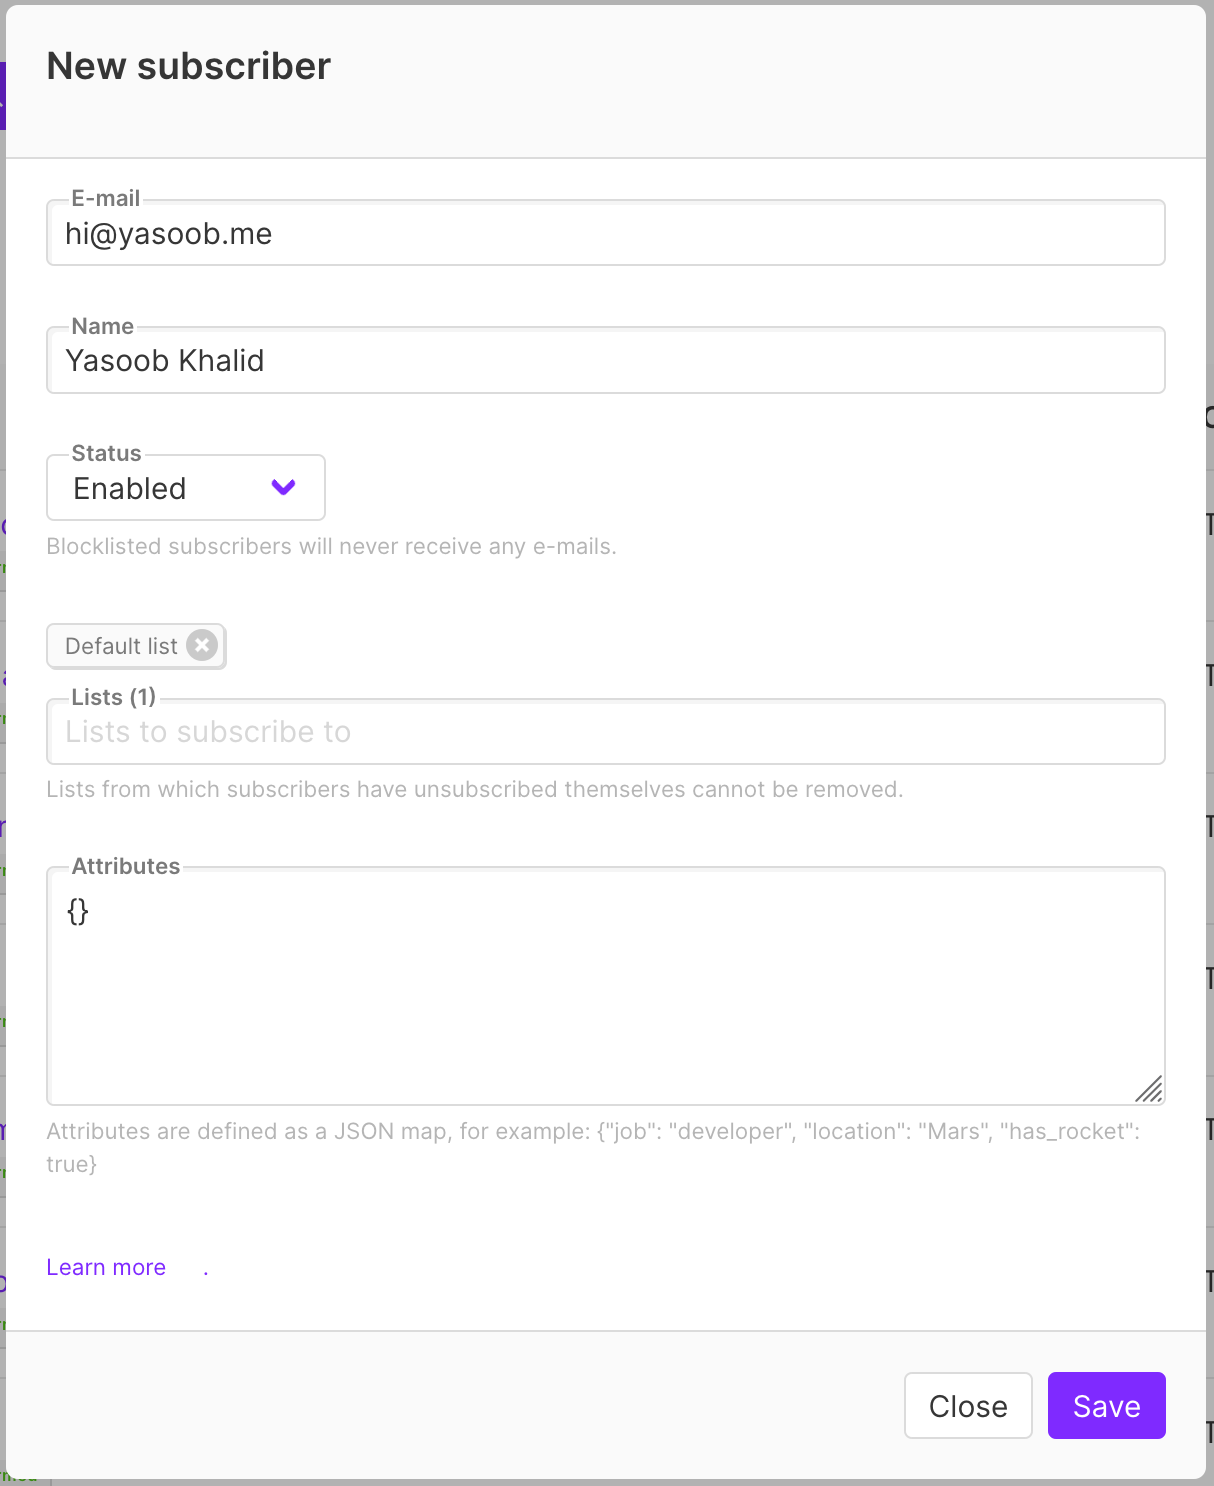
Thankfully, listmonk supports subscriber import. You have the option to either create a new subscriber using the GUI or import a CSV file that contains names, emails, and attributes (extra information) of subscribers.
The GUI looks like this:
If you add a subscriber via the online wizard, they will receive an opt-in email. Their status in the GUI will look like this:

Notice the “Unconfirmed”. That just tells us that the user hasn’t clicked on “confirm” in the opt-in email they received. As far as I know, we can’t currently add a user via the wizard and have listmonk not send them an opt-in email. So what’s the alternative? CSV imports!
A sample CSV looks like this:
| name | |
|---|---|
| Yasoob | hi@yasoob.me |
We can import this CSV via the GUI and by-default listmonk will not send anyone an opt-in email. However, listmonk will also not mark them as “confirmed” either. And you can not send the unconfirmed people a newsletter. We have two options at this point.
- Send an opt-in email campaign to everyone you just imported
- Manually mark them as confirmed in the DB
Let’s talk about the second option. For manually marking the subscribers as confirmed, we will have to run a sql query. I am assuming that you were able to get listmonk working using docker-compose and you are currently on the same server as where listmonk is running. The default docker-compose.yml file runs a postgresql container and docker-compose names it listmonk_db_1 on first run. You can check out the list of currently running containers by running:
$ docker-compose ps

CONTAINER ID        IMAGE                      COMMAND                  CREATED             STATUS              PORTS                                      NAMES
f020015005a1        listmonk/listmonk:latest   "./listmonk --static…"   33 hours ago        Up 33 hours         0.0.0.0:9000->9000/tcp                     listmonk_app_1
623c84d3d072        postgres:11                "docker-entrypoint.s…"   33 hours ago        Up 33 hours         0.0.0.0:9432->5432/tcp                     listmonk_db_1
We can run bash in the listmonk_db_1 container and run psql (Postgresql command-line tool)
$ docker exec -it listmonk_db_1 /bin/bash
root@623c84d3d072:/# psql -d listmonk  -U listmonk -W
Password:
psql (11.11 (Debian 11.11-1.pgdg90+1))
Type "help" for help.

listmonk=#
The above commands just connected us to the listmonk db. We can list all the tables in the db by typing:
\dt
              List of relations
 Schema |       Name       | Type  |  Owner
--------+------------------+-------+----------
 public | campaign_lists   | table | listmonk
 public | campaign_views   | table | listmonk
 public | campaigns        | table | listmonk
 public | link_clicks      | table | listmonk
 public | links            | table | listmonk
 public | lists            | table | listmonk
 public | media            | table | listmonk
 public | settings         | table | listmonk
 public | subscriber_lists | table | listmonk
 public | subscribers      | table | listmonk
 public | templates        | table | listmonk
(11 rows)
The table that we want to look into is the subscriber_lists. We can look at the contents of this table by typing this:
SELECT * from subscriber_lists;
| subscriber_id | list_id | status | created_at | updated_at |
|---|---|---|---|---|
| 11180 | 3 | unconfirmed | 2021-03-10 18:38:52.022231+00 | 2021-03-10 18:38:52.022231+00 |
| 11181 | 3 | unconfirmed | 2021-03-10 18:38:52.022231+00 | 2021-03-10 18:38:52.022231+00 |
| 11182 | 3 | unconfirmed | 2021-03-10 18:38:52.022231+00 | 2021-03-10 18:38:52.022231+00 |
| 11183 | 3 | unconfirmed | 2021-03-10 18:38:52.022231+00 | 2021-03-10 18:38:52.022231+00 |
| 11184 | 3 | unconfirmed | 2021-03-10 18:38:52.022231+00 | 2021-03-10 18:38:52.022231+00 |
| 11185 | 3 | unconfirmed | 2021-03-10 18:38:52.022231+00 | 2021-03-10 18:38:52.022231+00 |
| 11186 | 3 | unconfirmed | 2021-03-10 18:38:52.022231+00 | 2021-03-10 18:38:52.022231+00 |
| 11187 | 3 | unconfirmed | 2021-03-10 18:38:52.022231+00 | 2021-03-10 18:38:52.022231+00 |
We can update the status of all the subscribers to confirmed by running the following query:
UPDATE subscriber_lists SET status='confirmed' WHERE list_id=4;
Sweet! Running the SELECT query again should reflect the change in the status:
| subscriber_id | list_id | status | created_at | updated_at |
|---|---|---|---|---|
| 11180 | 3 | confirmed | 2021-03-10 18:38:52.022231+00 | 2021-03-10 18:38:52.022231+00 |
| 11181 | 3 | confirmed | 2021-03-10 18:38:52.022231+00 | 2021-03-10 18:38:52.022231+00 |
| 11182 | 3 | confirmed | 2021-03-10 18:38:52.022231+00 | 2021-03-10 18:38:52.022231+00 |
| 11183 | 3 | confirmed | 2021-03-10 18:38:52.022231+00 | 2021-03-10 18:38:52.022231+00 |
| 11184 | 3 | confirmed | 2021-03-10 18:38:52.022231+00 | 2021-03-10 18:38:52.022231+00 |
| 11185 | 3 | confirmed | 2021-03-10 18:38:52.022231+00 | 2021-03-10 18:38:52.022231+00 |
| 11186 | 3 | confirmed | 2021-03-10 18:38:52.022231+00 | 2021-03-10 18:38:52.022231+00 |
| 11187 | 3 | confirmed | 2021-03-10 18:38:52.022231+00 | 2021-03-10 18:38:52.022231+00 |
Now we can go ahead and send emails to all of these people without asking them to opt-in first.
Setting up SSL
By default, listmonk runs over HTTP and doesn’t implement SSL. It is kinda required if you are running any service these days. So the next thing we need to do is to set up SSL support. I will be showing you how to do that by incorporating NGINX and certbot to listmonk via the docker-compose.yml. I was able to set NGINX up by following this helpful guide by Philipp and by going through this accompanying repo on GitHub.
The first step is to create a data/nginx folder in the same folder that contains the docker-compose.yml file.
mkdir -p data/nginx
Now create a nginx.conf file in this folder with the following content:
server {
    listen 80;
    server_name example.com;
    server_tokens off;

    location /.well-known/acme-challenge/ {
        root /var/www/certbot;
    }

    location / {
        return 301 https://$host$request_uri;
    }
}

server {
    listen 443 ssl;
    server_name example.com;
    server_tokens off;

    ssl_certificate /etc/letsencrypt/live/example.com/fullchain.pem;
    ssl_certificate_key /etc/letsencrypt/live/example.com/privkey.pem;
    include /etc/letsencrypt/options-ssl-nginx.conf;
    ssl_dhparam /etc/letsencrypt/ssl-dhparams.pem;

    location / {
        proxy_pass  http://app:9000;
        proxy_set_header    Host                $http_host;
        proxy_set_header    X-Real-IP           $remote_addr;
        proxy_set_header    X-Forwarded-For     $proxy_add_x_forwarded_for;
    }
}
Make sure you replace example.com with your custom domain that you will be running this on. This can also be a CNAME.
Now we have to download an init script from GitHub. You can get it from here. Download it and replace the domain name with your domain name and the sample email with your own email. I had to make one additional change to this file to make it work: comment out nginx from line 42.
The resulting init-letsencrypt.sh file will look something like this:
#!/bin/bash

if ! [ -x "$(command -v docker-compose)" ]; then
  echo 'Error: docker-compose is not installed.' >&2
  exit 1
fi

domains=(custom.yasoob.me)
rsa_key_size=4096
data_path="./data/certbot"
email="newsletter@yasoob.me" # Adding a valid address is strongly recommended
staging=0 # Set to 1 if you're testing your setup to avoid hitting request limits

if [ -d "$data_path" ]; then
  read -p "Existing data found for $domains. Continue and replace existing certificate? (y/N) " decision
  if [ "$decision" != "Y" ] && [ "$decision" != "y" ]; then
    exit
  fi
fi


if [ ! -e "$data_path/conf/options-ssl-nginx.conf" ] || [ ! -e "$data_path/conf/ssl-dhparams.pem" ]; then
  echo "### Downloading recommended TLS parameters ..."
  mkdir -p "$data_path/conf"
  curl -s https://raw.githubusercontent.com/certbot/certbot/master/certbot-nginx/certbot_nginx/_internal/tls_configs/options-ssl-nginx.conf > "$data_path/conf/options-ssl-nginx.conf"
  curl -s https://raw.githubusercontent.com/certbot/certbot/master/certbot/certbot/ssl-dhparams.pem > "$data_path/conf/ssl-dhparams.pem"
  echo
fi

echo "### Creating dummy certificate for $domains ..."
path="/etc/letsencrypt/live/$domains"
mkdir -p "$data_path/conf/live/$domains"
docker-compose run --rm --entrypoint "\
  openssl req -x509 -nodes -newkey rsa:$rsa_key_size -days 1\
    -keyout '$path/privkey.pem' \
    -out '$path/fullchain.pem' \
    -subj '/CN=localhost'" certbot
echo


echo "### Starting nginx ..."
docker-compose up --force-recreate -d # nginx
echo

echo "### Deleting dummy certificate for $domains ..."
docker-compose run --rm --entrypoint "\
  rm -Rf /etc/letsencrypt/live/$domains && \
  rm -Rf /etc/letsencrypt/archive/$domains && \
  rm -Rf /etc/letsencrypt/renewal/$domains.conf" certbot
echo


echo "### Requesting Let's Encrypt certificate for $domains ..."
#Join $domains to -d args
domain_args=""
for domain in "${domains[@]}"; do
  domain_args="$domain_args -d $domain"
done

# Select appropriate email arg
case "$email" in
  "") email_arg="--register-unsafely-without-email" ;;
  *) email_arg="--email $email" ;;
esac

# Enable staging mode if needed
if [ $staging != "0" ]; then staging_arg="--staging"; fi

docker-compose run --rm --entrypoint "\
  certbot certonly --webroot -w /var/www/certbot \
    $staging_arg \
    $email_arg \
    $domain_args \
    --rsa-key-size $rsa_key_size \
    --agree-tos \
    --force-renewal" certbot
echo

echo "### Reloading nginx ..."
docker-compose exec nginx nginx -s reload
Next, we need to add an NGINX and certbot service in the docker-compose.yml file. Add the following two services to the docker-compose.yml file:
nginx:
    image: nginx:mainline-alpine
    restart: unless-stopped
    ports:
      - "80:80"
      - "443:443"
    volumes:
      - ./data/nginx:/etc/nginx/conf.d
      - ./data/certbot/conf:/etc/letsencrypt
      - ./data/certbot/www:/var/www/certbot
    networks:
      - listmonk
    depends_on:
      - app
    command: "/bin/sh -c 'while :; do sleep 6h & wait $${!}; nginx -s reload; done & nginx -g \"daemon off;\"'"

  certbot:
    image: certbot/certbot
    container_name: certbot
    volumes:
      - ./data/certbot/conf:/etc/letsencrypt
      - ./data/certbot/www:/var/www/certbot
    networks:
      - listmonk
    depends_on:
      - nginx
    entrypoint: "/bin/sh -c 'trap exit TERM; while :; do certbot renew; sleep 12h & wait $${!}; done;'"
The resulting docker-compose.yml will look like this:
version: "3.7"

x-app-defaults: &app-defaults
  restart: unless-stopped
  image: listmonk/listmonk:latest
  ports:
    - "9000:9000"
  networks:
    - listmonk

x-db-defaults: &db-defaults
    image: postgres:11
    ports:
      - "9432:5432"
    networks:
      - listmonk
    environment:
      - POSTGRES_PASSWORD=listmonk
      - POSTGRES_USER=listmonk
      - POSTGRES_DB=listmonk
    restart: unless-stopped

services:
  db:
    <<: *db-defaults
    volumes:
      - type: volume
        source: listmonk-data
        target: /var/lib/postgresql/data

  app:
    <<: *app-defaults
    depends_on:
      - db
    command: "./listmonk --static-dir=/listmonk/static"
    volumes:
      - ./config.toml/:/listmonk/config.toml
      - ./static:/listmonk/static

  nginx:
    image: nginx:mainline-alpine
    restart: unless-stopped
    ports:
      - "80:80"
      - "443:443"
    volumes:
      - ./data/nginx:/etc/nginx/conf.d
      - ./data/certbot/conf:/etc/letsencrypt
      - ./data/certbot/www:/var/www/certbot
    networks:
      - listmonk
    depends_on:
      - app
    command: "/bin/sh -c 'while :; do sleep 6h & wait $${!}; nginx -s reload; done & nginx -g \"daemon off;\"'"

  certbot:
    image: certbot/certbot
    container_name: certbot
    volumes:
      - ./data/certbot/conf:/etc/letsencrypt
      - ./data/certbot/www:/var/www/certbot
    networks:
      - listmonk
    depends_on:
      - nginx
    entrypoint: "/bin/sh -c 'trap exit TERM; while :; do certbot renew; sleep 12h & wait $${!}; done;'"

networks:
  listmonk:

volumes:
  listmonk-data:
At this point your file and directory structure should resemble this:
.
├── README.md
├── config.toml
├── data
│   └── nginx
│       └── nginx.conf
├── docker-compose.yml
├── init-letsencrypt.sh
└── static
    ├── email-templates
    │   ├── base.html
    │   ├── campaign-status.html
    │   ├── default.tpl
    │   ├── import-status.html
    │   ├── subscriber-data.html
    │   ├── subscriber-optin-campaign.html
    │   └── subscriber-optin.html
    └── public
        ├── static
        │   ├── favicon.png
        │   ├── logo.png
        │   ├── logo.svg
        │   ├── script.js
        │   └── style.css
        └── templates
            ├── index.html
            ├── message.html
            ├── optin.html
            ├── subscription-form.html
            └── subscription.html
Everything is in place and we can run the init-letsencrypt.sh file. It will generate proper SSL certificates for us and will expose listmonk on port 8080.
Conclusion
I wanted to contribute to the open-source mailing list ecosystem by writing this article. We need more open source tools in this area. I am currently testing out listmonk in production on this blog. I am not sure if the lack of bounce tracking and granular list management will become an issue in the future but I will try to make sure I give listmonk a proper try before moving on. I hope you all learned something new and I made it a little bit easier for you to set up listmonk. If you have any questions you can head over to the listmonk GitHub page and open an issue. The developers are super responsive. Kailash Nadh has done a commendable job with this software.
You can also get the final setup code from this repository.
If you have any feedback, comments, or suggestions please comment below 😊
Vince Fulco