


Let's Reverse Engineer an Android App!
I had always wanted to learn how to reverse engineer Android apps. There were people out there who knew how to navigate and modify the internals of an APK file and I wasn’t one of them. This had to be changed but it took a long time for that to happen. In this post, I will show you how I was able to reverse engineer an Android app, add some debug statements, and figure out how certain query parameters for API calls were being generated. It should give you a fairly good idea of how APK reverse engineering generally works.
Backstory
You might be wondering what fueled this curiosity so let me explain. I was in high school and was preparing for my advanced maths exam. I had recently learned that I could use a certain app to get step-by-step solutions to my problems. I was excited. I tried the app and it worked! It only required a one time purchase fee and that was it. I had a lot of questions about how the app worked under the hood:
- Was the processing happening on the phone?
- Were they making any API calls?
- If so then what were the calls?
Simple, innocent questions that led me into a rabbit hole. I tried reverse-engineering the app but couldn’t get far. I eventually decided to put the project on the back burner and come back to it once I had more time and experience. It only took 3 years, a whole lot of learning, and a renewed interest in reverse-engineering for me to come back to this project.
I decided to have a fresh start at the problem and figure out if I even need to go as far as decompiling the APK. Maybe just a simple MITM attack would be enough to snoop the API calls and craft my own?
I currently have an iPhone so I installed the Android Emulator on my Linux machine and install the app on that. Then I launched mitmproxy and started intercepting the traffic from the emulator. Whenever I made a query, this API call was made:
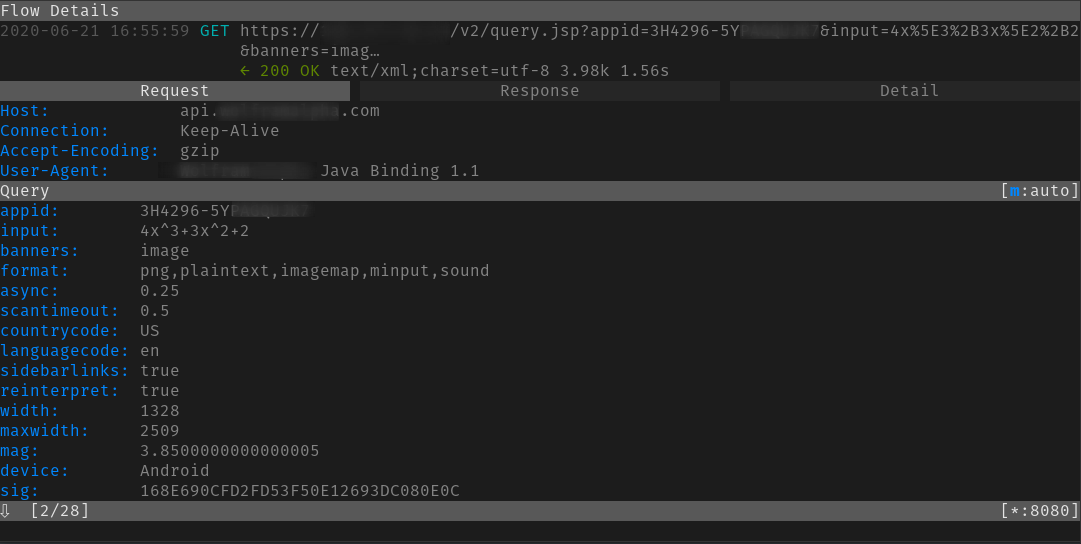
So far so good. No need for learning how to reverse-engineer the app. Surely I can figure out what those query parameters are? As it turns out it was extremely hard to figure out how the sig parameter was being generated. Everything else seemed generic enough but sig was dynamic and changed with a change in input.
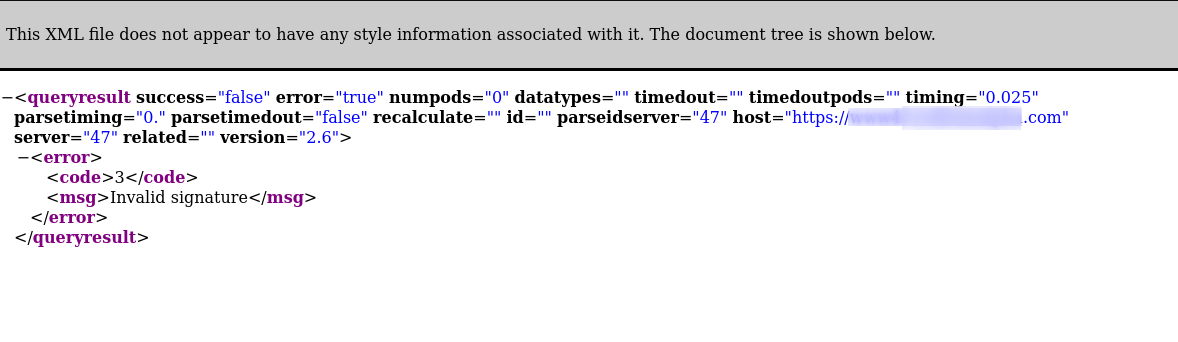
I tried modifying the input slightly just to check if the API was even checking the sig parameter. As it turns out, it was. The endpoint returned an invalid signature error even on the slightest change in input:
sig was some sort of hash but I wasn’t sure what kind or how it was being generated and now this required a little bit of reverse engineering.
Note: While trying to proxy the android emulator requests via mitmproxy, you might see the error: Client connection killed by block_global. To fix this, make sure you run mitmproxy with the block_global flag set to false: mitmproxy --set block_global=false. You will also have to install the mitmproxy certificate on the device to decrypt the SSL traffic. Follow these instructions to do that.
Downloading and unpacking the APK
Disclaimer: I do not condone piracy. This is merely an exercise to teach you how something like this works. The same knowledge is used to reverse malware apps and to disable certificate pinning in APKs. There will be places throughout the article where I will censor the name of the application or the package I am reversing. Do not do anything illegal with this knowledge.
The very first step is to get your hands on the APK file. There are multiple ways to do that. You can either use ADB to get an APK from an Android device (emulated or real) or you can use an online APK website to download a working version of the app. I opted for the latter option. Search on Google and you should be able to find a way to download APKs pretty easily.
Let’s suppose our APK is called application.apk. Now we need to figure out how to unpack the APK into a folder with all the resources and Dalvik bytecode files. We can easily do that using the apktool. You can easily download the apktool from this link.
At the time of writing, the most recent version was apktool_2.4.1.jar. Put this file wherever you want (in my case ~/Dev) and add an alias to it in your .bashrc for ease of use:
alias apktool='java -jar ~/Dev/apktool_2.4.1.jar'
I had to install JDK to get it to work so make sure you have it installed.
Now we can use apktool to actually unpack the APK:
apktool d application.apk
This should give you an application folder in the same directory where application.apk is located. The structure of the application folder should look something like this:
$ ls application
AndroidManifest.xml  assets  lib       res    smali_classes2
apktool.yml          kotlin  original  smali  unknown
Sweet!
What about JADX?
At the time of writing this article, the most famous tool for decompiling an APK is probably JADX. It converts an APK file into a human-readable Java output. Even though the decompilation of an APK using JADX usually gives you fairly readable Java code, the decompilation process is lossy and you can’t simply recompile the app using Android Studio.
This is where I got stuck in the past as well. I used to assume that you can simply recompile a decompiled APK and it would work. If only APK reverse-engineering was this easy…

So wait! Does this mean we won’t be using JADX at all? Quite the contrary. It is super useful to have the decompiled source code available even if it isn’t in a functional state. It will help us in figuring out the internals of how the app works and which methods we need to modify in the smali code.
This is the perfect time to use JADX to decompile the APK. The hosted version of JADX is pretty neat. You can access it here. Just give it the APK and it will give you a zip file containing the decompiled source.
Seeing the following string in multiple places in the decompiled output gave me a good chuckle:
"ModGuard - Protect Your Piracy v1.3 by ill420smoker"
Introducing smali
So what are our options if JADX doesn’t work? We are gonna do the next best thing and decompile the APK into smali code. Think of smali as assembly language. Normally when you compile your Java code into an APK, you end up with .dex files (inside the APK) which aren’t human-readable. So we convert the .dex code into .smali code which is a human-readable representation of the .dex code. You can read more about where smali fits in the compilation life-cycle in this wonderful answer by Antimony on StackOverflow.
This is what smali code looks like:
invoke-interface {p1}, Ljava/util/Iterator;->hasNext()Z
move-result v2
This is equivalent to calling the hasNext method of java.util.Iterator. Z tells us that this call returns a boolean. p1 is called a parameter register and that is what the hasNext() is being called on. move-result v2 moves the return value of this method call to the v2 register.
It probably won’t make a lot of sense right now but I will explain the required bits in a bit. This is just to give you an idea of what to expect. If you are interested, I highly recommend you to take a look at this wonderful presentation about Android code injection. It gives some useful details about smali code as well.
There is also a smali cheat-sheet that was super helpful for me to understand the basics of smali.
Finding the signature location
I had to find out where the &sig= query parameter was being added to in the smali code. It was fairly simple to figure this out using grep.
$ grep -r 'sig=' ./smali/com/
./simple/SimpleApi.smali:    const-string v2, "&sig="
./impl/WAQueryImpl.smali:    const-string v1, "&sig="
I started my exploration from there. I used the output of JADX to explore where this parameter was being populated. This is where having the decompiled source code was really useful. The file structure in the apktool output and jadx output is the same so we can explore the output of JADX to help us figure out where to insert the debug statements in smali.
After exploring the Java output for a while I found the method that was generating the signature. The signature was just an MD5 hash of the rest of the query parameters which were being sent to the server:
private String getMd5Digest(WAQueryParameters wAQueryParameters) {
    // ...
    StringBuilder sb = new StringBuilder(600);
    sb.append("vFdeaRwBTVqdc5CL");
    for (String[] strArr : parameters) {
        sb.append(strArr[0]);
        sb.append(strArr[1]);
    }
    try {
        MessageDigest instance = MessageDigest.getInstance("MD5");
        instance.update(sb.toString().getBytes());
        return String.format("%1$032X", new Object[]{new BigInteger(1, instance.digest())});
    } catch (NoSuchAlgorithmException unused) {
        return "";
    }
}
Now the only issue was I didn’t know what query parameters were being passed to this method. I tried generating an MD5 hash in Python based on the parameters I saw in the URL but I was failing. If only I had a log statement that showed me the value of wAQueryParameters…
Adding logging in smali
The equivalent smali code for the getMd5Digest method was:
.method private getMd5Digest(Lcom.______/WAQueryParameters;)Ljava/lang/String;
    .locals 6

    const/4 v5, 0x1

    .line 1196
    const/4 v5, 0x2

    invoke-interface {p1}, Lcom/____/_____/WAQueryParameters;->getParameters()Ljava/util/List;

    move-result-object p1

    # ..snipped for brevity

.end method
The move-result-object call was moving the output of getParameters to the p1 register. This is where I needed a log statement (or so I thought). I did some research and according to StackOverflow I could do something like this:
const-string v8, "log-tag"
invoke-static {v8, v9}, Landroid/util/Log;->d(Ljava/lang/String;Ljava/lang/String;)I
This would print a debug statement in the logcat output and print the value of the v9 register. There were a couple of things to take care of if I were to use this snippet. I had to make sure that v8 was actually a register declared for local use in the method (go through this PDF if you don’t know what I mean) and that I was not over-writing a value in that register that was going to be used later in the method by the original code. And additionally, I wanted to print the value of p1 and it was not of the java.lang.String type.
The code wasn’t all that hard to modify but it took me an embarrassingly long time to figure out the correct statements to insert in smali.
Firstly, I changed .locals 6 to .locals 7. This is useful because instead of tracing which register I could safely use for my custom code, why not allow the function access to a new register? That way we can be sure that no original code in the method is using the new register.
Then I inserted the following lines:
const-string v6, "YASOOB getMd5Digest"
invoke-static {v6, p1}, Landroid/util/Log;->d(Ljava/lang/String;Ljava/lang/String;)I
Repacking the unpacked APK
After the smali modifications, we have to repack the APK. This isn’t terribly hard if you have the tooling already set up. We will do this in steps.
- Building the APK
If the output of apktool d application.apk was ~/application then simply go to ~ (your home folder) and run:
apktool b application
This will generate an application.apk file in the ~/application/dist folder.
- Signing the APK
Android doesn’t allow you to install unsigned APKs. If you have the Android SDK installed then you already have a debug keystore that you can use to sign an APK. The command for doing that is this:
jarsigner -verbose -sigalg MD5withRSA -digestalg SHA1 -keystore ~/.android/debug.keystore -storepass android ~/application/dist/application.apk androiddebugkey
This will use the debug.keystore file in the ~/.android folder to sign the APK.
- Aligning the APK
You have to make sure to align your APK files using a tool called zipalign. It comes as part of the Android SDK. According to the Android docs:
zipalign is an archive alignment tool that provides important optimization to Android application (APK) files. The purpose is to ensure that all uncompressed data starts with a particular alignment relative to the start of the file.
You can use zipalign like this:
zipalign -v 4 ~/application/dist/application.apk ~/application/dist/application-aligned.apk
This will generate an application-aligned.apk file.
Installing the modified APK & Logging
I used an Android Emulator for this step. Specifically a Pixel 3XL emulator image with API 28 and Android Oreo. Make sure that you use an emulator Android image without Google Play. This is extremely important because otherwise in later steps ADB will give you an error saying adbd cannot run as root in production builds. You can find a detailed solution on StackOverflow.
Once you have an emulator set up you need to make sure that the original APK isn’t installed on the device. It is fairly easy to uninstall an APK using adb. If the package name for the app is com.yasoob.app, you can uninstall it using the following command:
adb uninstall com.yasoob.app
Once it is uninstalled, you can install the modified version:
adb install -r ~/application/dist/application-aligned.apk
Now run the installed app in the emulator and run logcat in a terminal on the host machine:
adb logcat | grep 'YASOOB'
The output of logcat is super noisy and it outputs a lot of stuff we don’t care about. That is why we use grep to only output the debug statements we actually care about.
In my case the output of logcat looked something like this:
YASOOB getMd5Digest: [[Ljava.lang.String;@ea7d7a1, [Ljava.lang.String;@8b00dc6, [Ljava.lang.String;@44c6187, [Ljava.lang.String;@fa6d8b4, [Ljava.lang.String;@f494cdd, [Ljava.lang.String;@78f4052, [Ljava.lang.String;@f038f23, [Ljava.lang.String;@232cc20, [Ljava.lang.String;@a92d9d9, [Ljava.lang.String;@5bd0f9e, [Ljava.lang.String;@e75fa7f, [Ljava.lang.String;@7c88a4c, [Ljava.lang.String;@d4e3a95]
This is exciting and disappointing at the same time. Exciting because the apk didn’t crash (it crashed quite a few times before I figured out the correct smali code for logging a list) and disappointing because Java outputted the references to Strings and not the string values themselves. But hey! At least we made some progress and our repacked APK isn’t crashing!

At this point I merged all of the APK building and installation commands into one huge command so that I don’t have to continuously execute them one by one:
apktool b application && \
jarsigner -verbose -sigalg MD5withRSA -digestalg SHA1 -keystore ~/.android/debug.keystore -storepass android ~/application/dist/application.apk androiddebugkey && \
rm ~/application/dist/application-aligned.apk && \
zipalign -v 4 ~/application/dist/application.apk ~/application/dist/application-aligned.apk && \
adb uninstall com.yasoob.app && \
adb install -r ~/application/dist/application-aligned.apk && \
adb logcat | grep 'YASOOB'
Fixing the debug statement in smali
Ok, we had a working debug statement but it didn’t give us the information we needed. I looked at the smali code again and saw the following statements:
.method private getMd5Digest(Lcom.______/WAQueryParameters;)Ljava/lang/String;
    #--snipped for brevity--
    aget-object v4, v2, v1

    invoke-virtual {v0, v4}, Ljava/lang/StringBuilder;->append(Ljava/lang/String;)Ljava/lang/StringBuilder;

    .line 1211
    const/4 v5, 0x0

    aget-object v2, v2, v3

    invoke-virtual {v0, v2}, Ljava/lang/StringBuilder;->append(Ljava/lang/String;)Ljava/lang/StringBuilder;

    #--snipped for brevity--
.end method
This is where the application was appending the query parameters to a StringBuilder which is eventually used to generate the MD5 hash. Why didn’t I simply put a debug statement here? We know that StringBuilder expects a String so hopefully Java will output the value of String this time instead of the reference.
This is how the modified code looked like:
.method private getMd5Digest(Lcom.______/WAQueryParameters;)Ljava/lang/String;
    #--snipped for brevity--
    aget-object v4, v2, v1

    invoke-virtual {v0, v4}, Ljava/lang/StringBuilder;->append(Ljava/lang/String;)Ljava/lang/StringBuilder;

    # Custom Code YASOOB
    const-string v6, "YASOOB QueryTask->getMd5Digest::FirstAppend"
    invoke-static {v6, v4}, Landroid/util/Log;->d(Ljava/lang/String;Ljava/lang/String;)I
    # Custom Code end

    .line 1211
    const/4 v5, 0x0

    aget-object v2, v2, v3

    invoke-virtual {v0, v2}, Ljava/lang/StringBuilder;->append(Ljava/lang/String;)Ljava/lang/StringBuilder;


    # Custom Code YASOOB
    const-string v6, "YASOOB QueryTask->getMd5Digest::SecondAppend"
    invoke-static {v6, v2}, Landroid/util/Log;->d(Ljava/lang/String;Ljava/lang/String;)I
    # Custom Code end

    #--snipped for brevity--
.end method
While I was at it, I added some more debug statements in a couple of additional places in the same file but different methods. There was one method that was calling this getMd5Digest method and another that outputted the actual API URL with the query parameters. I added a debug statement in both of these.
I rebuilt the APK and started monitoring the logs in logcat:
YASOOB QueryTask->getMd5Digest::FirstAppend: appid
YASOOB QueryTask->getMd5Digest::SecondAppend: ****-*********
YASOOB QueryTask->getMd5Digest::FirstAppend: async
YASOOB QueryTask->getMd5Digest::SecondAppend: 0.25
YASOOB QueryTask->getMd5Digest::FirstAppend: banners
YASOOB QueryTask->getMd5Digest::SecondAppend: image
YASOOB QueryTask->getMd5Digest::FirstAppend: countrycode
YASOOB QueryTask->getMd5Digest::SecondAppend: US
YASOOB QueryTask->getMd5Digest::FirstAppend: device
YASOOB QueryTask->getMd5Digest::SecondAppend: Android
YASOOB QueryTask->getMd5Digest::FirstAppend: format
YASOOB QueryTask->getMd5Digest::SecondAppend: png,plaintext,imagemap,minput,sound
YASOOB QueryTask->getMd5Digest::FirstAppend: input
YASOOB QueryTask->getMd5Digest::SecondAppend: 1
YASOOB QueryTask->getMd5Digest::FirstAppend: languagecode
YASOOB QueryTask->getMd5Digest::SecondAppend: en
YASOOB QueryTask->getMd5Digest::FirstAppend: mag
YASOOB QueryTask->getMd5Digest::SecondAppend: 3.8500000000000005
YASOOB QueryTask->getMd5Digest::FirstAppend: maxwidth
YASOOB QueryTask->getMd5Digest::SecondAppend: 2509
YASOOB QueryTask->getMd5Digest::FirstAppend: reinterpret
YASOOB QueryTask->getMd5Digest::SecondAppend: true
YASOOB QueryTask->getMd5Digest::FirstAppend: scantimeout
YASOOB QueryTask->getMd5Digest::SecondAppend: 0.5
YASOOB QueryTask->getMd5Digest::FirstAppend: sidebarlinks
YASOOB QueryTask->getMd5Digest::SecondAppend: true
YASOOB QueryTask->getMd5Digest::FirstAppend: width
YASOOB QueryTask->getMd5Digest::SecondAppend: 1328
YASOOB QueryTask->setSignatureParameter: 7A1AE2AD7F5F81C85B8A4D0FC2723C8C
YASOOB WAQueryImpl->toString: &input=1&banners=image&format=png,plaintext,imagemap,minput,sound&async=0.25&scantimeout=0.5&countrycode=US&languagecode=en&sidebarlinks=true&reinterpret=true&width=1328&maxwidth=2509&mag=3.8500000000000005&device=Android&sig=7A1AE2AD7F5F81C85B8A4D0FC2723C8C
This is amazing! Now I knew which parameters, and in what order, are being used to generate the MD5 hash. I quickly whipped out my trusty Visual Studio Code and wrote down a super simple Python script for generating this hash for me based on custom inputs. This is what I came up with:
import hashlib

url = "https://api.********.com/v2/query.jsp?"
sb = hashlib.md5()
sb.update("vFdeaRwBTVqdc5CL".encode())

input = "4x^3+3x^2+2x"
data = {
    "appid":"*****-********",
    "async":"0.25",
    "banners":"image",
    "countrycode":"US",
    "device":"Android",
    "format":"png,plaintext,imagemap,minput,sound",
    "input": input,
    "languagecode":"en",
    "mag":"3.8500000000000005",
    "maxwidth":"2509",
    "reinterpret":"true",
    "scantimeout":"0.5",
    "sidebarlinks":"true",
    "width":"1328"
}

for k, v in data.items():
    sb.update(k.encode())
    sb.update(v.encode())
    base_url += f"&{k}={v}"

url += f"&sig={sb.hexdigest()}"
print(url)
I ran the program and the resulting URL was the same one I was seeing in mitmproxy. I modified the query, ran the Python program again and the resulting URL worked!

This is where I stopped my exploration. The original aims were to figure out how the sig hash was being generated and how to reverse-engineer the API to make custom query calls. I was able to accomplish both of those aims and my curiosity was satisfied.
I placed the code in an “old projects” folder, looked at the clock and sighed. I had promised myself that I would sleep at midnight but the clock was showing 4:30 am. Nevertheless, it was time for some hard-earned rest.

Useful Tips
-
If you don’t know what the smali output for some Java code is supposed to be, create a new Android project, write down the code in Java and see the resulting smali using
apktool. There is no better way to learn smali than actually seeing what your own Java (or Kotlin) code compiles to. -
There might be situations where a function/method is using the maximum allowed registers and you have no idea how to output a debug log. In those scenarios, you have to be a bit more creative and do some register shifting. The following commands will be super useful in those cases:
move-object vx,vy
move-object vy,vx
This is moving the object reference from vy to vx and back. This will allow you to temporarily shuffle register values, do your debugging, and then put the original register values back.
-
If for some reason your repacked APK is giving you an error and not working, try to repack the APK without any modifications first. This will make sure that your modifications aren’t the reason why the repacked APK isn’t working. It is also really useful to use
adb logcatwithoutgrepwhen debugging issues.
Conclusion
That is all for today. If you learned something new in this post please subscribe to my weekly newsletter (scroll a bit further for the form) or the RSS feed for the website. You can also follow me on Twitter where I usually post an update about new articles.
Take care and I will see you in a future article! 👋
Arcus
Khalid Nuur
Yasoob
In reply to Khalid Nuur
levy
Josiah
Daniel
Toby
Vlad