
How to Use Apple Vision Framework via PyObjC for Text Recognition
Introduction
This post has been sitting in my drafts folder for a long time. Sometime earlier this year I saw a job posting where someone wanted to use Apple’s vision framework to do text recognition. I wasn’t interested in the job but I was curious about the Vision framework as I had never used it before.
In this article, I will take you through how I used PyObjC to interface with the Apple Vision Framework and create a script to detect text in images. In the process, you will learn how PyObjC works and how it maps functions and methods from Objective C to Python.
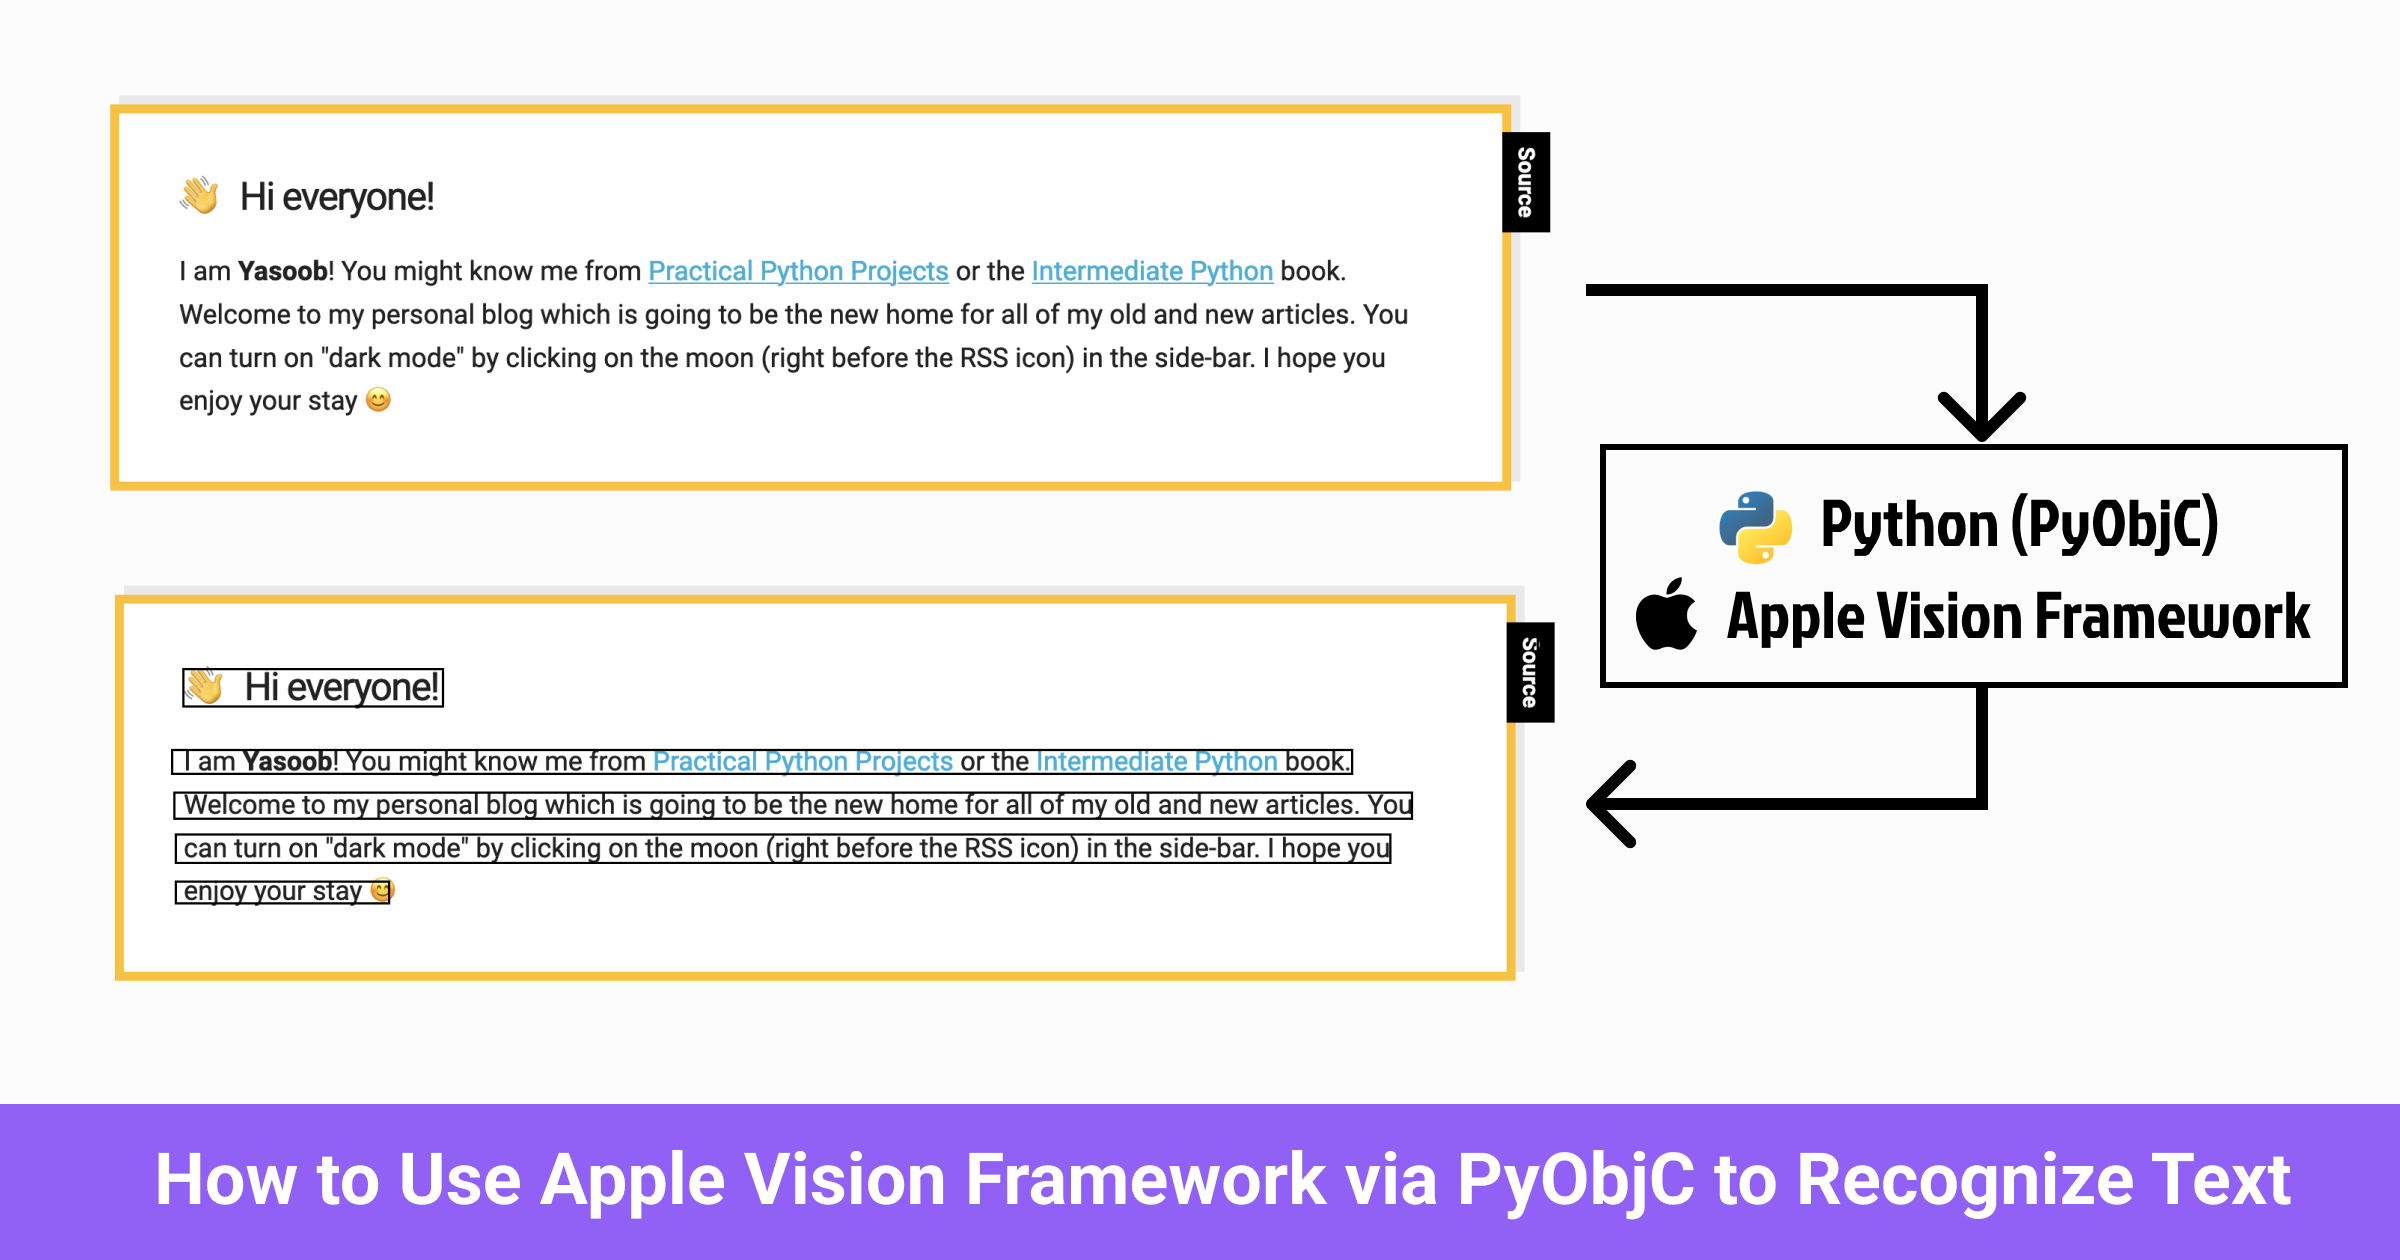
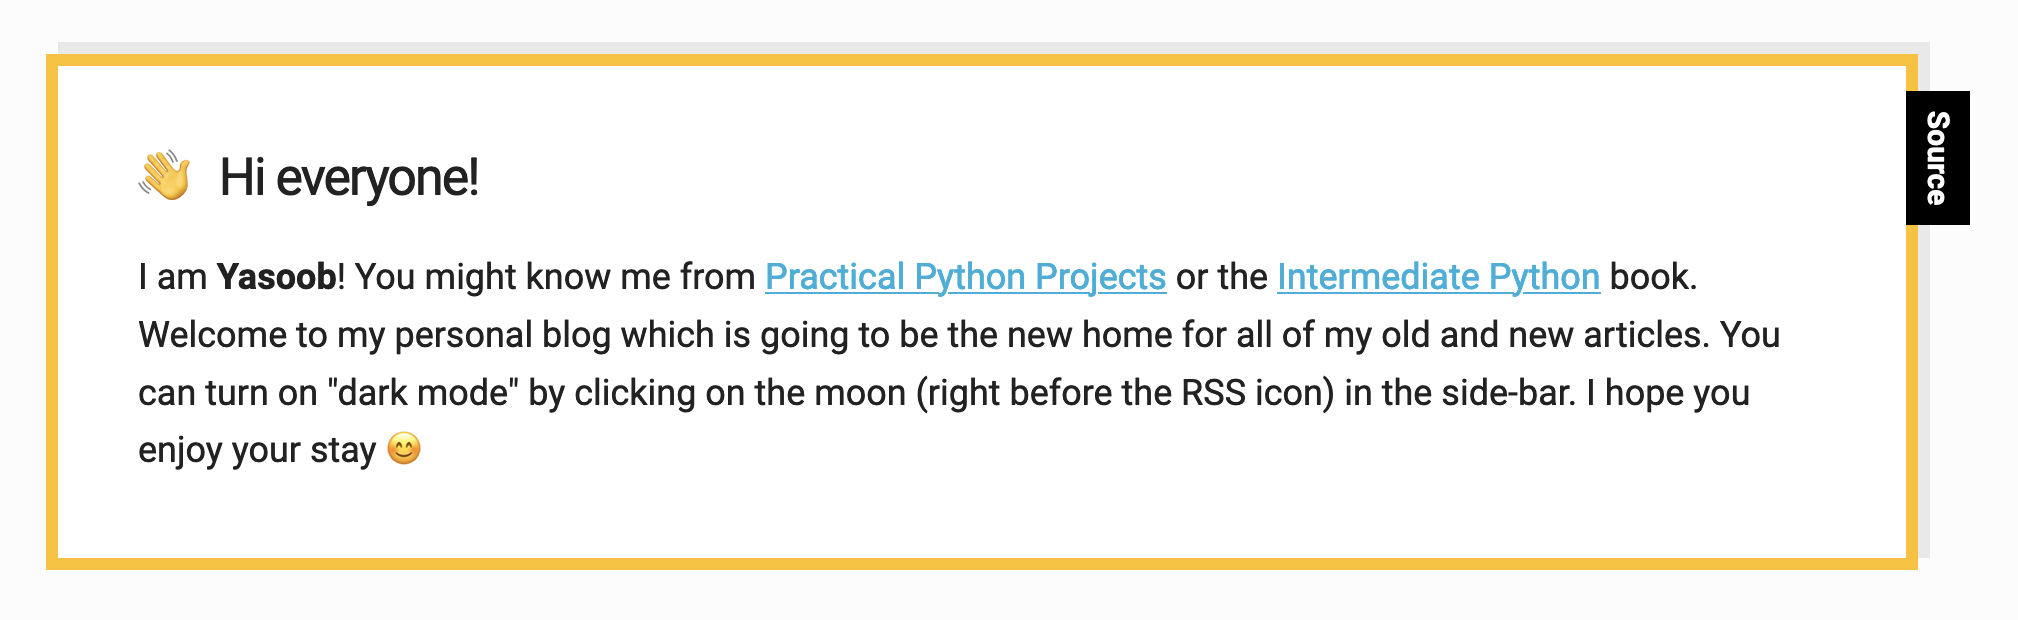
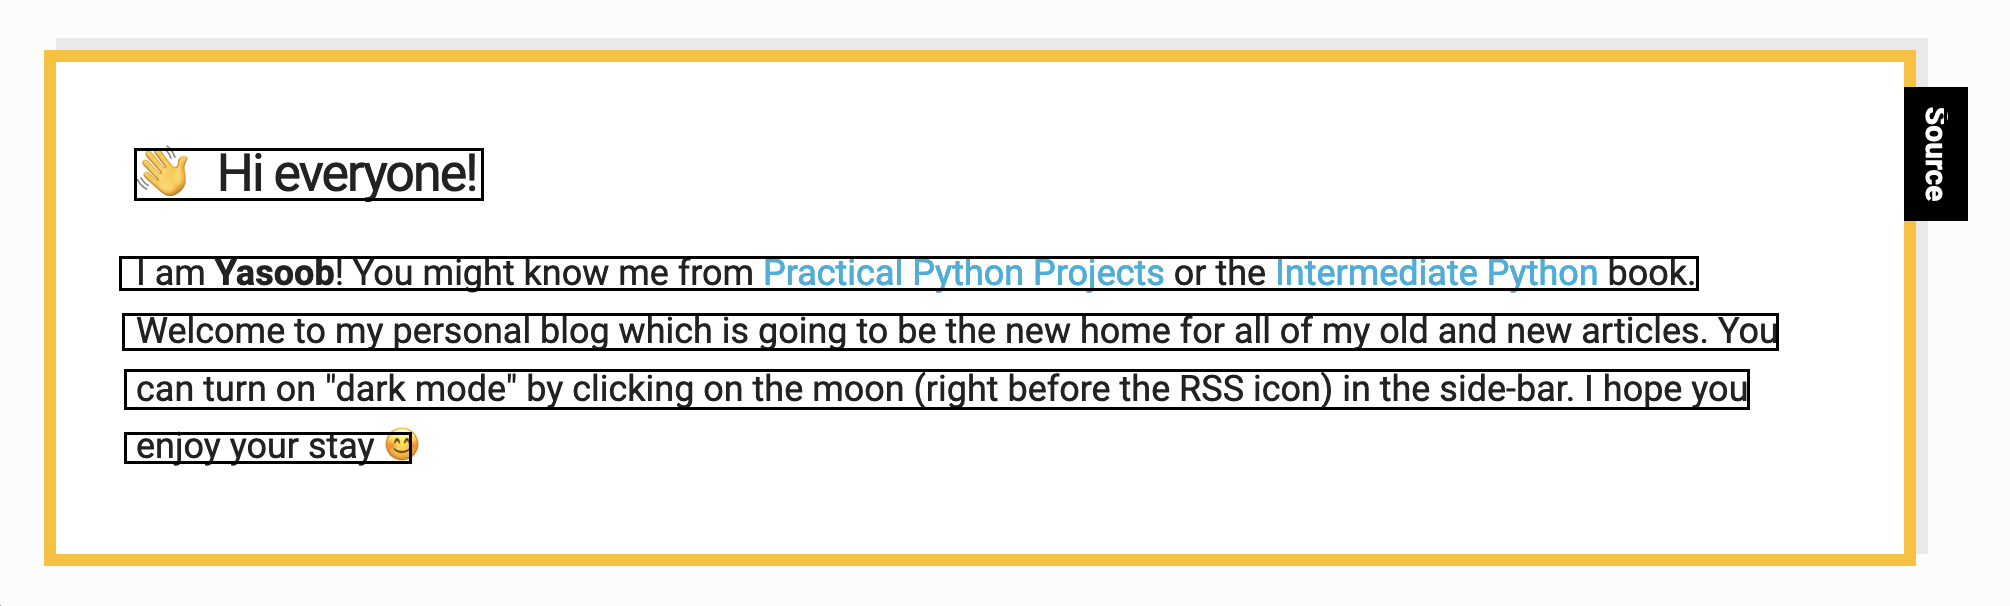
By the end of this article, you will know enough to be able to write a script that takes such an image as input:
And uses Vision Framework to run OCR over it and produce an output image with overlayed bounding boxes:
And also print the detected text in the terminal:
• Hi everyone!
I am Yasoob! You might know me from Practical Python Projects or the Intermediate Python book.
Welcome to my personal blog which is going to be the new home for all of my old and new articles. You
can turn on "dark mode" by clicking on the moon (right before the RSS icon) in the side-bar. I hope you
enjoy your stay g
Source
So without any further ado, let’s begin!
Disclaimer: While I was halfway through this project, I discovered the wonderful osxphotos project on GitHub that also interfaces with the Vision Framework. I developed most of the code in this article independently but I did take a lot of inspiration from the osxphotos project once I found out about it.
What is Apple Vision Framework
It is a proprietary framework from Apple that is specifically designed for use with iOS and macOS. It provides a range of pre-trained models and APIs that can be used to quickly and easily add image analysis and computer vision capabilities to an app.
I am not an Objective C or Swift programmer so when I heard about this framework, my very next question was whether I could use it from Python. Turns out, the framework is not exposed through a dedicated Python library. However, I could use it via PyObjC. If you have never used or heard about PyObjC, it provides a bridge between Python and Objective C and also provides bindings to most Apple frameworks on macOS.
How to use Apple Vision Framework with Python
We will be relying on the following libraries in this tutorial:
You can install both of these using the following PIP command:
$ pip install Pillow pyobjc
As I already mentioned, PyObjC is a bridge between Python and Objective-C. It allows full-featured Cocoa applications to be written in pure Python. It provides wrappers for most of the Objective C classes and frameworks on Apple machines. We will be relying on it to make use of native Apple frameworks and classes via Python.
Create a new Python file and add the following imports:
import Quartz
from Foundation import NSURL, NSRange
import Vision
from PIL import Image, ImageDraw
The Quartz, Vision, and Foundation packages all come from the pyobjc library. They provide access to the following features:
- Quartz (provides tools for working with graphics on Macs)
- Foundation (provides access to different core data types)
- Vision (provides access to the vision framework)
I will be basing this whole tutorial around the official Apple tutorial for recognizing text in images using Vision Framework. The only difference will be that the official docs use Swift whereas I will use Python.
The text recognition process broadly involves using VNRecognizeTextRequest and VNImageRequestHandler. The VNRecognizeTextRequest takes in an image-based input and finds and extracts text from that image and the VNImageRequestHandler performs this request.
According to Apple docs, the code for doing text recognition looks like this:
// Get the CGImage on which to perform requests.
guard let cgImage = UIImage(named: "snapshot")?.cgImage else { return }

// Create a new image-request handler.
let requestHandler = VNImageRequestHandler(cgImage: cgImage)

// Create a new request to recognize text.
let request = VNRecognizeTextRequest(completionHandler: recognizeTextHandler)

do {
    // Perform the text-recognition request.
    try requestHandler.perform([request])
} catch {
    print("Unable to perform the requests: \(error).")
}
and the recognizeTextHandler (for processing the response) looks something like this:
func recognizeTextHandler(request: VNRequest, error: Error?) {
    guard let observations =
            request.results as? [VNRecognizedTextObservation] else {
        return
    }
    let recognizedStrings = observations.compactMap { observation in
        // Return the string of the top VNRecognizedText instance.
        return observation.topCandidates(1).first?.string
    }

    // Process the recognized strings.
    processResults(recognizedStrings)
}
Our goal is to replicate all of these steps using PyObjC. The first issue is that the Apple docs make use of UIImage which is a part of UIKit. However, pyobjc does not currently provide a wrapper for this framework. I had to do some digging to find a reliable source for this claim. The official pyobjc docs mention it but it took me a while to find this page:

This means that I have to find another way to get a CGImage instance from a file on the disc.
After some research, I found that I can initialize a VNImageRequestHandler using a CIImage and then create a CIImage from a file on disc. The code looks something like this:
# Get the CIImage on which to perform requests.
input_url = NSURL.fileURLWithPath_(img_path)
input_image = Quartz.CIImage.imageWithContentsOfURL_(input_url)

# Create a new image-request handler.
request_handler = Vision.VNImageRequestHandler.alloc().initWithCIImage_options_(
        input_image, None
)
This code might look fairly verbose compared to the Swift example but if you try to understand how pyobjc works, it will start making sense. Read this page of the pyobjc docs and then come back. Now let’s explore the above code step by step.
I start by creating an NSURL by passing it a path to the image file I want to perform the OCR on. PyObjC appends a trailing _ on all method calls (not function calls) that take an argument. Next, I pass the NSURL into the imageWithContentsOfURL_ method of CIImage. Finally, I pass this CIImage to the initWithCIImage_options_ method of VNImageRequestHandler.
Objective C does object initialization in two stages. In the first step, it allocates some space and then it initializes an object. Swift masks this whole process. PyObjC allows us to follow the same two-step procedure by first calling alloc() and then calling a modified form of init depending on our needs.
According to the official docs, VNImageRequestHandler has quite a few initializers:
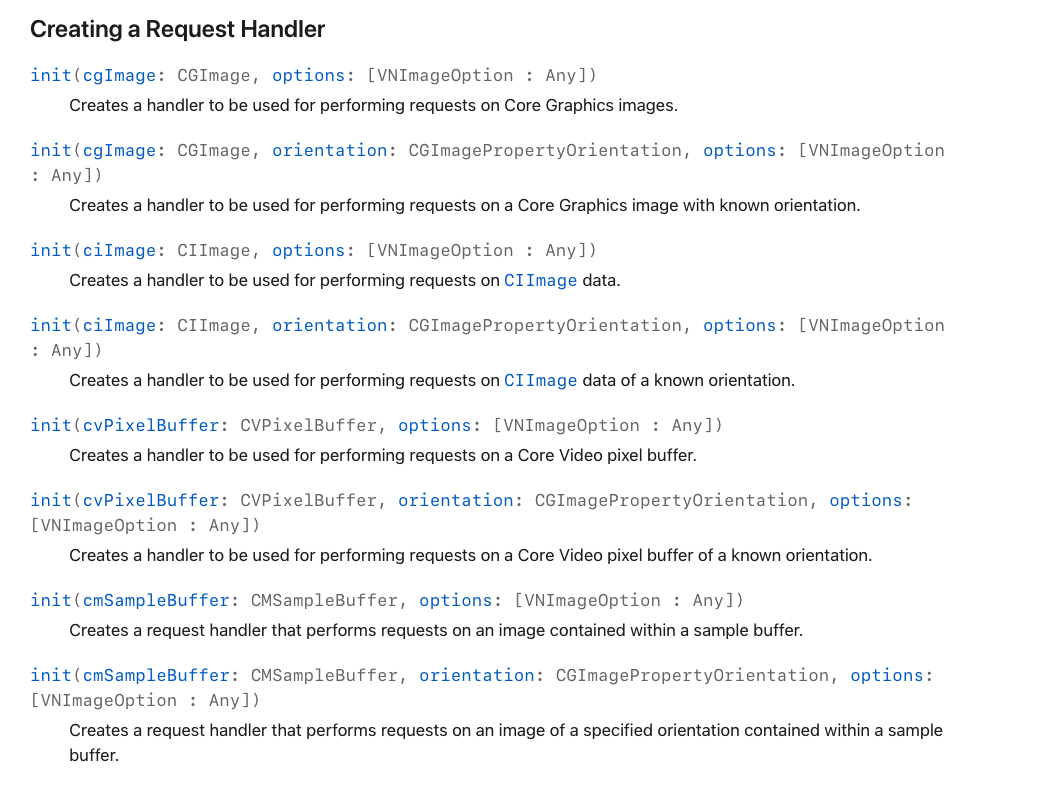
PyObjC allows us to use any of these initializers by appending With to init and then following that with the argument names and appending a _ to each argument name. For instance, if I want to call init with ciImage and options arguments, I can use initWithCIImage_options_ and if I want to call init with ciImage, orientation and options arguments, I can use initWithCIImage_orientation_options_. Once you internalize this format, you will be able to convert any Objective C method/function call to pyobjc format with little to no effort.
Next, I need to create a Python-based recognizeTextHandler function. This is what I ended up with:
def recognize_text_handler(request, error):
    observations = request.results()
    results = []
    for observation in observations:
        recognized_text = observation.topCandidates_(1)[0]
        results.append([recognized_text.string(), recognized_text.confidence()])
    print(results)
Now I need to create a new Vision request and pass recognizeTextHandler to it:
# Create a new request to recognize text.
request = Vision.VNRecognizeTextRequest.alloc().initWithCompletionHandler_(recognize_text_handler)
I know I can use initWithCompletionHandler because VNRecognizeTextRequest inherits from the VNRequest superclass and that superclass has a init method that takes a completionHandler argument.
The only thing left to do is to initiate the request. I can do that by calling the Python equivalent of perform method:
# Perform the text-recognition request.
error = request_handler.performRequests_error_([vision_request], None)
Here is the complete Python code so far:
import Quartz
from Foundation import NSURL
import Vision


def recognize_text_handler(request, error):
    observations = request.results()
    results = []
    for observation in observations:
        # Return the string of the top VNRecognizedText instance.
        recognized_text = observation.topCandidates_(1)[0]
        results.append([recognized_text.string(), recognized_text.confidence()])
    for result in results:
        print(result)
    # TODO Process the recognized strings.

img_path = "./screenshot.png"

# Get the CIImage on which to perform requests.
input_url = NSURL.fileURLWithPath_(img_path)
input_image = Quartz.CIImage.imageWithContentsOfURL_(input_url)

# Create a new image-request handler.
request_handler = Vision.VNImageRequestHandler.alloc().initWithCIImage_options_(
        input_image, None
)

# Create a new request to recognize text.
request = Vision.VNRecognizeTextRequest.alloc().initWithCompletionHandler_(recognize_text_handler)

# Perform the text-recognition request.
error = request_handler.performRequests_error_([request], None)
If you run this code, you should see the detected strings in the terminal. I used the following image for testing (taken from my homepage):
And this is the output I saw in the terminal:
['• Hi everyone!', 0.5]
['I am Yasoob! You might know me from Practical Python Projects or the Intermediate Python book.', 1.0]
['Welcome to my personal blog which is going to be the new home for all of my old and new articles. You', 1.0]
['can turn on "dark mode" by clicking on the moon (right before the RSS icon) in the side-bar. I hope you', 0.5]
['enjoy your stay g', 1.0]
['Source', 1.0]
Displaying detected bounding boxes using Pillow
I have been able to successfully detect text in an image using Vision Framework but it is very hard to visualize where Vision detected the said text in the image. I can fix that by overlaying the detected bounding boxes on the original image. Pillow](https://pillow.readthedocs.io/en/stable/index.html) makes this overlaying job very convenient.
It turns out, the observation.topCandidates_ method call returns a VNRecognizedText object and these objects have a boundingBoxForRange method that returns the bounding box around the range of characters in an observation. This is exactly what I need.
This is what I used to get the bounding box:
from Foundation import NSRange

# ...

box_range = NSRange(0, len(recognized_text.string()))
boxObservation = recognized_text.boundingBoxForRange_error_(box_range, None)
The boxObservation is of type CGRect. However, I can not use these coordinates directly as they are in the normalized coordinates space. This means that they range from -1 to 1. I need to convert them to image coordinates first. This is possible via the VNImageRectForNormalizedRect function. This function takes in the normalized coordinates and the dimensions of an image and maps the normalized coordinates in the image coordinate space.
# Convert the rectangle from normalized coordinates to image coordinates.
image_width, image_height = input_image.extent().size.width, input_image.extent().size.height
rect = Vision.VNImageRectForNormalizedRect(boundingBox, image_width, image_height)
Let’s put this rect in the results array and create a new function to process all the results and overlay them on the input image:
def recognize_text_handler(request, error):
    # --snip--
    for observation in observations:
        # --snip--
        results.append([recognized_text.string(), recognized_text.confidence(), rect])
    visualize_results(results)

def visualize_results(results):
    image = Image.open(img_path)
    draw=ImageDraw.Draw(image)

    for result in results:
        # TODO: Draw the result bounding box

    image.show()
After doing a little digging, it appears that I can get the x, and y coordinates of the rect via the following functions:
CGRectGetMinXCGRectGetMinYCGRectGetMaxXCGRectGetMaxY
I can update the visualization code to get the appropriate x, and y coordinates and draw them over the image. I replaced the TODO comment with this code:
rect = result[-1]
min_x = Quartz.CGRectGetMinX(rect)
min_y = Quartz.CGRectGetMinY(rect)
max_x = Quartz.CGRectGetMaxX(rect)
max_y = Quartz.CGRectGetMaxY(rect)
draw.rectangle([(min_x, min_y),(max_x, max_y)],outline="black", width=3)
After saving and running the code, I got this output:
This doesn’t seem right! Upon closer inspection, I observed that the y coordinates are upside down. Took me a while to figure out that I could easily fix that by subtracting the y-coordinates from the image height:
min_y = input_image.extent().size.height - Quartz.CGRectGetMinY(rect)
max_y = input_image.extent().size.height - Quartz.CGRectGetMaxY(rect)
I am not entirely certain why the coordinates are flipped. I did some research and it just appears that the Core Graphics library simply returns flipped Y coordinates and we need to compensate for it ourselves.
This is the complete code so far (with some minor modifications):
import Quartz
from Foundation import NSURL, NSRange
import Vision
from PIL import Image, ImageDraw


def recognize_text_handler(request, error):
    observations = request.results()
    results = []
    for observation in observations:
        # Return the string of the top VNRecognizedText instance.
        recognized_text = observation.topCandidates_(1)[0]

        # Find the bounding-box observation for the string range.
        box_range = NSRange(0, len(recognized_text.string()))
        boxObservation = recognized_text.boundingBoxForRange_error_(box_range, None)

        # Get the normalized CGRect value.
        boundingBox = boxObservation[0].boundingBox()

        # Convert the rectangle from normalized coordinates to image coordinates.
        image_width, image_height = input_image.extent().size.width, input_image.extent().size.height
        rect = Vision.VNImageRectForNormalizedRect(boundingBox, image_width, image_height)

        results.append([recognized_text.string(), recognized_text.confidence(), rect])

    # Print out the results in the terminal for inspection
    for result in results:
        print(result[0])

    visualize_results(results)

def visualize_results(results):
    image = Image.open(img_path)
    draw=ImageDraw.Draw(image)
    for result in results:
        rect = result[-1]
        min_x = Quartz.CGRectGetMinX(rect)
        max_x = Quartz.CGRectGetMaxX(rect)

        # The y coordinates need to be flipped
        min_y = input_image.extent().size.height - Quartz.CGRectGetMinY(rect)
        max_y = input_image.extent().size.height - Quartz.CGRectGetMaxY(rect)

        # Draw the observation rect on the image
        draw.rectangle([(min_x, min_y),(max_x, max_y)],outline="black", width=3)

    # Display the final image with all the observations overlayed
    image.show()

img_path = "./screenshot.png"

# Get the CIImage on which to perform requests.
input_url = NSURL.fileURLWithPath_(img_path)
input_image = Quartz.CIImage.imageWithContentsOfURL_(input_url)

# Create a new image-request handler.
request_handler = Vision.VNImageRequestHandler.alloc().initWithCIImage_options_(
    input_image, None
)

# Create a new request to recognize text.
request = Vision.VNRecognizeTextRequest.alloc().initWithCompletionHandler_(recognize_text_handler)

# Perform the text-recognition request.
error = request_handler.performRequests_error_([request], None)

# Deallocate memory
request_handler.dealloc()
request.dealloc()
Save and run the code and you should see something similar to this:
Conclusion
I hope you learned a little bit about how to use PyObjC and how to interact with the native Objective C classes, functions, and frameworks. It was a very interesting journey for me as I had never worked with Quartz, Vision, and Core Graphics libraries before. I had no clue about how PyObjC worked either. I just had a vision (no pun intended) of being able to use the Vision framework for text detection and learned everything else on the fly.
Would I use PyObjC for programming against Objective C frameworks again? It depends. If I have to develop a very complex application that is entirely based on the Objective C frameworks then I might just use Swift as the tooling is much better. However, if the Objective C frameworks are just a small part of the application then I might just go ahead and use PyObjC. A big reason for this apart from the dedicated tooling is that sometimes it can be hard to debug errors in PyObjC-based code. I had to pull my hair quite a bit while developing this sample application and I would not want to go through that same experience on a bigger project with considerably more complex PyObjC code.
Sick-E