
A guide to finding books in images using Python and OpenCV.
This is a guest post by Adrian Rosebrock from PyImageSearch.com, a blog all about computer vision, image processing, and building image search engines.
I always tell people that if they want to learn to write well they need to do two things:
- Practice writing often.
- Read. A lot.
It seems strange, doesn’t it? How reading often can dramatically improve your writing ability.
But it’s absolutely true.
Reading authors that like you can actually engrain their vernacular into your own writing style. And eventually, with enough practice, you can develop a style and voice of your own.
All that said, between the PyImageSearch blog, my book Practical Python and OpenCV, and PyImageSearch Gurus (a computer vision course I’m developing), I write (and read) a lot.
There will be moments when I’m literally walking down the street, coffee in hand, when a stroke of inspiration will strike me like a bolt of lightning.
And less I let the fleeting thought disappear into the abyss of my subconscious, I have to stop in the middle of my walk, pull out my iPhone, and compose a blog post on my tiny screen and hard-to-use keyboard.
Is it a bit annoying at times? Yes but. But it’s a lot of fun. Both reading and writing are a passion of mine - and one passion fuels the other.
So it should come as no surprise that my coffee table is covered in books right now.
As I’m sitting here looking at my coffee table, I decided, hey, why not create a Python script to count the number of books on my table? That would be pretty cool, right? I could merge two of my passions - books and computer vision.
And when Yasoob invited me to do a guest post, I couldn’t help but accept. In the rest of this blog post I will show you how to create a Python script to count the number of books in an image using OpenCV.
What are we going to do?
Let’s start by taking a look at our example image we are going to count books in:
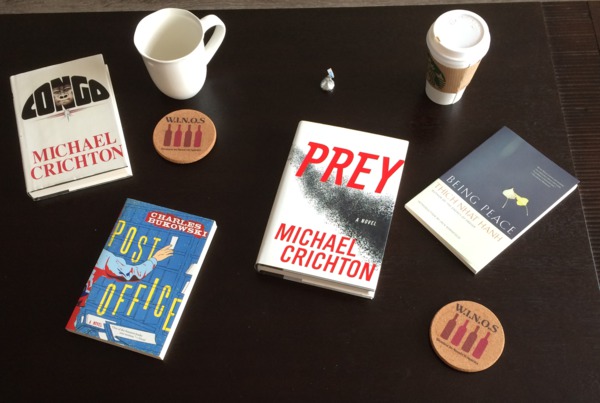
We see there are four books in the image, along with various “distractors” such as a coffee mug, a Starbucks cup, multiple coasters, and a piece of candy.
Our goal here is to find the four books in the image while ignoring the distractors.
How are we going to do that?
Read on to find out!
What libraries will we need?
In order to build our system to find and detect books in images, we’ll be utilizing two main libraries:
Make sure you have these libraries installed!
Finding books in images using Python and OpenCV.
Let’s go ahead and get started.
Open up your favorite code editor, create a new file named find_books.py, and let’s get started:
# import the necessary packages
import numpy as np
import cv2

# load the image, convert it to grayscale, and blur it
image = cv2.imread("example.jpg")
gray = cv2.cvtColor(image, cv2.COLOR_BGR2GRAY)
gray = cv2.GaussianBlur(gray, (3, 3), 0)
cv2.imshow("Gray", gray)
cv2.waitKey(0)
We’ll start by importing our required libraries. We’ll be using NumPy for numerical processing and cv2 for our OpenCV bindings.
Loading an image off disk is handled by the cv2.imread function. Here we are simply loading our image off disk, followed by converting it from the Red, Green, Blue (RGB) color space to grayscale.
We’ll also blur the image slightly to reduce high frequency noise and increase the accuracy of our code used to find books later in this post.
After executing our code, our output should look like this:

Here you can see that we have loaded the image off disk, converted it to grayscale, and blurred it slightly.
Now, let’s detect edges (i.e outlines) of the objects in the image:
# detect edges in the image
edged = cv2.Canny(gray, 10, 250)
cv2.imshow("Edged", edged)
cv2.waitKey(0)
Our edged image now looks like this:
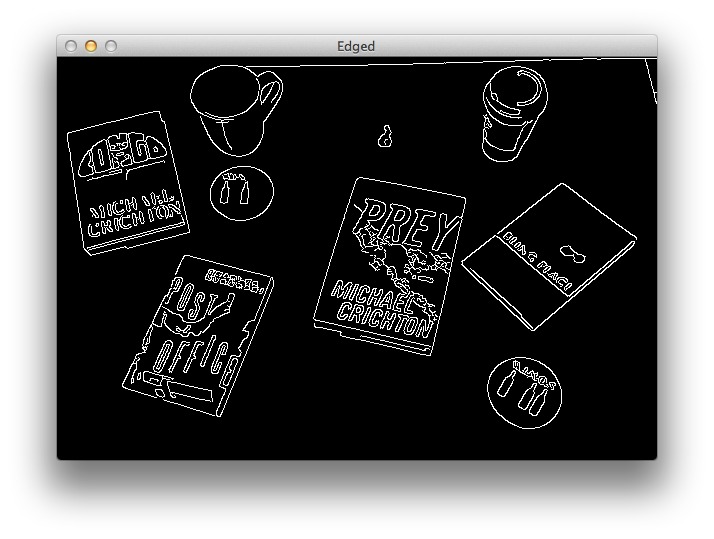
We have clearly found the outlines of the objects in the images. However, you’ll notice that some of the outlines are not “clean” and complete. There are gaps in between the outlines that we need to close in order to successfully detect our books.
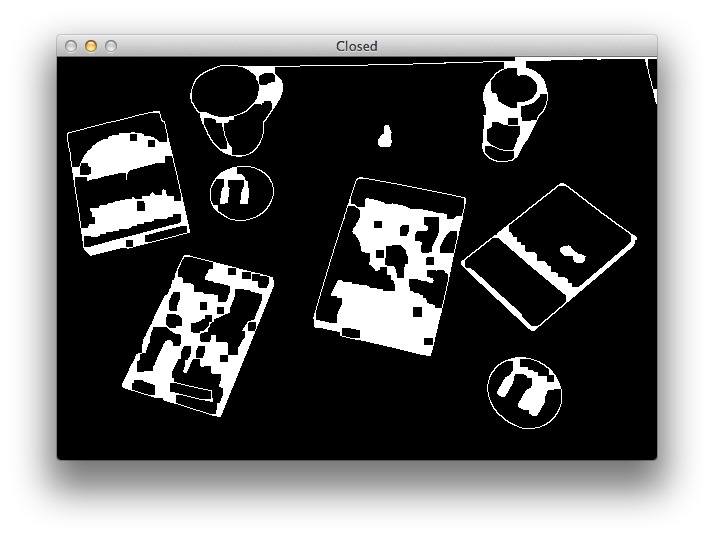
To solve this, we’ll apply a “closing” operation to close the gaps between the white pixels in the image:
# construct and apply a closing kernel to 'close' gaps between 'white'
# pixels
kernel = cv2.getStructuringElement(cv2.MORPH_RECT, (7, 7))
closed = cv2.morphologyEx(edged, cv2.MORPH_CLOSE, kernel)
cv2.imshow("Closed", closed)
cv2.waitKey(0)
Sure enough, the gaps in the outlines have been closed:
The next step is to actually detect the outlines of the objects in the image. We’ll use the cv2.findContours function for that:
# find contours (i.e. the 'outlines') in the image and initialize the
# total number of books found
(cnts, _) = cv2.findContours(closed.copy(), cv2.RETR_EXTERNAL, cv2.CHAIN_APPROX_SIMPLE)
total = 0
Let’s take a second and consider the geometry of a book.
A book is a rectangle. And a rectangle has four vertices. Therefore, if we examine a contour and find that it has four vertices, then we can assume it is a book and not one of the distractors in the image.
To check if a contour is a book or not, we need to loop over each of the contours individually:
# loop over the contours
for c in cnts:
  # approximate the contour
  peri = cv2.arcLength(c, True)
  approx = cv2.approxPolyDP(c, 0.02 * peri, True)

  # if the approximated contour has four points, then assume that the
  # contour is a book -- a book is a rectangle and thus has four vertices
  if len(approx) == 4:
    cv2.drawContours(image, [approx], -1, (0, 255, 0), 4)
    total += 1
This code block is where all the magic happens. For each of the contours we compute the perimeter using cv2.arcLength and then approximate the contour using cv2.approxPolyDP.
The reason we approximate the contour is because the outline may not be a perfect rectangle. Due to noise when the photo was captured or shadows in the image, it is possible (and even very likely) that the book will not have exactly four vertices. By approximating the contour we can ensure we are able to side-step this problem.
Lastly, we make a check to see if the approximated contour does indeed have four vertices. If it does, then we draw the contour surrounding the book and then increment the total number of books counter.
We’ll wrap this example up by writing the total number of books found to the terminal and displaying the output image:
# display the output
print "I found {0} books in that image".format(total)
cv2.imshow("Output", image)
cv2.waitKey(0)
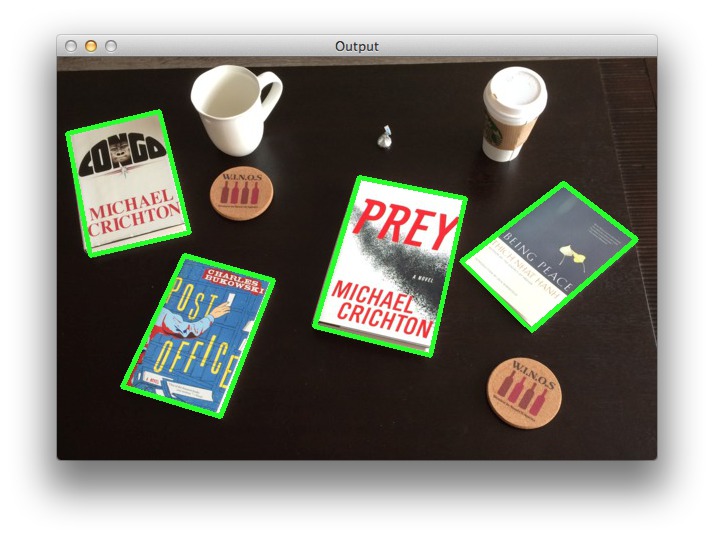
At this point our output image should look like this:
And our terminal does indeed show that we have successfully found the four books in the image will ignoring the other distractor objects:
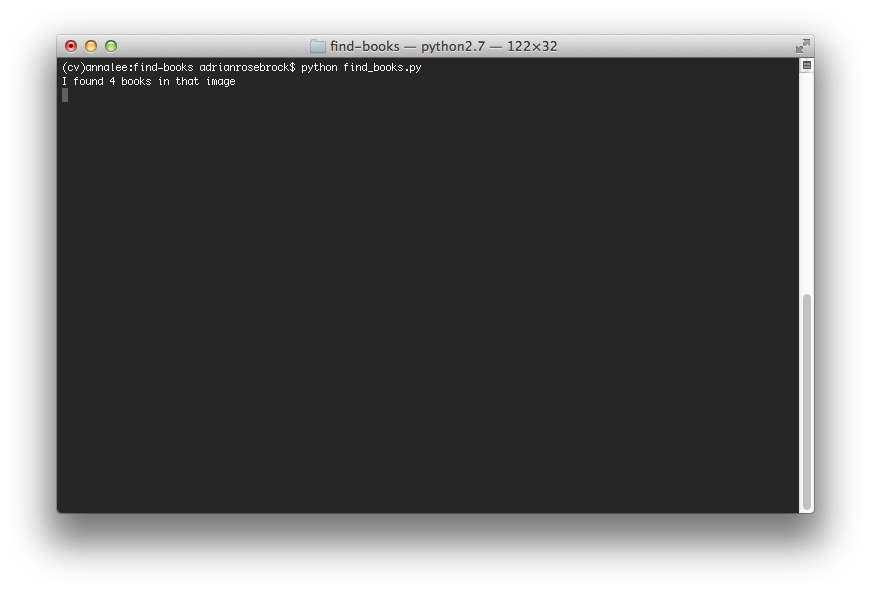
To execute the script yourself, open up a terminal and execute the following commnd:
$ python find_books.py
Summary
In this blog post you learned how to find books in images using simple image processing and computer vision techniques with Python and OpenCV.
In review, our approach was to:
- Load the image from disk and convert it to grayscale.
- Blur the image slightly.
- Apply the Canny edge detector to detect edges (i.e. outlines) of the objects in the image.
- Apply a closing morphological operation to close any gaps in the outlines.
- Find the contours of the objects in the image.
- Apply contour approximation to determine if the contour was a rectangle, and thus a book.
And that’s all there is to it!
I hope you enjoyed this blog post! And a big thanks to Yasoob for giving me this opportunity! If you’re interested in learning more about myself and computer vision, check out the PyImageSearch blog.
What are the next steps?
We are only scratching the surface of what we can do with computer vision and image processing. Finding contours is just the start.
If you’re interested in learning how to detect faces in images, track objects in video, or handwriting recognition, take a look at my book, Practical Python and OpenCV. Yasoob has written a review about one of my courses as well.
Downloads:
To download the source code and example images used in this article, use this link.
Guys I hope that you enjoyed this interesting intro to image processing in Python and OpenCV. I am sure that there would be more posts like this in future. If you have any comments and feedback do comment below.
See you till next time.
eneskemalergin