
Kivy 101: How to Use BoxLayouts
This was a guest post by Mike Driscoll.
Recently I’ve started learning about Kivy, a Python Natural User Interface (NUI) toolkit. As I understand it, Kivy is kind of a spiritual successor to pyMT, which you can read more about here. In this article, we will be learning how Kivy handles layout management. While you can position widgets using x/y coordinates, in every GUI toolkit I’ve used, it’s almost always better to use some kind of layout management that the toolkit provides. This allows the widgets to resize and move appropriately as the user changes the window’s size. In Kivy, these things Layouts. If you’ve used wxPython, they are analogous to wxPython’s sizers.
I should also note that Kivy can do layouts in two different ways. The first way is to do Layouts with Python code only. The second way is to use a mixture of Python and Kv language. This is to promote the model-view-controller way of doing things. It looks kind of like CSS and reminds me a little of wxPython and XRC. We will look at how to use both methods in this article. While Kivy supports multiple types of Layouts, this article will be focusing only on the BoxLayout. We will show how to nest BoxLayouts.
Kivy, Python and BoxLayout
Creating a BoxLayout in Kivy using Python is actually pretty easy and quite intuitive. We’ll start out with a code example and then follow the code with an explanation. Let’s get started!
import kivy
import random

from kivy.app import App
from kivy.uix.button import Button
from kivy.uix.boxlayout import BoxLayout

red = [1,0,0,1]
green = [0,1,0,1]
blue =  [0,0,1,1]
purple = [1,0,1,1]

########################################################################
class HBoxLayoutExample(App):
    """
    Horizontally oriented BoxLayout example class
    """

    #----------------------------------------------------------------------
    def build(self):
        """
        Horizontal BoxLayout example
        """
        layout = BoxLayout(padding=10)
        colors = [red, green, blue, purple]

        for i in range(5):
            btn = Button(text="Button #%s" % (i+1),
                         background_color=random.choice(colors)
                         )

            layout.add_widget(btn)
        return layout

########################################################################
class VBoxLayoutExample(App):
    """
    Vertical oriented BoxLayout example class
    """

    #----------------------------------------------------------------------
    def setOrientation(self, orient):
        """"""
        self.orient = orient

    #----------------------------------------------------------------------
    def build(self):
        """"""
        layout = BoxLayout(padding=10, orientation=self.orient)

        for i in range(5):
            btn = Button(text="Button #%s" % (i+1) )
            layout.add_widget(btn)
        return layout

#----------------------------------------------------------------------
if __name__ == "__main__":
    app = HBoxLayoutExample()
    #app = VBoxLayoutExample()
    #app.setOrientation(orient="vertical")
    app.run()
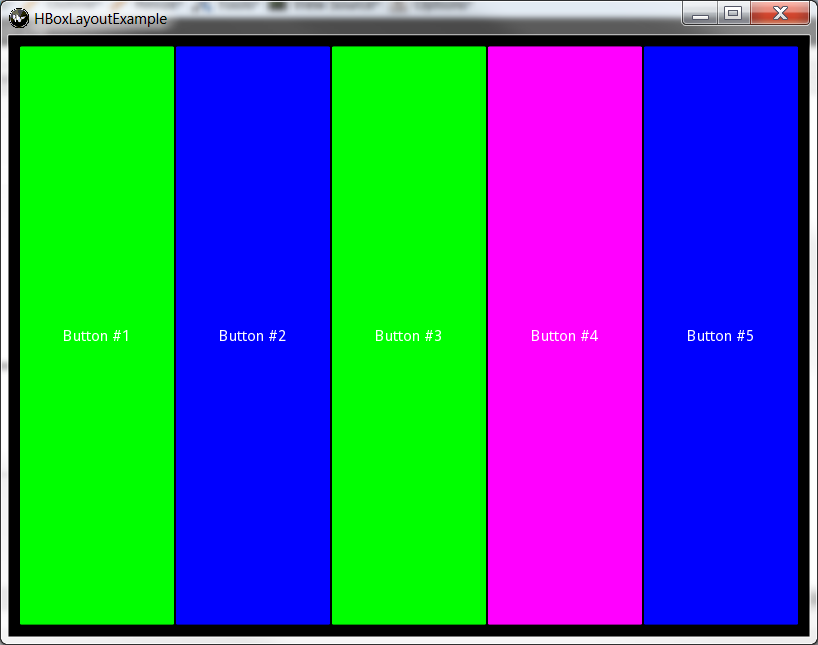
Here we have created a vertically oriented BoxLayout class and a horizontally oriented BoxLayout class. Each class contains 5 buttons with random background colors. The colors follow RGBA, but can have individual values that are between zero and one. Oddly enough, if you use numbers greater than one, the color becomes brighter. I happened to use 255 instead of 1 when I created the screenshot above, so if you happen to run this code and see a more muted set of colors, that’s why.
To make the examples extremely simple, we only import Kivy’s App, Button and BoxLayout classes. The BoxLayout class accepts several arguments, but we’ll focus on the following 3: orientation, padding and spacing. Because BoxLayout is a sub-class of Layout and Widget, it inherits many other methods and keyword arguments that are not covered here. But back to the arguments we currently care about. The padding argument tells Kivy how much space there should be between the Layout and its children, whereas the spacing arguments tells it how much spacing there should be between the children.
To create the buttons, we use a simple loop that loops over a small range of numbers. Each iteration creates a button with a random background color and adds that button to the Layout instance. Then we return the layout at the end.
The vertical BoxLayout example in the VBoxLayoutExample class is slightly different in that I thought it would be fun to be able to set the orientation programmatically. The code is pretty much the same except that I added a setOrientation method. Note that if you call setOrientation again, it will have no effect. As one of my commenters so kindly pointed out, you would need to bind the orientation to the App orient property or use the Kv language to achieve this.
If you comment out the call to HBoxLayoutExample at the end of the script and un-comment out the other two lines, then you should end up seeing something like this:
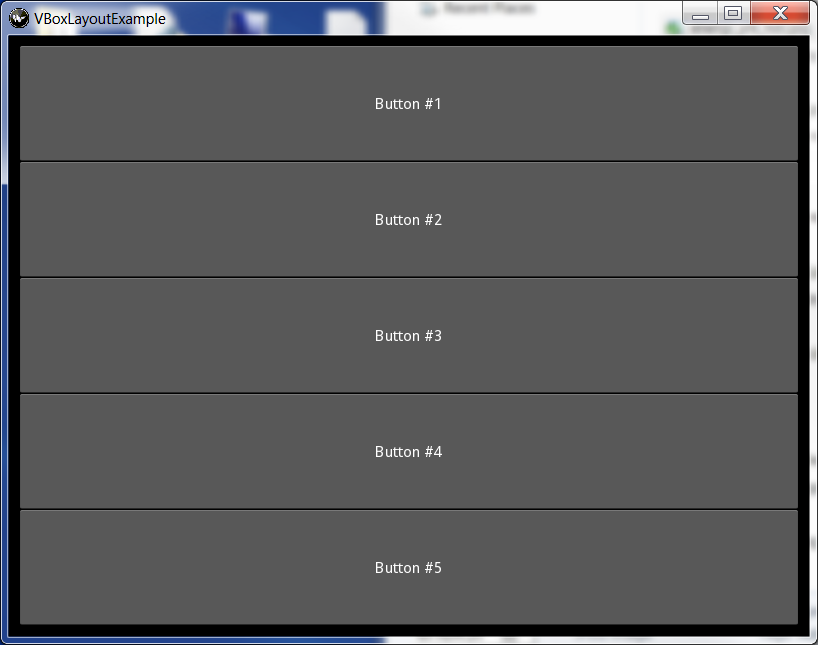
Notice that when you don’t set a background color, Kivy defaults to a dark grey. Kivy does not try to look like a native application. This may or may not be a big deal to you depending on what sort of program you’re trying to achieve, but it should be noted. Now we’re ready to learn about nesting!
Nesting BoxLayouts
Nesting BoxLayouts inside of each other is pretty easy with Kivy too. Whenever you go to create an application with a complicated interface that will need nested sizers, you should take some time to sketch the layout out with pencil and paper. Then you can draw boxes around the widgets in different ways to help you visualize which Layouts you’ll need and how to nest them in each other. I have found this quite helpful with wxPython and I think it applies to any other GUI toolkit that doesn’t have a WYSIWYG editor. By the way, BoxLayouts are very powerful. If you know what you’re doing, you can make just about any interface with them alone just be using clever nesting.
Enough talk, let’s look at some code!
import kivy
import random

from kivy.app import App
from kivy.uix.button import Button
from kivy.uix.boxlayout import BoxLayout

red = [1,0,0,1]
green = [0,1,0,1]
blue =  [0,0,1,1]
purple = [1,0,1,1]

########################################################################
class NestedLayoutExample(App):
    """
    An example of nesting three horizontally oriented BoxLayouts inside
    of one vertically oriented BoxLayout
    """

    #----------------------------------------------------------------------
    def build(self):
        """
        Horizontal BoxLayout example
        """
        main_layout = BoxLayout(padding=10, orientation="vertical")

        colors = [red, green, blue, purple]

        for i in range(3):
            h_layout = BoxLayout(padding=10)
            for i in range(5):
                btn = Button(text="Button #%s" % (i+1),
                             background_color=random.choice(colors)
                             )

                h_layout.add_widget(btn)
            main_layout.add_widget(h_layout)

        return main_layout

#----------------------------------------------------------------------
if __name__ == "__main__":
    app = NestedLayoutExample()
    app.run()
This example is very similar to the last one. The devil is in the details though. Here we have a nested for loop that creates 3 BoxLayouts that contain 5 buttons a piece. Each Layout is then inserted into the top level Layout at the end of each iteration in the outside loop. In case you missed it, scroll back up to see how it turned out. The trick is to create one top-level or main Layout and add other Layouts to it. Now let’s turn our attention to learning how to do these things with the Kv language.
Kv+Python and BoxLayout
It’s almost always a little painful to learn a new language. Fortunately, the Kv language actually follows Python pretty closely, including Python’s requirement of using indentation levels to denote when a section of code begins and ends. You may want to spend a few minutes reading about the Kv language on the Kivy website. Whenever you’re ready, we can continue. First we’ll start off with the Python code:
# kvboxlayout.py

from kivy.app import App
from kivy.uix.boxlayout import BoxLayout

########################################################################
class KVMyHBoxLayout(BoxLayout):
    pass

########################################################################
class KVBoxLayoutApp(App):
    """"""

    #----------------------------------------------------------------------
    def build(self):
        """"""
        return KVMyHBoxLayout()

#----------------------------------------------------------------------
if __name__ == "__main__":
    app = KVBoxLayoutApp()
    app.run()
This code is much simpler than our previous examples, but it’s also rather mysterious. First of all, we create an empty sub-class of BoxLayout. Then we create our App class which has a build method that just returns an instance of the empty BoxLayout class. What’s going on here? Well we have to look at the Kv file to find out!
<MyButton@Button>:
    color: .8,.9,0,1
    font_size: 32

<MyButton@Button>:
    orientation: 'horizontal'
    MyButton:
        text: "Btn1"
        background_color: 1,0,0,1
    MyButton:
        text: "Btn2"
        background_color: 0,1,0,1
    MyButton:
        text: "Btn3"
        background_color: 0,0,1,1
    MyButton:
        text: "Btn4"
        background_color: 1,0,1,1
    MyButton:
        text: "Btn5"
        background_color: 1,0,0,1
When you save the code above, you’ll have to name it to be the same as the App class, but with a .kv instead of a .py and in lowercase. That means the name of this Kv file needs to be kvboxlayout.kv. You will note that you also need to strip off the App part of the class name such that KVBoxLayoutApp becomes kvboxlayout. Yes, it’s a little confusing. If you don’t follow the naming conventions correctly, the file will run but you will have an empty black window.
Anyway, first off in the Kv file, we have a section that starts with :. This tells Kivy that we are sub-classing the Button class and calling our sub-class MyButton. Then we indent the required four spaces and set the button’s label color and font size. Next we create a BoxLayout section. Notice that we didn’t create a sub-class this time. Then we tell it what orientation it should be and add 5 MyButton instances, each one having its own individual label and color.
One of the core Kivy developers pointed out that by creating the BoxLayout in this manner, I am redefining the BoxLayout for all usages. This is not a good thing, even if it does make the example simpler. Thus in the next example, we’ll stop doing that and do it the right way instead!
Nesting BoxLayouts with Kv
Nesting BoxLayouts in Kv is a little confusing at first, but once you get the hang of it, you’ll find that it’s really quite easy. We’ll start out with the Python code, take a look at how it works and then look at the Kv code.
from kivy.app import App
from kivy.uix.boxlayout import BoxLayout
from kivy.uix.widget import Widget

########################################################################
class HBoxWidget(Widget):
    pass

########################################################################
class VBoxWidget(Widget):
    pass

########################################################################
class KVNestedBoxLayoutApp(App):
    """"""

    #----------------------------------------------------------------------
    def build(self):
        """"""
        return VBoxWidget()

#----------------------------------------------------------------------
if __name__ == "__main__":
    app = KVNestedBoxLayoutApp()
    app.run()
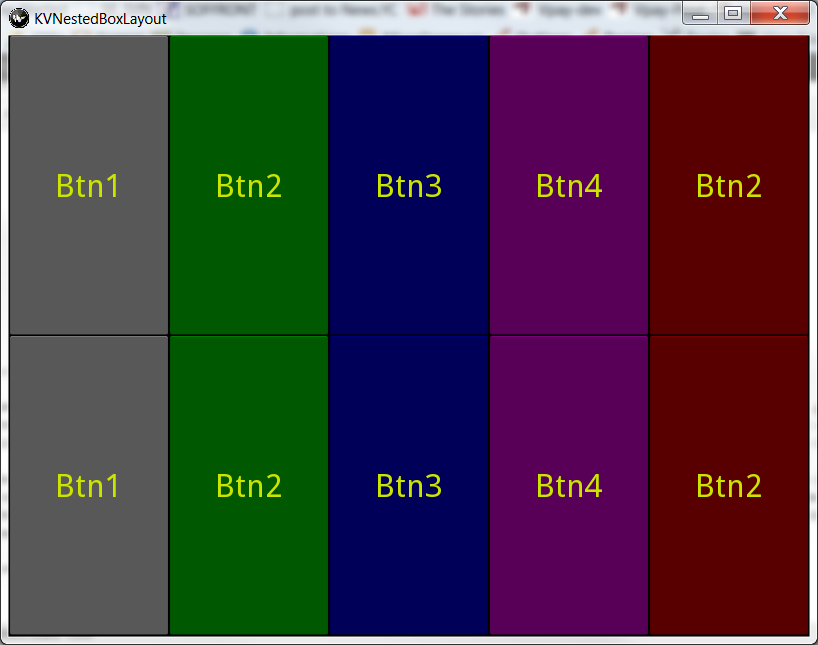
This time around, we need to create two generic Widget classes: HBoxWidget and VBoxWidget. These are actually dummy classes that become BoxLayouts in the Kv code. Speaking of which, let’s take a look at that now. Note that you’ll need to name the Kv file kvnestedboxlayout.kv, which you’ll note, is a lowercase version of KVNestedBoxLayoutApp.
:
    color: .8,.9,0,1
    font_size: 32

:
    BoxLayout:
        size: root.size
        pos: root.pos
        orientation: 'horizontal'
        MyButton:
            text: "Btn1"
            background_color: 1,1,1,1
        MyButton:
            text: "Btn2"
            background_color: 0,1,0,1
        MyButton:
            text: "Btn3"
            background_color: 0,0,1,1
        MyButton:
            text: "Btn4"
            background_color: 1,0,1,1
        MyButton:
            text: "Btn2"
            background_color: 1,0,0,1

:
    BoxLayout:
        size: root.size
        pos: root.pos
        id: foo_bar
        orientation: 'vertical'
        HBoxWidget:
        HBoxWidget:
The button code is the same as before. Next we have the HBoxWidget which we define as a horizontal BoxLayout with 5 buttons in it. Then we create an instance of VBoxWidget that is a vertical BoxLayout, but this Layout contains two instances of the HBoxWidget. You’ll note that in the Python code’s build method, we are returning the VBoxWidget, so that’s where the action is. If you remove those two HBoxWidget calls, the result will be an empty black window.
There is another way to use Kv files in Kivy. It is through the kivy.lang.Builder.load_file (or load_string) API, which gives you the ability to load Kv files without needing to remember to name the Kv file in some special way. You can read about the API on their website and see an example of it in action in the Kivy examples on github. The only caveat to using this method is that you need to be careful not to load the same file twice or your UI may get messed up.
Wrapping Up
This just scratches the surface of Kivy’s Layout system. There are 6 other Layout types available. However, I think you’ll find that the examples in this article will get you started down the road of successfully creating cool Kivy applications of your very own. If you need help learning Kivy, there’s a pretty good set of documentation on their website. They also have a Google Group and a #kivy channel on freenode.
Related Readings
- Kivy’s Getting Started with Layouts
- Kivy’s programming guide also has coverage on layouts
- A simple nested Layout example on github
- Kivy’s Kv language page
- Other Kivy examples on github
Download the Source
Note: This is an official cross-posting of an article from the Mouse Vs Python blog. You can read the original here.
✍️ Comments
Thank you!
Your comment has been submitted and will be published once it has been approved. 😊
OK