




How to Listen to Trunked Police Radio Using SDRTrunk
Hi everyone! 👋 Remember I wrote a post about how you can listen to your local police department using a Baofeng? As it turns out, most police and fire departments have moved to trunked radio. Trunked radio is just a fancy way of saying that these departments use a shared pool of frequencies (and these days it is usually digital as well). A Baofeng UV-5X3 or UV-5R radio can not decode this communication.
You have two options. You will either have to buy an expensive scanner or radio that supports digital trunking, or you can use a $30-$40 RTL-SDR dongle with your computer. In this post, I will show you how to do the latter using SDRTrunk, a free and open-source program that runs on Windows, Mac and Linux.
When I first published this post in 2020, it was just a short video. SDRTrunk has changed quite a bit since then, so I have rewritten it as a complete step-by-step guide. The original video is still at the end of the post if you prefer watching over reading. The screenshots in this post are taken from that video, so the SDRTrunk interface in them is from an older version (0.5.0). Things have moved around a little bit but everything I show here still exists.
The short answer
Yes, you can listen to most trunked police radio systems with an RTL-SDR dongle and SDRTrunk, as long as:
- the system uses a protocol SDRTrunk supports (P25 Phase 1, P25 Phase 2, DMR and a few older analog ones), and
- the talkgroup you want to listen to is not encrypted.
Here is what you need:
- An RTL-SDR dongle and an antenna (the RTL-SDR Blog V4 kit is a good choice)
- A computer with a 4-core CPU and ideally 8GB of RAM
- SDRTrunk (free)
- The frequencies of your local trunked system from RadioReference (free to browse)
What is a trunked radio system?
In a conventional radio system, each channel is a fixed frequency. If the police use 155.475 MHz, you tune your radio to 155.475 MHz and you hear them. This is how the Baofeng setup from my previous post works.
A trunked system works differently. The system has a pool of frequencies that everyone shares. One of these frequencies is the control channel. It constantly broadcasts data (it sounds like a buzzing noise) that tells the radios what is going on in the system. Instead of channels, users are organized into talkgroups (for example “Police Dispatch” or “Fire Tactical”). When someone presses the talk button, the system picks a free frequency from the pool and announces on the control channel: “talkgroup 1234 is now talking on 851.0125 MHz”. All radios in that talkgroup jump to that frequency, and when the conversation is over, the frequency goes back into the pool.
This is why a regular radio can’t follow these conversations. The conversation keeps hopping between frequencies. A trunking scanner (or SDRTrunk) listens to the control channel and follows the conversation to whichever frequency it lands on. That is what “trunk tracking” means.
Most modern public safety systems in the US use APCO P25 (Phase 1 or Phase 2). Some agencies and a lot of businesses use DMR. SDRTrunk supports both of these, as well as a few older analog trunking protocols like LTR, Passport and MPT-1327. If your local system is Motorola Type II (SmartNet/SmartZone), EDACS or NXDN, SDRTrunk won’t be able to follow it because those protocols aren’t on its supported list.
Step 1: Get an RTL-SDR dongle
An RTL-SDR is a cheap USB dongle that was originally made for watching TV on a computer. People figured out that it can be used as a general-purpose software defined radio (SDR) that receives everything from roughly 24 MHz to 1.7 GHz. That covers the frequencies used by almost all public safety radio systems.
I recommend getting the RTL-SDR Blog V4 kit. It comes with a dipole antenna that works well enough to get started. SDRTrunk has supported the V4 (it uses the R828D tuner chip) since version 0.6.0. Older dongles based on the R820T/R820T2 chips also work.
One thing to keep in mind is bandwidth. An RTL-SDR can “see” a little over 2 MHz of spectrum at a time. SDRTrunk listens to the control channel and then needs to tune to the voice frequencies as calls come in. If all of your system’s frequencies fit within about 2 MHz, one dongle is enough. If the frequencies are spread out more than that, you will need two (or more) dongles so that SDRTrunk can cover the whole range. SDRTrunk manages multiple dongles automatically.
Step 2: Install the driver (Windows and Linux only)
Mac: You don’t need to install any driver. However, if you are on macOS Tahoe 26.x, there is a known issue where SDRTrunk fails to launch because of changes in how macOS handles USB devices. The SDRTrunk README has a workaround that involves installing the latest libusb with Homebrew and using the nightly build of SDRTrunk.
Windows: Plug in your dongle, download Zadig, and use it to install the WinUSB driver for the dongle. In Zadig, go to Options and select “List All Devices”, pick “Bulk-In, Interface (Interface 0)” from the dropdown, make sure WinUSB is selected, and click “Replace Driver”.
Linux: The Linux kernel will try to use the dongle as a TV tuner. Blacklist the default driver so that SDRTrunk can access the dongle:
echo 'blacklist dvb_usb_rtl28xxu' | sudo tee /etc/modprobe.d/blacklist-rtl.conf
Then copy the rtl-sdr.rules udev file from the SDRTrunk repository into /etc/udev/rules.d/ so that your user account has permission to use the dongle. Unplug the dongle, reboot (or reload the udev rules) and plug it back in.
Step 3: Download and run SDRTrunk
Go to the SDRTrunk releases page and download the latest final release (0.6.1 at the time of writing) for your operating system from the Assets section:
- Windows:
sdr-trunk-windows-x86_64 - Mac with Apple Silicon (M1 and newer):
sdr-trunk-osx-aarch64 - Intel Mac:
sdr-trunk-osx-x86_64 - Linux:
sdr-trunk-linux-x86_64(oraarch64for a Raspberry Pi 4/5 running a 64-bit OS)
SDRTrunk doesn’t need to be installed. Unzip the download and run the launch script inside the bin folder:
# Mac and Linux
./bin/sdr-trunk

# Windows
bin\sdr-trunk.bat
You don’t need to install Java either because each release comes with its own bundled Java runtime. That was one of my biggest annoyances when I first tried SDRTrunk in 2020, so I am happy they did this.
On a Mac, the first time you run SDRTrunk, macOS might refuse to open the bundled Java with a warning saying that the developer can not be verified. This is not malware. Apple just doesn’t like apps that haven’t been notarized.
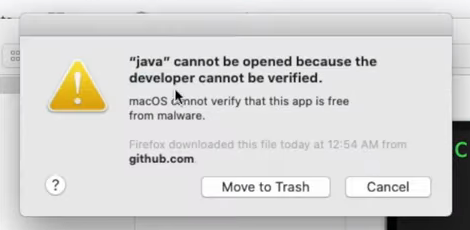
Click Cancel, open System Settings > Privacy & Security, scroll down to the message about java being blocked and click Open Anyway. Now run bin/sdr-trunk again and click Open when macOS asks you one last time.
If your dongle is plugged in, you should see it listed under the Tuners tab at the bottom of the main window.
Step 4: Build the JMBE library for digital audio
This is the step most people miss. SDRTrunk can decode the P25 and DMR control channels out of the box, but it can’t play digital voice audio without the JMBE library. Because of licensing concerns, SDRTrunk doesn’t ship with it, but thankfully it can build it for you.
Open View > User Preferences, go to the Decoder section and click on JMBE Audio Library. Click Create Library and SDRTrunk will download the JMBE source code and compile it for you. Once it is done, SDRTrunk will remember the library location.
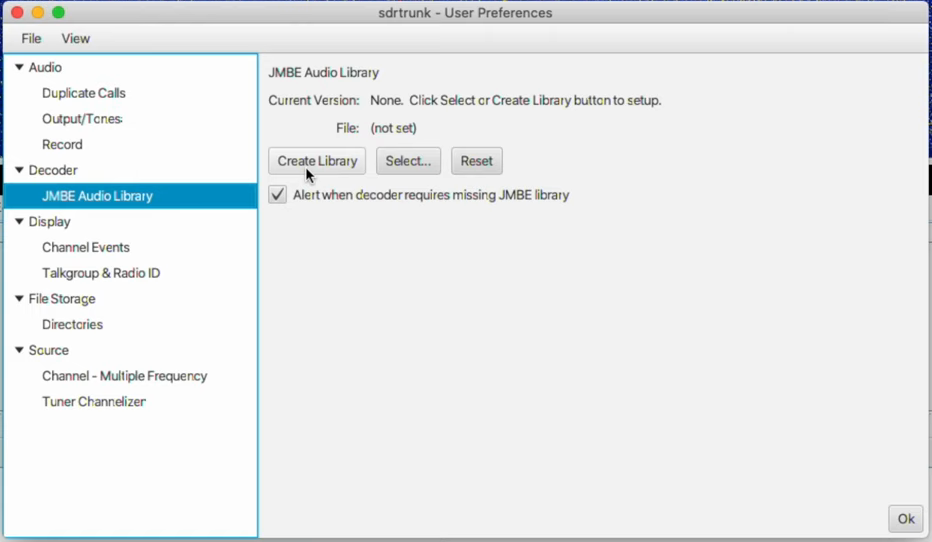
If you skip this step, everything will look like it is working (you will see calls showing up) but you won’t hear any audio.
Step 5: Find your local trunked system on RadioReference
Now we need to figure out which system your local police and fire departments use. Go to the RadioReference database, select your country, state and county, and look for the Trunked Radio Systems section.
Open the system and note down:
- System Type - for example “Project 25 Phase II” or “DMR”. Make sure it is something SDRTrunk supports.
- System Voice - if it says “APCO-25 Common Air Interface Exclusive” or similar, you are good. If it says encrypted, you will hear little or nothing.
- The site closest to you and its frequencies. The frequencies in red are control channels and the ones in blue are alternate control channels.
- Talkgroups - the list of talkgroups with their descriptions. Talkgroups with an “E” in the Mode column (like “DE” or “TE”) are encrypted.
When I made the video, I was living in Hamilton, NY, which is in Madison County. This is what the Madison County page looked like:
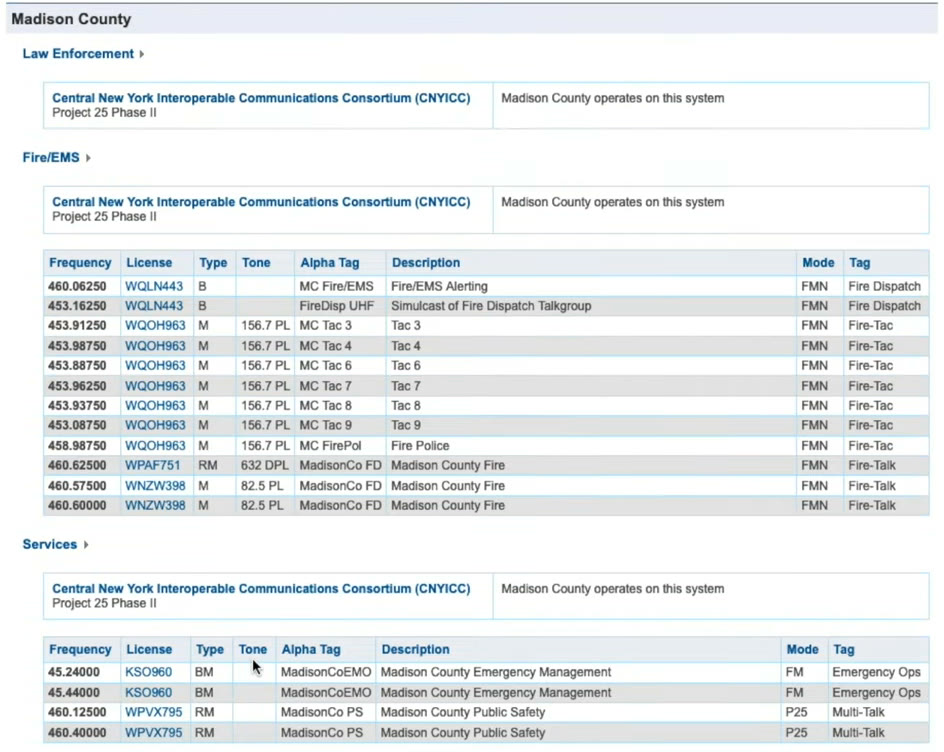
You can see that the county operates on the CNYICC Project 25 Phase II trunked system. The two Madison County Public Safety frequencies at the bottom (460.125 and 460.400 MHz) are listed with the P25 mode. There is no “E” next to them, so they are not encrypted. I picked 460.400 MHz for my setup.
If you have a RadioReference Premium subscription, SDRTrunk can pull all of this information directly (see the next step). If you don’t, you can enter it by hand. It only takes a few minutes.
Step 6: Create the channel in the Playlist Editor
SDRTrunk stores everything you configure in a playlist. Open the Playlist Editor by clicking View > Playlist Editor.
Option A: Import from RadioReference (Premium)
- Click Login in the top-right corner of the Playlist Editor and enter your RadioReference Premium username and password.
- Go to the Radio Reference tab and select your country, state and county.
- Pick your trunked system from the System dropdown. A green checkmark means SDRTrunk supports the protocol and a red circle means it doesn’t.
- In the System View tab, select the site closest to you. Set Frequencies to “Control & Alternates” and Configurations to “Single”.
- Click New Alias List and give it a name (for example the name of your county).
- Click Create Channel Configuration.
Option B: Enter it by hand
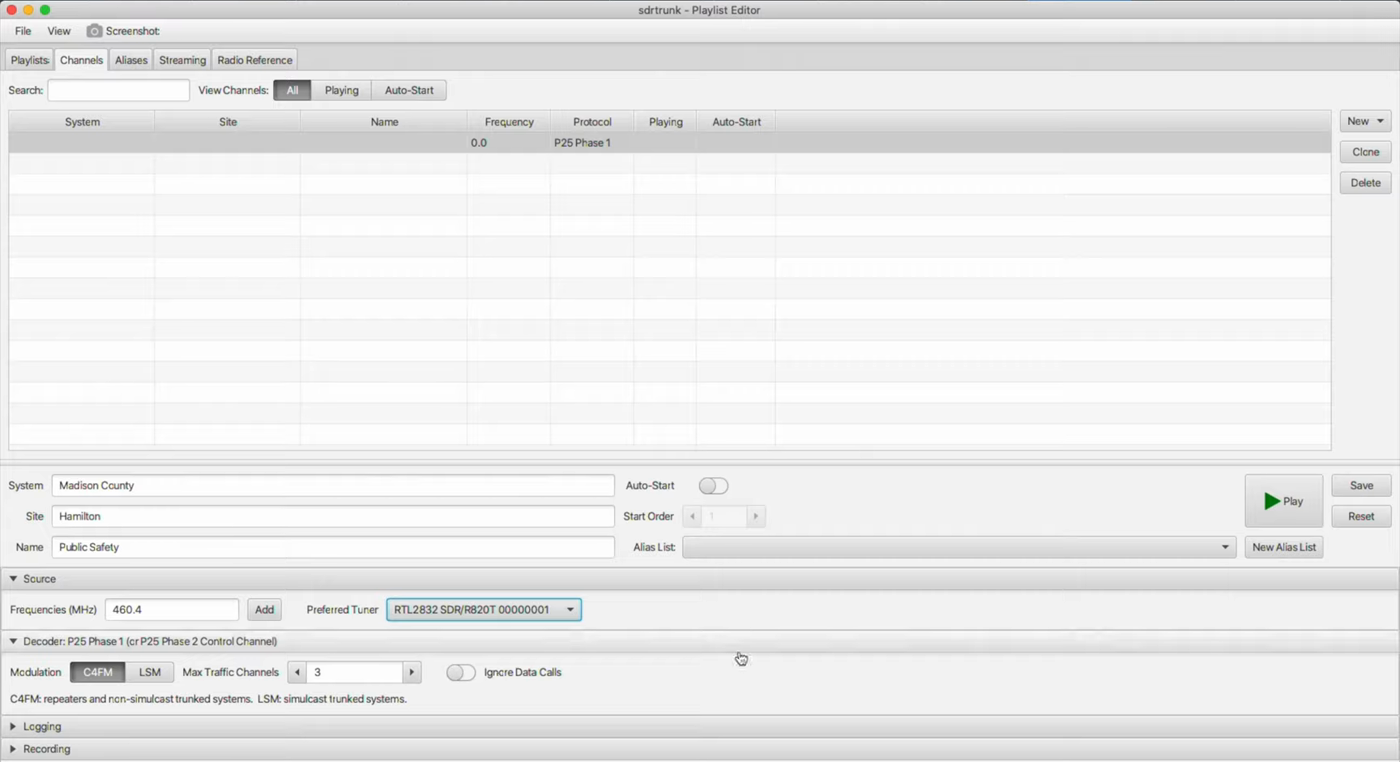
- Go to the Channels tab and click New. Select P25 Phase 1 as the decoder. Even if your system is P25 Phase 2, select Phase 1. All P25 Phase 2 systems use a Phase 1 control channel and SDRTrunk automatically creates the Phase 2 voice channels for you. For DMR systems, select DMR instead.
- Give the channel a Name, System and Site label.
- Click New Alias List and create an alias list for this channel.
- In the Source section, enter the control channel frequency. Click Add to add the alternate control channel frequencies as well. This way SDRTrunk can find the active control channel on its own.
- In the Decoder section, choose the Modulation: use C4FM for most systems and LSM if RadioReference lists the site as simulcast.
- Set Max Traffic Channels to the number of voice frequencies at the site if your computer can handle it. The default is 3.
- Click Save.
This is what my channel configuration looked like for Madison County:
Now select your new channel and click Play. Go back to the main window and you should see the channel in the Now Playing list. After a few seconds, if everything is configured correctly, events will start showing up in the Events and Messages tabs, and you will hear audio as soon as someone talks on a talkgroup that isn’t encrypted.
What it looked like for me
When I first clicked Play, the channel just sat there as IDLE. Looking at the spectrum, there was no strong constant signal at 460.400 MHz. There was one at roughly 460.475 MHz though:
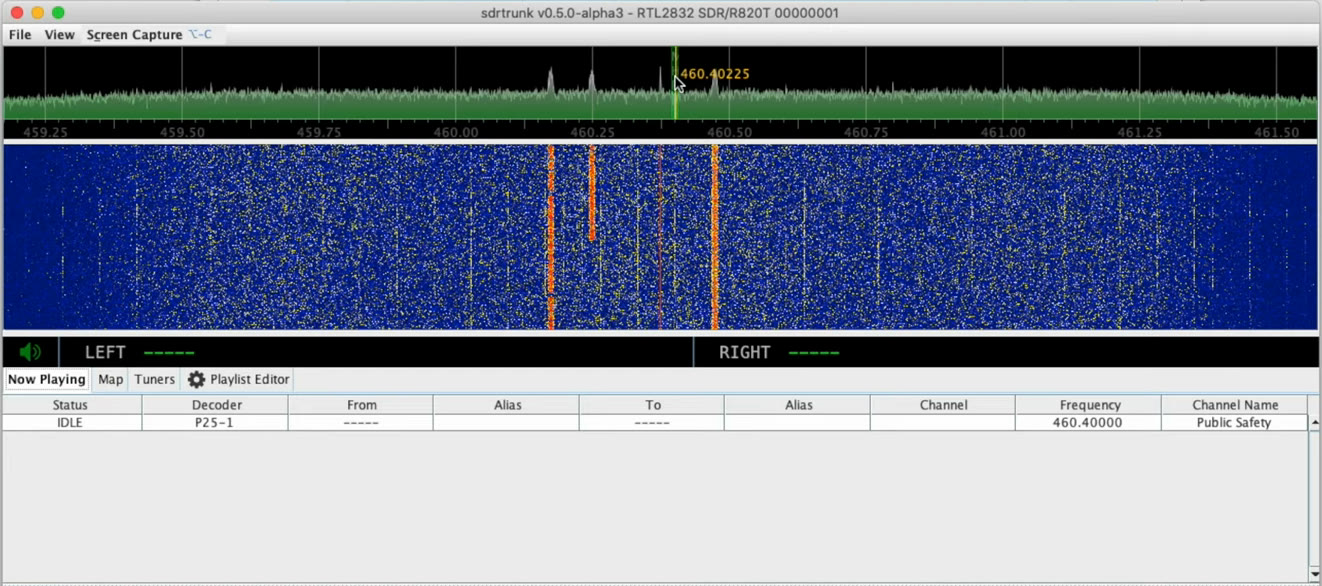
A control channel transmits all the time, so it shows up as a solid line in the waterfall. I stopped the channel, changed the frequency to 460.473 MHz, and pressed Play again. This time SDRTrunk locked on to it as the CONTROL channel and started following calls to the traffic channels on 460.250 and 460.175 MHz:
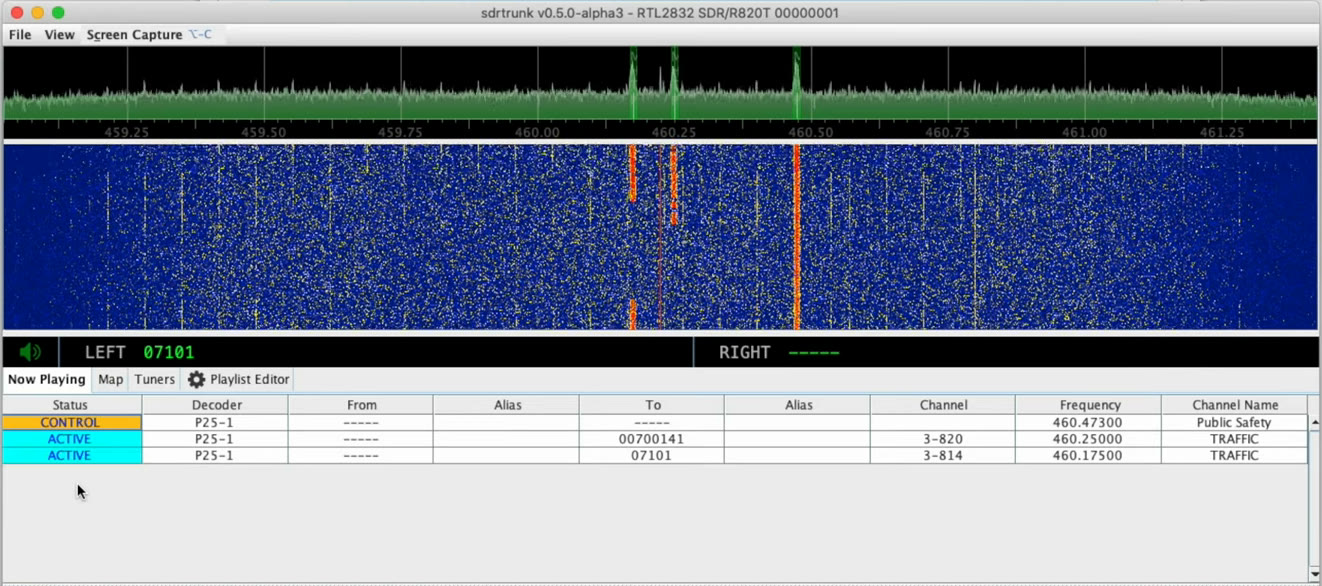
In the video I blamed this on the dongle drifting, but a 73 kHz difference at 460 MHz is about 160 PPM, which is way more than an RTL-SDR drifts. Most likely the site was simply using a different control channel frequency than the one I picked. This is exactly why I now recommend adding all of the control and alternate control channel frequencies for your site (Step 6). SDRTrunk will then find the active one on its own. If your channel stays idle, look for the solid line in the waterfall near your frequencies.
Step 7: Calibrate the dongle (PPM correction and gain)
If the channel shows up but nothing decodes, the most likely reason is that your dongle isn’t tuned exactly to the frequency it thinks it is tuned to. Cheap dongles drift a little bit and this offset is measured in PPM (parts per million). The RTL-SDR Blog V4 has a temperature-compensated oscillator so it drifts a lot less than older dongles, but it is still worth checking.
- In the Tuners tab, select your dongle and click View Spectrum. Let it run for a few minutes so that it warms up.
- Find a signal with a known frequency. A NOAA weather radio station (162.400-162.550 MHz in the US) or your P25 control channel works well.
- Zoom into the signal with your mouse wheel and adjust the PPM value until the signal lines up with its known frequency.
For gain, start with the gain at minimum and slowly increase it while watching the spectrum. Keep going while the signals get taller. Stop as soon as the noise floor (the parts of the spectrum without any signals) starts rising as well. Too much gain is just as bad as too little.
Once your dongle is calibrated, the P25 and DMR decoders will automatically keep fine-tuning the PPM value as they run.
Step 8: Add aliases so you know who is talking
By default, SDRTrunk shows talkgroups as numbers. That is not very useful when you have no idea that “1234” is the sheriff’s dispatch channel. Aliases let you give names to talkgroups (and radio IDs).
If you have RadioReference Premium, go to the Radio Reference tab, select your system and open the Talkgroup View. You can select talkgroups from the list and create aliases for them in your alias list in a couple of clicks.
If you are entering them by hand, go to the Aliases tab, click New, give the alias a name, select the same alias list that your channel uses, and add a Talkgroup identifier with the number from RadioReference.
Aliases are also how you control what you hear. Set Listen to off for talkgroups you don’t care about, and give the important ones a Priority (1 is the highest) so that SDRTrunk plays them first when multiple calls happen at the same time.
Step 9 (optional): Recording and streaming
SDRTrunk can record the calls and stream them to services like Broadcastify Calls, Rdio Scanner and OpenMHz. Streaming is set up in the Streaming tab of the Playlist Editor and you choose which aliases to stream in each alias’s Streaming section. Recording is enabled per alias as well. This is great if you want to keep a log of your local scanner traffic or share it with your community.
Troubleshooting
The tuner doesn’t show up. On Windows, run Zadig again and make sure the WinUSB driver is installed for the right interface. On Linux, check that the dvb_usb_rtl28xxu driver is blacklisted and the udev rules are in place. On Mac, check the macOS Tahoe note in Step 2. Also make sure no other SDR program is using the dongle at the same time.
The channel is playing but no messages are decoding. Calibrate the PPM (Step 7). Make sure you entered the right control channel and that you are close enough to the site. Try a better antenna or put it near a window.
Messages are decoding but I don’t hear anything. Build the JMBE library (Step 4). Also check the audio output device in User Preferences.
I can see calls but they say encrypted. The talkgroup is encrypted and there is nothing SDRTrunk (or any scanner) can do about it.
Calls show “NO TUNER AVAILABLE”. The voice frequency is outside of the bandwidth of your dongle. You need another dongle so that SDRTrunk can cover the whole system.
Audio is choppy or there are lots of decode errors on a simulcast system. Make sure the modulation is set to LSM. Simulcast systems transmit the same signal from multiple towers at once and they are notoriously hard to decode with cheap SDRs. Using a directional antenna pointed at the closest tower helps a lot.
Is it legal to listen to police radio?
In the US, it is generally legal to listen to unencrypted public safety radio. However, some states have restrictions on using scanners in a vehicle, and it is illegal to use what you hear to commit a crime. Other countries have very different rules. For example, in the UK it is illegal to listen to police radio without authorization. Please check your local laws before you start.
Video
Here is the original video I made in 2020 that the screenshots above are taken from. The SDRTrunk interface looks slightly different in newer versions but the overall process is still the same.
Conclusion
That is it! You now have a digital trunking scanner for the price of a USB dongle. If you want to go further, look into better antennas, adding a second dongle, or running SDRTrunk on a Raspberry Pi so that it can stream your local system 24/7.
Links mentioned in this post:
- SDRTrunk: https://github.com/DSheirer/sdrtrunk/releases
- SDRTrunk documentation: https://github.com/DSheirer/sdrtrunk/wiki
- RTL-SDR Blog V4: https://www.rtl-sdr.com/V4/
- Radio Reference: https://www.radioreference.com/db/
If you have any questions please post them in the comments below. I am also relatively new to this but I will try to answer as many of your questions as possible. I will see you in the next post.
Take care! 👋 ❤️
Rebecca