

Connecting and Interfacing Raspberry Pi with Arduino
Hi lovely people! 👋 I am working on a greenhouse monitoring project and I had to connect my Arduino to the internet over WiFi. I wanted to push some sensor data to my server. I could have bought a WiFi shield for the Arduino but why spend more money when you already have a Pi with WiFi card?
I ended up connecting Arduino with my Pi and pushing sensor data to my server through the Pi. The process was super simple.
Step 1: Start serial communication on Arduino
In your Arduino code you need to start serial communication during setup and send some data to the Raspberry Pi. I am using the loop function to send the data every half-second:
void setup(){
    Serial.begin(9600);
}

void loop(){
    Serial.println("Welcome to Arduino :)");
    delay(500);
}
Add any other code you might need for your project and upload the code on Arduino.
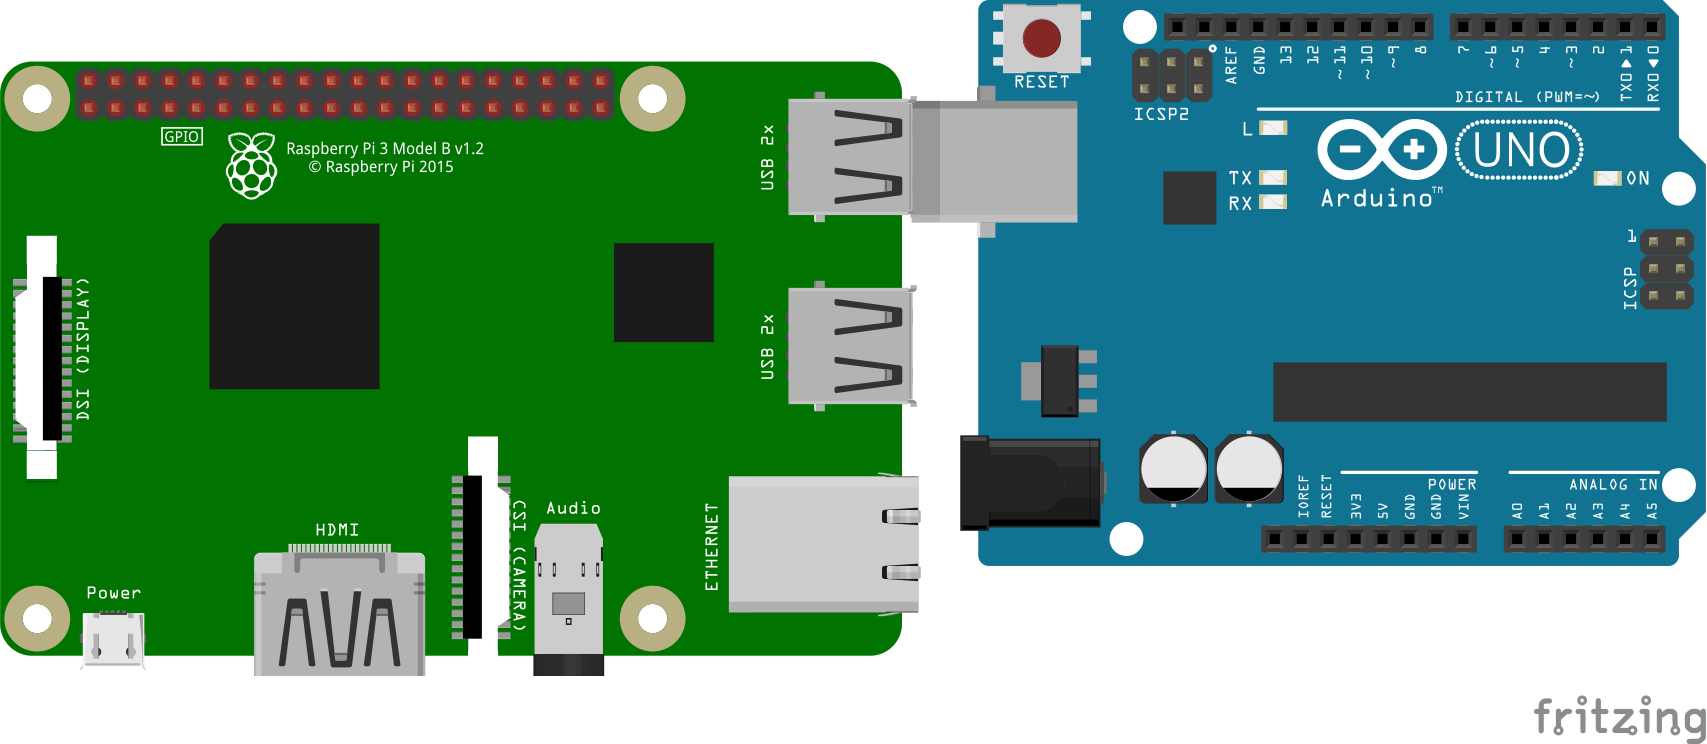
Step 2: Connecting Arduino & Raspberry Pi
Connect the Arduino using the USB cable to the Raspberry Pi after the code has been uploaded to Arduino.
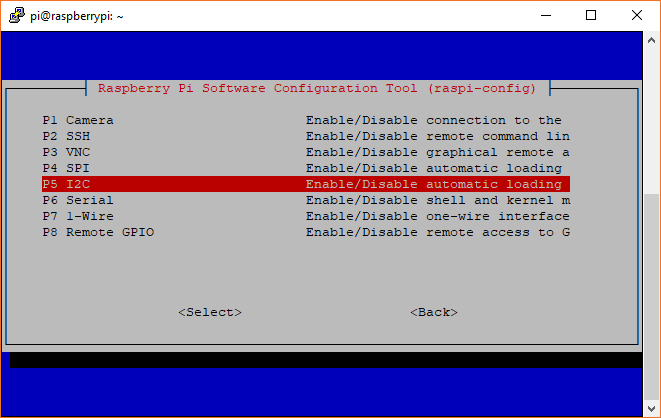
Step 3: Enable I2C on the Raspberry Pi
We need to enable I2C communication on the Raspberry Pi. I2C is a common standard which allows one device to talk to another. You can enable this from the terminal by running:
$ sudo raspi-config
Now select 5 Interfacing Options from the list. Now select I2C from the list and select enable.
Step 4: Write code on Pi to read incoming data
Create a file code.py on your desktop on the Raspberry Pi. Add the following code in the file:
import serial
import RPi.GPIO as GPIO
import time

ser=serial.Serial("/dev/ttyACM0",9600)

while True:
    read_ser=ser.readline()
    print(read_ser)
The code above is going to open up a serial connection between the Arduino and Raspberry Pi. It will run a continuous loop where it will read incoming data from the Arduino and will print it on the terminal.
You might be wondering where I got /dev/ttyACM0 from. This is an identifier for the USB interface. It might be slightly different for you. In order to find out what this identifier is for you type this command in the terminal:
$ ls /dev/tty*
This will print a whole bunch of stuff on the screen:
/dev/tty    /dev/tty23  /dev/tty39  /dev/tty54
/dev/tty0   /dev/tty24  /dev/tty4   /dev/tty55
/dev/tty1   /dev/tty25  /dev/tty40  /dev/tty56
/dev/tty10  /dev/tty26  /dev/tty41  /dev/tty57
/dev/tty11  /dev/tty27  /dev/tty42  /dev/tty58
/dev/tty12  /dev/tty28  /dev/tty43  /dev/tty59
/dev/tty13  /dev/tty29  /dev/tty44  /dev/tty6
/dev/tty14  /dev/tty3   /dev/tty45  /dev/tty60
/dev/tty15  /dev/tty30  /dev/tty46  /dev/tty61
/dev/tty16  /dev/tty31  /dev/tty47  /dev/tty62
/dev/tty17  /dev/tty32  /dev/tty48  /dev/tty63
/dev/tty18  /dev/tty33  /dev/tty49  /dev/tty7
/dev/tty19  /dev/tty34  /dev/tty5   /dev/tty8
/dev/tty2   /dev/tty35  /dev/tty50  /dev/tty9
/dev/tty20  /dev/tty36  /dev/tty51  /dev/ttyACM0
/dev/tty21  /dev/tty37  /dev/tty52
/dev/tty22  /dev/tty38  /dev/tty53
Find the string containing ACM and in most cases that is going to be the interface for the Arduino.
In most cases it will probably be ACM0 so you don’t need to edit the code but if it is different go back and edit the code.py file.
Step 5: Run code.py
Perfect! We have everything we need. Its time to run code.py on the Raspberry Pi and data should start showing up on the screen.
Troubleshooting:
In case things nothing shows up on the screen reconnect the Arduino to your laptop, open up the serial monitor and make sure that data show up there at least. If it doesn’t, there is something wrong with your Arduino code.
If data shows up in the serial monitor then restart your Raspberry Pi. Normally the age-old solution of turning it off and on again works wonders.
If it still doesn’t work, search on Google and if even Google isn’t able to help, send me an email and I will try my best to help you out.
Dylan Jardine