

Setting up & Deploying JWT based auth using Flask & React
Hi everyone! 👋 I was working on a React project these last couple of weeks and I had to implement login functionality. I searched around and most of the solutions I found relied on Redux or some other huge dependency that I wasn’t already using in my project. I didn’t want to introduce a big dependency so decided to continue looking. In the end, I found a wonderful library by Oleg Babichev that allowed me to implement the login functionality on the front-end fairly easily. The backend for the login was based on Flask and flask-praetorian. flask-praetorian allows us to use JWT for auth and handles most of the hard logic itself. We just need to define some endpoints and some basic logic.
In this article, I am going to take you from a fresh React project to a project with a fully functional login backed by flask-praetorian. I hope this article helps you fill all the knowledge gaps that you might have.
Note: All the code from this article can be found in this GitHub repository.
New React project
I am assuming that you already have npx installed and have access to the create-react-app command. Let’s start by creating a new sample-app project:
$ npx create-react-app sample-app
This command will take some time but you will end up with a sample-app folder with the following structure:
.
├── README.md
├── package.json
├── node_modules
│   └── ...
├── public
│   ├── favicon.ico
│   ├── index.html
│   ├── logo192.png
│   ├── logo512.png
│   ├── manifest.json
│   └── robots.txt
├── src
│   ├── App.css
│   ├── App.js
│   ├── App.test.js
│   ├── index.css
│   ├── index.js
│   ├── logo.svg
│   ├── serviceWorker.js
│   └── setupTests.js
└── yarn.lock
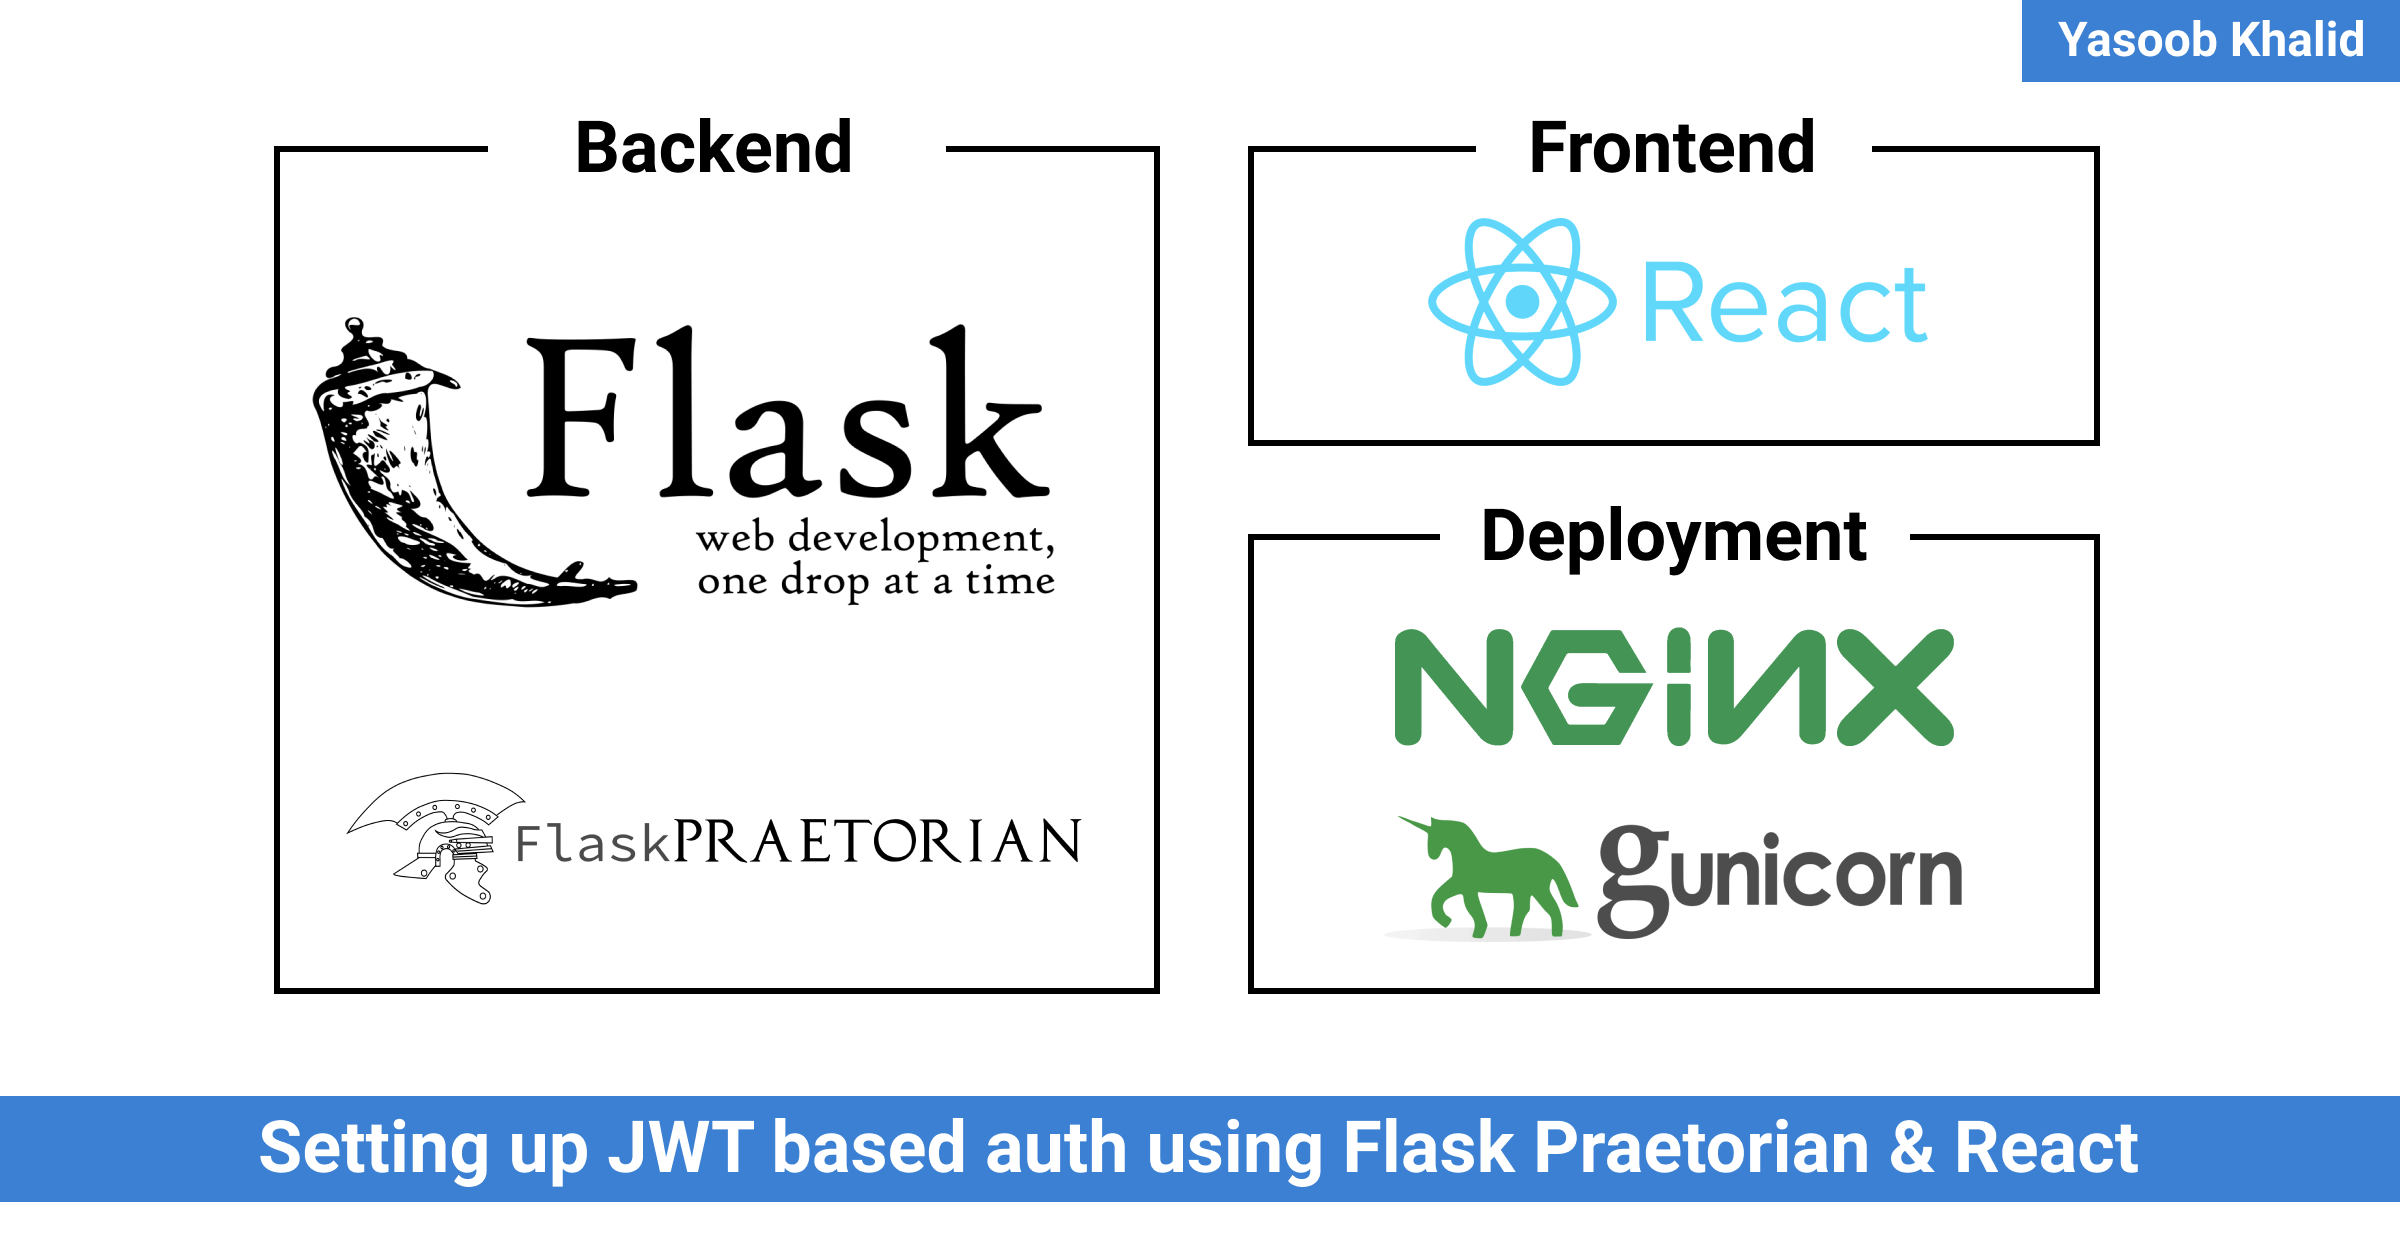
Now let’s start the development server for our React app:
$ yarn start
Sweet! You should see something similar to this:
Setting up Flask API
Now that we have the basic React app working, it is time to set up the Flask project that is going to serve as our API backend. We will create an api folder inside the sample-app folder and this is where all of our Flask (Python) code is going to be stored. While we are at it, we will also set up a virtual environment inside the api folder and activate it.
$ mkdir api
$ cd api
$ touch api.py
$ python3 -m venv env
$ source env/bin/activate
Our folder structure will look something like this now:
.
├── README.md
├── package.json
├── node_modules
│   └── ...
├── api
│   ├── env
|   │   └── ...
│   └── api.py
├── public
│   ├── favicon.ico
│   ├── index.html
│   ├── logo192.png
│   ├── logo512.png
│   ├── manifest.json
│   └── robots.txt
├── src
│   ├── App.css
│   ├── App.js
│   ├── App.test.js
│   ├── index.css
│   ├── index.js
│   ├── logo.svg
│   ├── serviceWorker.js
│   └── setupTests.js
└── yarn.lock
Now let’s install the Python libraries that we will be using:
$ pip install flask
$ pip install flask_sqlalchemy
$ pip install flask-praetorian
$ pip install flask_cors
We are ready to write our Python code! Open up your favorite text editor and paste the following code in the api.py file we created earlier:
import os
import flask
import flask_sqlalchemy
import flask_praetorian
import flask_cors

db = flask_sqlalchemy.SQLAlchemy()
guard = flask_praetorian.Praetorian()
cors = flask_cors.CORS()


# A generic user model that might be used by an app powered by flask-praetorian
class User(db.Model):
    id = db.Column(db.Integer, primary_key=True)
    username = db.Column(db.Text, unique=True)
    password = db.Column(db.Text)
    roles = db.Column(db.Text)
    is_active = db.Column(db.Boolean, default=True, server_default='true')

    @property
    def rolenames(self):
        try:
            return self.roles.split(',')
        except Exception:
            return []

    @classmethod
    def lookup(cls, username):
        return cls.query.filter_by(username=username).one_or_none()

    @classmethod
    def identify(cls, id):
        return cls.query.get(id)

    @property
    def identity(self):
        return self.id

    def is_valid(self):
        return self.is_active


# Initialize flask app for the example
app = flask.Flask(__name__)
app.debug = True
app.config['SECRET_KEY'] = 'top secret'
app.config['JWT_ACCESS_LIFESPAN'] = {'hours': 24}
app.config['JWT_REFRESH_LIFESPAN'] = {'days': 30}

# Initialize the flask-praetorian instance for the app
guard.init_app(app, User)

# Initialize a local database for the example
app.config['SQLALCHEMY_DATABASE_URI'] = f"sqlite:///{os.path.join(os.getcwd(), 'database.db')}"
db.init_app(app)

# Initializes CORS so that the api_tool can talk to the example app
cors.init_app(app)

# Add users for the example
with app.app_context():
    db.create_all()
    if db.session.query(User).filter_by(username='Yasoob').count() < 1:
        db.session.add(User(
          username='Yasoob',
          password=guard.hash_password('strongpassword'),
          roles='admin'
            ))
    db.session.commit()


# Set up some routes for the example
@app.route('/api/')
def home():
    return {"Hello": "World"}, 200


@app.route('/api/login', methods=['POST'])
def login():
    """
    Logs a user in by parsing a POST request containing user credentials and
    issuing a JWT token.
    .. example::
       $ curl http://localhost:5000/api/login -X POST \
         -d '{"username":"Yasoob","password":"strongpassword"}'
    """
    req = flask.request.get_json(force=True)
    username = req.get('username', None)
    password = req.get('password', None)
    user = guard.authenticate(username, password)
    ret = {'access_token': guard.encode_jwt_token(user)}
    return ret, 200


@app.route('/api/refresh', methods=['POST'])
def refresh():
    """
    Refreshes an existing JWT by creating a new one that is a copy of the old
    except that it has a refrehsed access expiration.
    .. example::
       $ curl http://localhost:5000/api/refresh -X GET \
         -H "Authorization: Bearer <your_token>"
    """
    print("refresh request")
    old_token = request.get_data()
    new_token = guard.refresh_jwt_token(old_token)
    ret = {'access_token': new_token}
    return ret, 200


@app.route('/api/protected')
@flask_praetorian.auth_required
def protected():
    """
    A protected endpoint. The auth_required decorator will require a header
    containing a valid JWT
    .. example::
       $ curl http://localhost:5000/api/protected -X GET \
         -H "Authorization: Bearer <your_token>"
    """
    return {'message': f'protected endpoint (allowed user {flask_praetorian.current_user().username})'}


# Run the example
if __name__ == '__main__':
    app.run(host='0.0.0.0', port=5000)
The code is pretty simple. We start by importing the libraries that we will be using and then create the required db, guard, and cors objects. Most of this code is taken from the flask-praetorian website and I have added or removed some stuff to make it simpler.
On the first run, the code will generate the database tables and create a new user named Yasoob if it doesn’t already exist. Then we have a login route that will give us our JWT tokens upon submitting valid credentials and a protected route that is only accessible with valid tokens. We also have a refresh route that will refresh our access tokens. If you don’t know how JWT tokens work, read some other article as I won’t be discussing that here.
One important thing to note is that I prefixed all routes with the word api. This is going to be very important as we try to set up React to work nicely with our API. Our reverse proxy (NGINX) will route all /api requests to our Python API and will route all other requests to the React index.html website. We will talk more about this later.
At this point we can go ahead and run our Python API:
$ export FLASK_APP=api.py
$ flask run
 * Running on http://127.0.0.1:5000/
If everything goes well, you should be able to access http://127.0.0.1:5000/api and see {"hello": "world"} in return. The flask run command will also generate the database.db file for us.
Just to make sure that the login endpoint is working correctly, open up a new terminal tab/window and run this command:
$ curl http://localhost:5000/api/login -X POST \
         -d '{"username":"Yasoob","password":"strongpassword"}'
You should see something similar to this:
{"access_token":"eyJ0eXAiOiJKV1QiLCJhbGciOiJIUzI1NiJ9.eyJpYXQiOjE2MDI2Mjk5MzcsImV4cCI6MTYwMjcxNjMzNywianRpIjoiYmU3OGVmZTgtZTg0YS00NDljLTllMmUtMmZkMWU0NzliNGZjIiwiaWQiOjEsInJscyI6ImFkbWluIiwicmZfZXhwIjoxNjA1MjIxOTM3fQ.hRrPwiCKQ2jW0bxhgf_qSAEV2B9yXxdswJAdpisTxlc"}
If you get an error, make sure you pasted the command correctly, and the username and password match with the one we created early on.
We can also go ahead and test the /api/protected endpoint as well (replace <your_token> with the access_token from the previous output):
$ curl http://localhost:5000/api/protected -X GET \
         -H "Authorization: Bearer <your_token>"
If everything goes well, you should see this:
{"message":"protected endpoint (allowed user Yasoob)"}
If you don’t copy the token correctly, you might see this error (there can be a different error as well depending on which part of the token you copied incorrectly):
{"error":"InvalidTokenHeader","message":"failed to decode JWT token -- InvalidSignatureError: Signature verification failed","status_code":401}
Sweet! Our API is working and we are ready to go to the next step.
Making React work nicely with Flask
In a production environment, you would want to compile your React app into a bunch of static HTML, CSS, and JS files with other static assets (images, etc.) and serve them using something like NGINX. NGINX provides superior performance for serving static files. But during development, I just use the default React server. We will have to make some modifications to make it work nicely with our backend API though. This is what we eventually want to be able to do:
- Tell React server to proxy all unknown URLs to our Flask instance
- Use yarn to run our Flask API as well (not necessary but a nice to have)
We will work in reverse. The very first thing we will do is create a .flaskenv file in our api folder with the following contents:
FLASK_APP=api.py
This way we won’t have to set the FLASK_APP environment variable before running flask run. Flask will detect this file and automatically set the variable. But for this to work, we will have to install another Python package as well:
$ pip install python-dotenv
Now we will add a new yarn command. For that, edit the package.json file in your sample-app directory and update the scripts section to look something like this:
"scripts": {
    "start-api": "cd api && env/bin/flask run --no-debugger",
  "start": "react-scripts start",
  "build": "react-scripts build",
  "test": "react-scripts test",
  "eject": "react-scripts eject"
}
I learned this trick from Miguel Grinberg. The way we have set it up, we won’t have to activate our virtual environment and Flask will automatically load the required packages and libraries from the env folder.
Let’s also add this line at the end of our package.json file:
"proxy": "http://localhost:5000"
This will proxy all unknown incoming requests to localhost:5000 where our API server is running. This is only for the development and will allow us to use fetch without worrying about CORS and ports. Now we can simply do this on the front-end to send a request to our Python backend:
fetch("/api")
The full package.json file will look something like this:
{
  "name": "sample-app",
  "version": "0.1.0",
  "private": true,
  "dependencies": {
    "@testing-library/jest-dom": "^4.2.4",
    "@testing-library/react": "^9.3.2",
    "@testing-library/user-event": "^7.1.2",
    "react": "^16.13.1",
    "react-dom": "^16.13.1",
    "react-router-dom": "^5.2.0",
    "react-scripts": "3.4.3"
  },
  "scripts": {
    "start-api": "cd api && env/bin/flask run --no-debugger",
    "start": "react-scripts start",
    "build": "react-scripts build",
    "test": "react-scripts test",
    "eject": "react-scripts eject"
  },
  "eslintConfig": {
    "extends": "react-app"
  },
  "browserslist": {
    "production": [
      ">0.2%",
      "not dead",
      "not op_mini all"
    ],
    "development": [
      "last 1 chrome version",
      "last 1 firefox version",
      "last 1 safari version"
    ]
  },
  "proxy": "http://localhost:5000"
}
Let’s test it out. Go to the sample-app folder and try running flask using yarn:
$ yarn start-api
If we haven’t managed to break anything, this should show up in the terminal:
yarn run v1.22.5
$ cd api && env/bin/flask run --no-debugger
 * Serving Flask app "api.py"
 * Environment: production
   WARNING: This is a development server. Do not use it in a production deployment.
   Use a production WSGI server instead.
 * Debug mode: off
 * Running on http://127.0.0.1:5000/ (Press CTRL+C to quit)
We will not be accessing our app directly from port 5000. We will be accessing it from 3000. If you haven’t stopped the yarn start process, you should be able to access the web app at http://localhost:3000.
Fleshing out React app
Let’s focus on the front-end for a bit. We will be using react-router-dom for the routing and before we can use it, we will have to install it:
$ npm install react-router-dom
Now replace everything in src/App.js with this:
import React, { useEffect } from "react";
import {
BrowserRouter as Router,
Switch,
Route,
Link
} from "react-router-dom";
export default function App() {
return (
<Router>
<div>
<nav>
<ul>
<li>
<Link to="/">Home</Link>
</li>
<li>
<Link to="/login">Login</Link>
</li>
<li>
<Link to="/secret">Secret</Link>
</li>
</ul>
</nav>
{/* A <Switch> looks through its children <Route>s and
renders the first one that matches the current URL. */}
<Switch>
<Route path="/login">
<Login />
</Route>
<Route path="/secret">
<Secret />
</Route>
<Route path="/">
<Home />
</Route>
</Switch>
</div>
</Router>
);
}
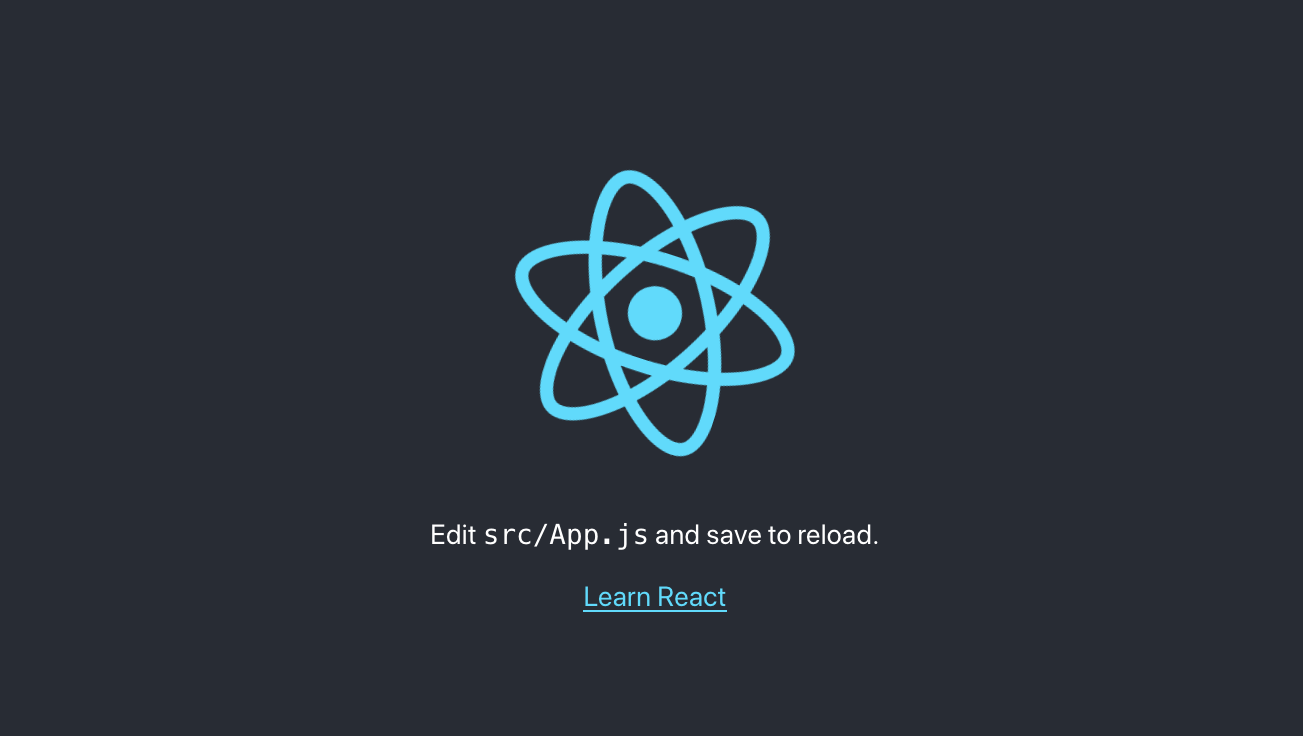
function Home() {
useEffect(() => {
fetch("/api").then(resp => resp.json()).then(resp => console.log(resp))
}, [])
return <h2>Home</h2>;
}
function Login() {
return <h2>Login</h2>;
}
function Secret() {
return <h2>Secret</h2>;
}
This is a simple app using react-router-dom to display three different pages. You can click on each link to go to a different page. I have also added the fetch call to /api just to confirm that our React development server is correctly proxying requests to our backend. To test it, open up localhost:3000 and open the developer tools. You should be able to see something similar to this:
{ Hello: "World" }
Nice! Now we can go ahead and create a login page. Modify the Login component like this:
function Login() {
  const [username, setUsername] = useState('')
  const [password, setPassword] = useState('')

  const onSubmitClick = (e)=>{
    e.preventDefault()
    console.log("You pressed login")
    let opts = {
      'username': username,
      'password': password
    }
    console.log(opts)
    fetch('/api/login', {
      method: 'post',
      body: JSON.stringify(opts)
    }).then(r => r.json())
      .then(token => {
        if (token.access_token){
          console.log(token)
        }
        else {
          console.log("Please type in correct username/password")
        }
      })
  }

  const handleUsernameChange = (e) => {
    setUsername(e.target.value)
  }

  const handlePasswordChange = (e) => {
    setPassword(e.target.value)
  }

  return (
    <div>
      <h2>Login</h2>
      <form action="#">
        <div>
          <input type="text"
            placeholder="Username"
            onChange={handleUsernameChange}
            value={username}
          />
        </div>
        <div>
          <input
            type="password"
            placeholder="Password"
            onChange={handlePasswordChange}
            value={password}
          />
        </div>
        <button onClick={onSubmitClick} type="submit">
          Login Now
        </button>
      </form>
    </div>
  )
}
Also, modify the react import at the top of the file and import useState as well:
import React, { useEffect, useState } from "react";
There are a couple of things we are doing here. We create two input elements, one for username and one for the password. We turn these into controlled components and make sure we are catching the event fired by the Login button. The UI should refresh automatically and you will be greeted by an ugly looking but functional form:
If you enter the username: “Yasoob” and password: “strongpassword”, and click “Login Now”, you should be able to see this in the developer tools console:

Seems like we have a basic login working!
Persisting login info
We need to be able to persist these access tokens and use those to make authenticated requests to our backend. How do we do that? If you search online, you will come across multiple solutions using Axios and Redux but we aren’t using either in our project. I don’t want to use those. The simplest solution that comes to mind is to put the access_token in the local storage and check for its existence before making any authenticated requests using fetch. If it exists, add it’s value in the Authorization header.
Luckily, there is a library out there that does exactly that. It is called react-token-auth. It has a super simple API and get’s out of your way. Let’s go ahead and install it and then I will show you how to use it:
$ npm install react-token-auth
Now we need to create an instance of authProvider that comes as a part of react-token-auth. I will create that in the src/auth/index.js file:
import {createAuthProvider} from 'react-token-auth';


export const [useAuth, authFetch, login, logout] =
    createAuthProvider({
        accessTokenKey: 'access_token',
        onUpdateToken: (token) => fetch('/api/refresh', {
            method: 'POST',
            body: token.access_token
        })
        .then(r => r.json())
    });
Now in the App.js file, add the following import at the top:
import {login} from "./auth"
and modify the fetch command like this:
fetch('/api/login', {
  method: 'post',
  body: JSON.stringify(opts)
}).then(r => r.json())
  .then(token => {
    if (token.access_token){
      login(token)
      console.log(token)
    }
    else {
      console.log("Please type in correct username/password")
    }
  })
If you try logging in, nothing would be any different from before but now your access tokens are being stored in the local storage and are accessible in other components via a hook provided by the very handy react-token-auth library. We also tell react-token-auth about the /api/refresh endpoint that it can use to refresh our tokens. The way we have set up our backend, the access tokens remain valid for a day and need to be refreshed after that via the /api/refresh endpoint. The react-token-auth library will do this token refresh automagically for us. The library also provides us with the authFetch function that will add the Authorization header automatically for us if it is stored in local storage.
Let’s modify the Login component a bit more and add a logout button if the user is already logged in. For that we first need to update the import from ./auth like this:
import {login, useAuth, logout} from "./auth"
Next add this to the login function somewhere before the return statement:
const [logged] = useAuth();
And lastly, update the return like this:
return (
  <div>
    <h2>Login</h2>
    {!logged? <form action="#">
      <div>
        <input type="text"
          placeholder="Username"
          onChange={handleUsernameChange}
          value={username}
        />
      </div>
      <div>
        <input
          type="password"
          placeholder="Password"
          onChange={handlePasswordChange}
          value={password}
        />
      </div>
      <button onClick={onSubmitClick} type="submit">
        Login Now
      </button>
    </form>
    : <button onClick={() => logout()}>Logout</button>}
  </div>
)
The useAuth() hook will return true if there are any access tokens stored in the local storage. We use that fact to show the logout button if the user is logged in and the login form if the user is logged out. The logout button simply calls the logout() function that removes the access tokens from storage.
Did you see how much this single library made things so much easier?
Making an authenticated call
Let’s go ahead and try to use the newly stored tokens to create an authenticated call to the protected API endpoint. We will be modifying the Secret component for that:
function Secret() {
  const [message, setMessage] = useState('')

  useEffect(() => {
    authFetch("/api/protected").then(response => {
      if (response.status === 401){
        setMessage("Sorry you aren't authorized!")
        return null
      }
      return response.json()
    }).then(response => {
      if (response && response.message){
        setMessage(response.message)
      }
    })
  }, [])
  return (
    <h2>Secret: {message}</h2>
  )
}
Make sure you also add authFetch in the import from ./auth at the top of App.js:
import {login, authFetch, useAuth, logout} from "./auth"
In the secret endpoint, we are using authFetch instead of fetch to automatically insert the Authorization header to the request. authFetch is simply a wrapper on top of fetch and has the same API. We check the response and if it is a 401 we display the unauthorized message and if it is a success, we display the message we receive from the server.
Try navigating to the /secret page and see how the output changes depending on if you are logged in or not. You should see something like this:

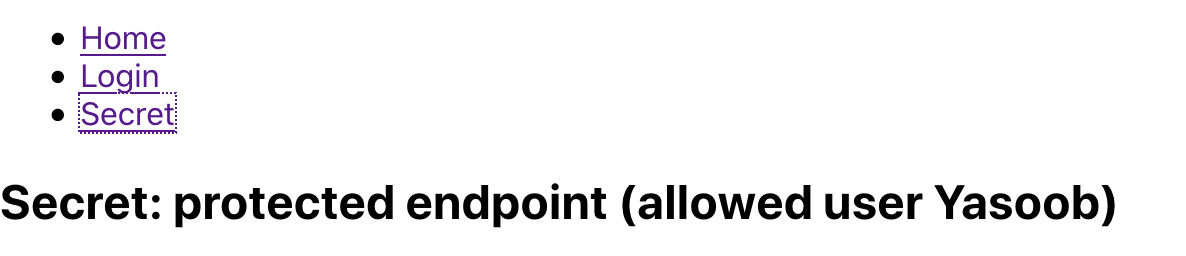
Pretty neat, eh?
Redirect to login page
If the user tried to go to the secret page without actually having logged in we would want to redirect them to the login page. Think of what happens when you try to access Gmail. If you are logged-in only then you are taken to your inbox. Otherwise, you are redirected to the login page. There are multiple ways to do that. We can either check for the logged value and redirect based on that or we can use Higher-Order Components. I will show you how to use HOC.
A HOC is simply a component that takes a component as input, does some computation and returns a component. We will define a PrivateRoute component that will check if the user is logged in or not and redirect them to /login if they aren’t logged in:
const PrivateRoute = ({ component: Component, ...rest }) => {
  const [logged] = useAuth();

  return <Route {...rest} render={(props) => (
    logged
      ? <Component {...props} />
      : <Redirect to='/login' />
  )} />
}
We also need to modify our imports and import Redirect from react-router-dom:
import {
  BrowserRouter as Router,
  Switch,
  Route,
  Redirect,
  Link
} from "react-router-dom"
Now the only thing left to do is to swap our /secret Route with the PrivateRoute. We will replace this code:
<Route path="/secret">
    <Secret />
</Route>
with this:
<PrivateRoute path="/secret" component={Secret} />
Now try navigating to /secret and if nothing is broken you should be redirected to /login if you are not currently logged in. Sweet! This is all I had planned for the login stuff. You can check out the docs for flask_praetorian to figure out how to implement registration and all the other stuff (registration emails, password reset, etc.) that goes with it.
Deploying our app using NGINX & Gunicorn
Let’s use NGINX to deploy our app. I am assuming that you are running Ubuntu 20.04. There are multiple ways to do it so if you don’t like this approach you can follow a different one. We are aiming for an architecture similar to this:
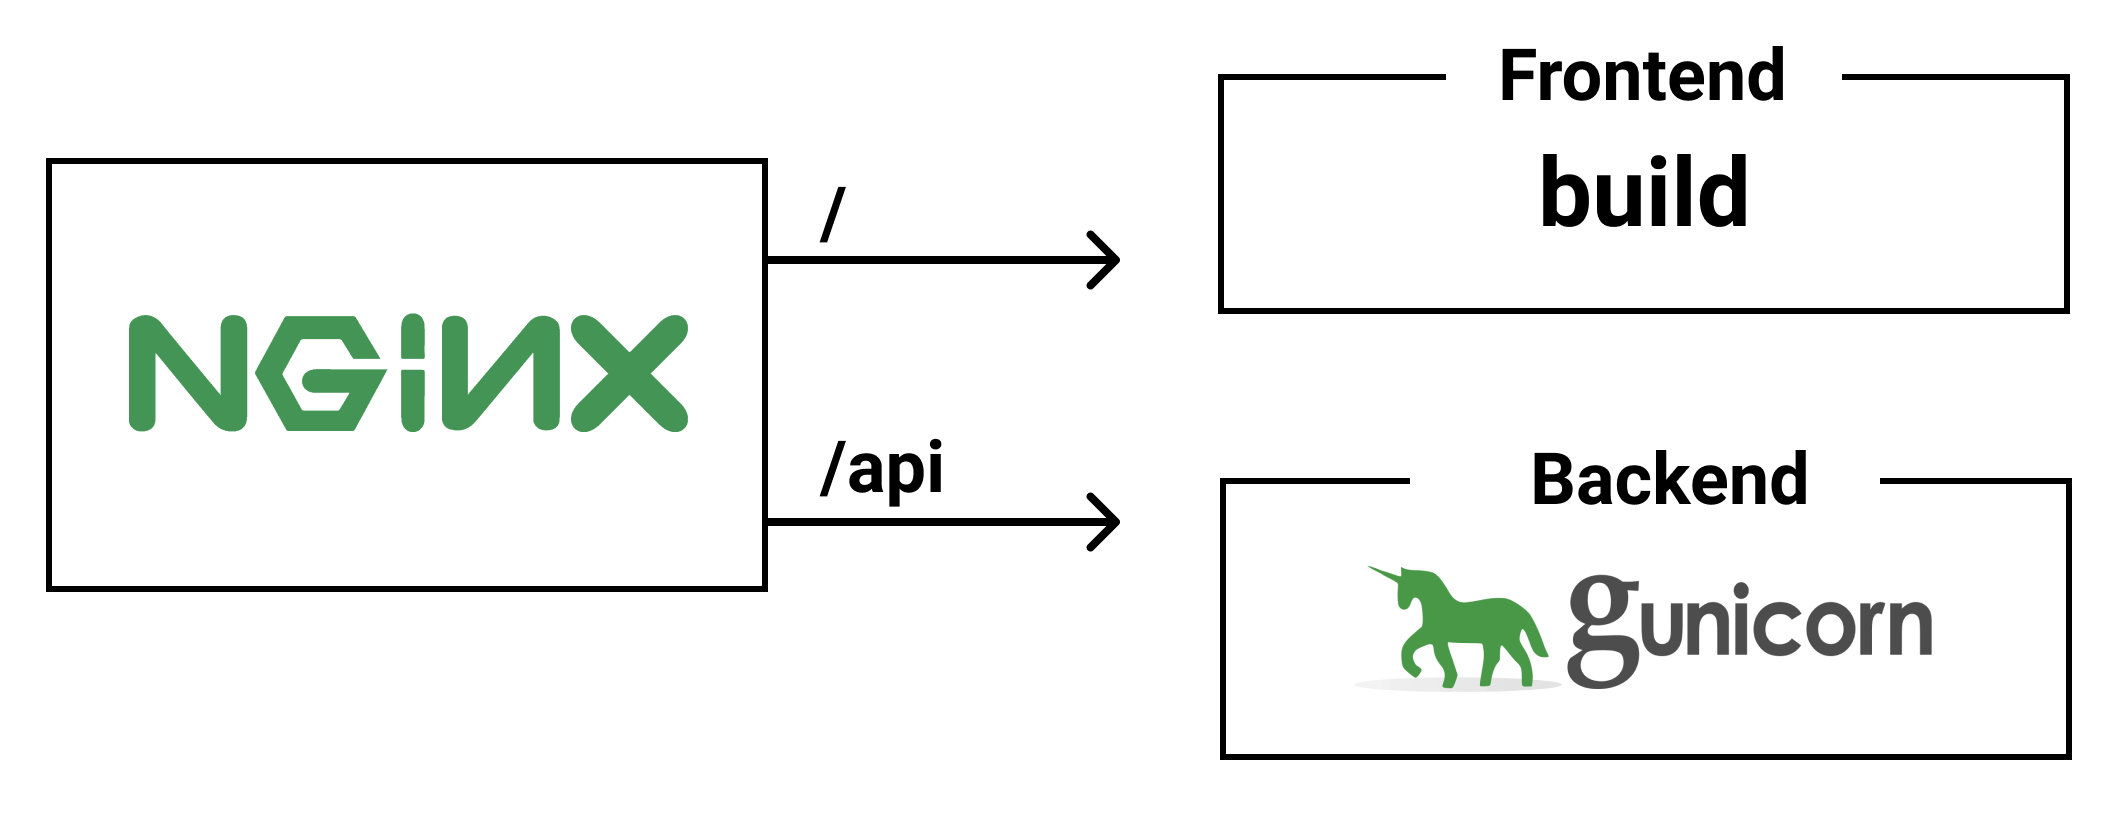
The very first thing we need is to build our react project into a bunch of static HTML, CSS, and JS files (+ other assets). This can be done by going to the sample-app folder and running:
$ yarn build
This should result in a build directory being generated in the sample-app folder. We will tell NGINX to serve all requests coming to the / endpoint from this build directory.
We also can’t use the default development server of Flask to serve our API. It is not as robust as a production-ready server. We will be using Gunicorn instead. Gunicorn will handle all requests coming to the /api endpoint. And to restart Gunicorn on system restarts and other accidental issues, we will use systemd to run Gunicorn as a service. To accomplish all this, we will first install Gunicorn using PIP:
$ pip install gunicorn
Next, we need to create a .service file for systemd. I named mine sample-app.service:
[Unit]
Description=Our Sample React app
After=network.target

[Service]
User=yasoob
WorkingDirectory=/home/yasoob/sample-app/api
ExecStart=/home/yasoob/sample-app/api/env/bin/gunicorn -b 127.0.0.1:5000 api:app --log-file /home/yasoob/sample-app/api/gunicorn.log --log-level=debug
Restart=always

[Install]
WantedBy=multi-user.target
Note: Make sure you update the User value to reflect your user account name on the server. Also, modify the directory paths as appropriate.
Make sure you have stopped the Flask server. Now we can move sample-app.service to /etc/systemd/system/sample-app.service and run:
$ systemctl daemon-reload
If things go well, gunicorn should start serving our API on port 5000. You can always start/stop/restart the service by using the following commands:
$ sudo service sample-app stop
$ sudo service sample-app start
$ sudo service sample-app restart
The next step is to delete the create an NGINX configuration file and tell NGINX to serve our app. All the configurations for different websites are stored in the /etc/nginx/sites-available/ directory. This is where you can create new configurations but NGINX will not load them. NGINX will only load the configurations available in /etc/nginx/sites-enabled/ and the general practice is to create a symlink in sites-enabled to the different files in sites-available. By default, NGINX serves a welcome page. We don’t want that. Therefore, we will remove the default file from NGINX. We are only removing the symlink. This does not remove the default file from sites-available:
$ sudo rm /etc/nginx/sites-enabled/default
Our super simple NGINX configuration file will look like this:
server {
    listen 80;
    root /home/yasoob/sample-app/build;
    index index.html;

    location / {
    try_files $uri /index.html;
        add_header Cache-Control "no-cache";
    }

    location /static {
        expires 1y;
        add_header Cache-Control "public";
    }

    location /api {
        include proxy_params;
        proxy_pass http://localhost:5000;
    }
}
Save this file as sample-app.nginx and move it to /etc/nginx/sites-available. Afterwards, create a symlink to this file in the /etc/nginx/sites-enabled folder:
sudo ln -s /etc/nginx/sites-available/sample-app.nginx /etc/nginx/sites-enabled/sample-app.nginx
And now we can reload NGINX so that this new configuration is loaded:
$ sudo systemctl reload nginx
Now if you go to localhost:80, you should see the React application and the login and signup should still work. Our web app is ready.
Once things are working and you are ready to deploy it, you might want to modify your configuration like this:
server {
    server_name example.com;
    root /home/yasoob/sample-app/build;
    index index.html;

    location / {
    try_files $uri /index.html;
        add_header Cache-Control "no-cache";
    }

    location /static {
        expires 1y;
        add_header Cache-Control "public";
    }

    location /api {
        include proxy_params;
        proxy_pass http://localhost:5000;
    }
}

server {
    server_name www.example.com;
    return 301 https://example.com$request_uri;
}
Replace server_name with the actual address that will be serving this app. I added a 301 redirect from www.example.com to example.com. The last step is to generate SSL certificates so that we can serve our website using HTTPS rather than HTTP. We can install certbot using the official instructions and use that to install the SSL certificate automatically and also implement a 301 redirect from HTTP to HTTPS.
After installing certbot, just run it using sudo and follow the on-screen instructions:
yasoob@server:~/sample-app$ sudo certbot
[sudo] password for yasoob:
Saving debug log to /var/log/letsencrypt/letsencrypt.log
Plugins selected: Authenticator nginx, Installer nginx

Which names would you like to activate HTTPS for?
- - - - - - - - - - - - - - - - - - - - - - - - - - - - - - - - - - - - - - - -
1: example.com
2: www.example.com
- - - - - - - - - - - - - - - - - - - - - - - - - - - - - - - - - - - - - - - -
Select the appropriate numbers separated by commas and/or spaces, or leave input
blank to select all options shown (Enter 'c' to cancel):
I installed the certificate for both of these and also added 301 redirects. Try going to example.com (replace this with your web address) and you should be able to see the shiny padlock right before the URL. Seems like we were able to successfully get HTTPS to work!
Security Issues
There are a bunch of things I skipped on the API side. Our API is open to all sorts of attacks right now and can be abused by anyone. There is no rate limiting on the login endpoint. Make sure you follow proper security practices before putting something like this in production. Or if you prefer, use a third-party service for user authentication and authorization so that you don’t have to worry about most of the security stuff.
Conclusion
This is all that I had planned for this post. You can check out Miguel’s blog for more fun stuff about React and Flask. He is an authority when it comes to Flask stuff and his React + Flask deployment articles have been a huge help to many (including me). If you want to dive deeper into how react-token-auth works, give this article a read. It is written by the author of the package.
I tried to keep all the React and Python code in single files so that it is easier to write an article about them. With that being said, I am still a beginner when it comes to front-end development using React so if you see any glaring issues in this article please let me know in the comments below. I will make sure to fix these issues.
Note: All the code from this article can be found in this GitHub repository.
Have a wonderful day everyone! 👋 I will see you in the next article ❤️
Alexey Brambalov
Alexey Brambalov
Yasoob Khalid
In reply to Alexey Brambalov
ndrini
Yasoob Khalid
In reply to ndrini
Al Naji
Rohaan
Laurentpm